What’s the #1 thing you are procrastinating on?
I know what mine is.
For 18 months, I’ve performed over 100 different marketing experiments and reported the results back to you with detailed case studies on how you can use the experiments in your business.
But there is one thing I’ve completely avoided…
Facebook Ads.
It’s time to change that!
🙂
Update #1: Step 1: ds created and custom audiences set up
Update #2: Step 2: Landing pages and lead magnets are created.
Update #3: Step 3: he Ads are up! But something isn’t quite right.
Update #4: Phase 1: Changed some stuff. Let’s see what happens.
Update #5: Phase 1: Success! Finally!
Update #6: Phase 1: Erg! It stopped working. What next?
Update #7: Phase 1: 0.75 per subscriber and the next step (+ bonus podcast)
Update #8: Phase 2: Begins: How to make money
Update #9: Phase 2: New product is created and funnel is live[
Update #10: Phase 2: We made money!!
Update #11: Phase 2: Results after raising the price
I have a goal of growing my email list to 40,000 email subscribers by September 30th.
Currently I have 17,134.
One of the 4 core strategies I originally planned to use to hit my goal was paid advertising.
But we’re 24 days into the quarter and I’ve been dragging my feet. Mainly because I’m completely intimidated by it.
• “What if I waste a bunch of money?”
• “How do I create a good ad?”
• “What if my ad doesn’t convert?”
• “What audiences should I target?”
• “What if my tracking isn’t set up correctly and I don’t know who converted and who didn’t?”
You know… all the stupid crap we get hung up on when doing something new.
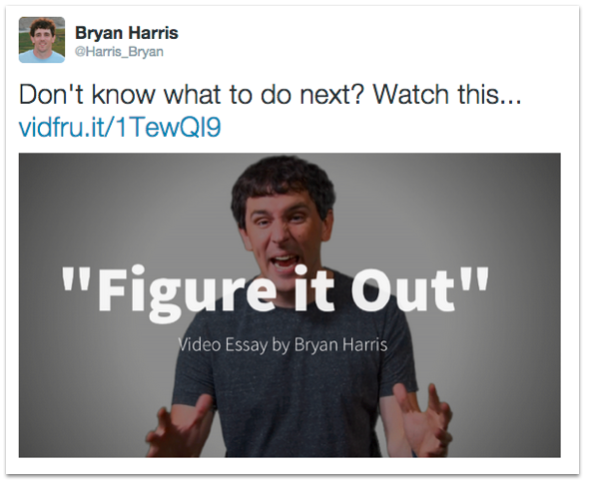
It’s time to take a piece of my own advice and just figure it out.
So today I’m going to kick off a 14-day challenge.
Here are the parameters:
- Primary objective: Get 500 new email subscribers for less than $1 each.
- Spend $500 on ads in the next 14 days.
- Make sure all new subscribers are interested in the topic of list building (my core topic).
- Get 50% of them to install my List Goal browser extension.
- Hold myself accountable by publicly reporting the results back to you.
I’ve found the key to KILLING procrastination is to start small.
Then slowly increase the size, scope and complexity over time.
So, this is my plan…
Step 1: Create Facebook Ads based on past popular social media posts.
One of the main reasons I’ve been dragging my feet is because I’m not sure how to write a good ad or pick the best images to accompany those ads.
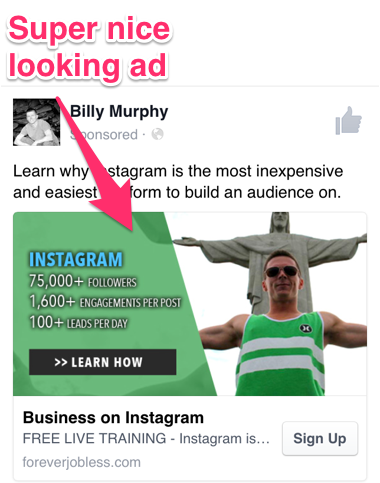
I see these super-polished ads from people like my friend Billy Murphy and think to myself, “Dang! That ad looks good. No clue how to make something that looks like that. Ugh!”
Then it hit me this past weekend… screw writing ads!
Forget about making really nice images!
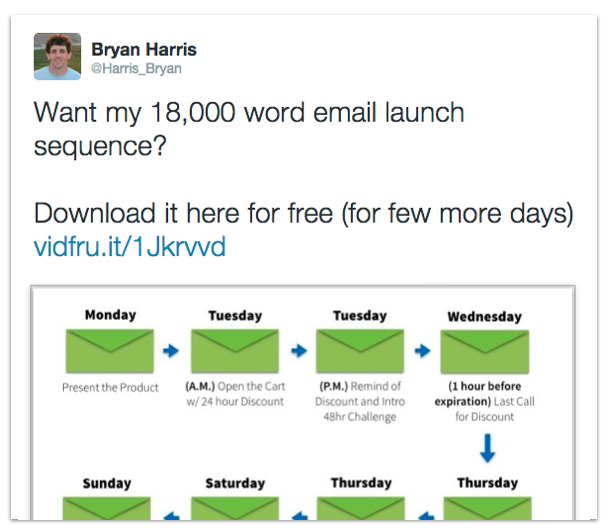
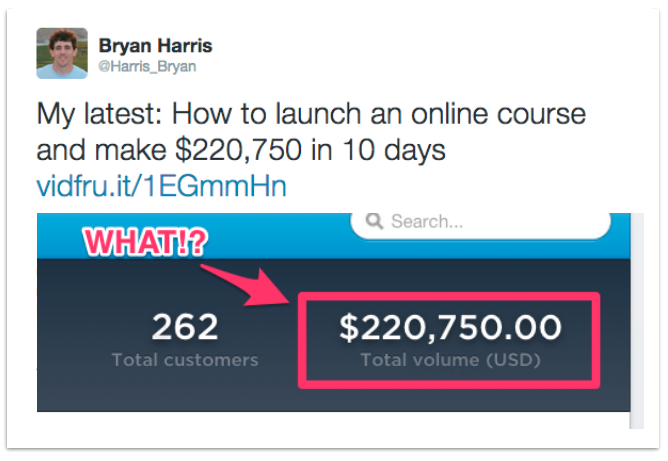
Instead of trying to come up with really good ad copy, I went to analytics.twitter.com and picked out my three most popular tweets from the past 180 days.
My theory is: This copy has already proven to be popular with my target audience. It’s been tested.
Why not just re-use it in my ad copy?
So that’s what we’ll do.
Here are three of my most popular tweets:
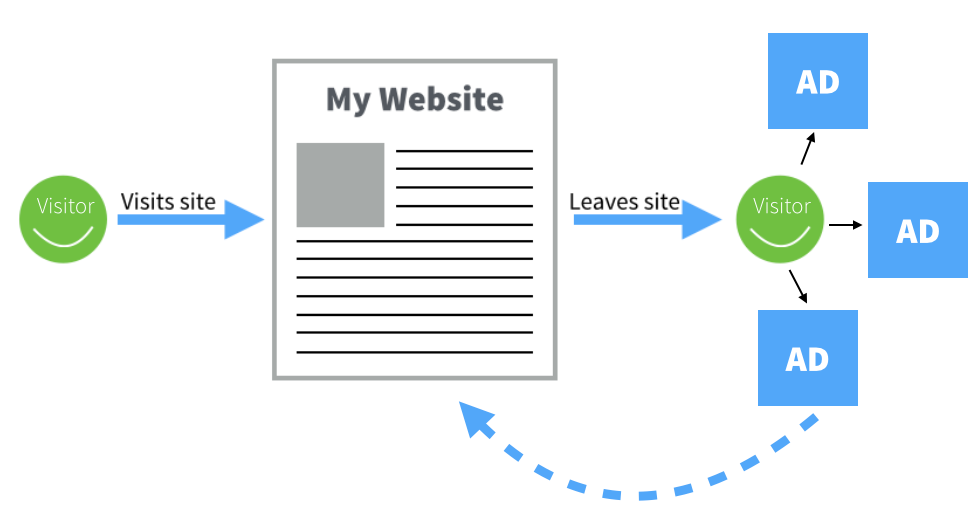
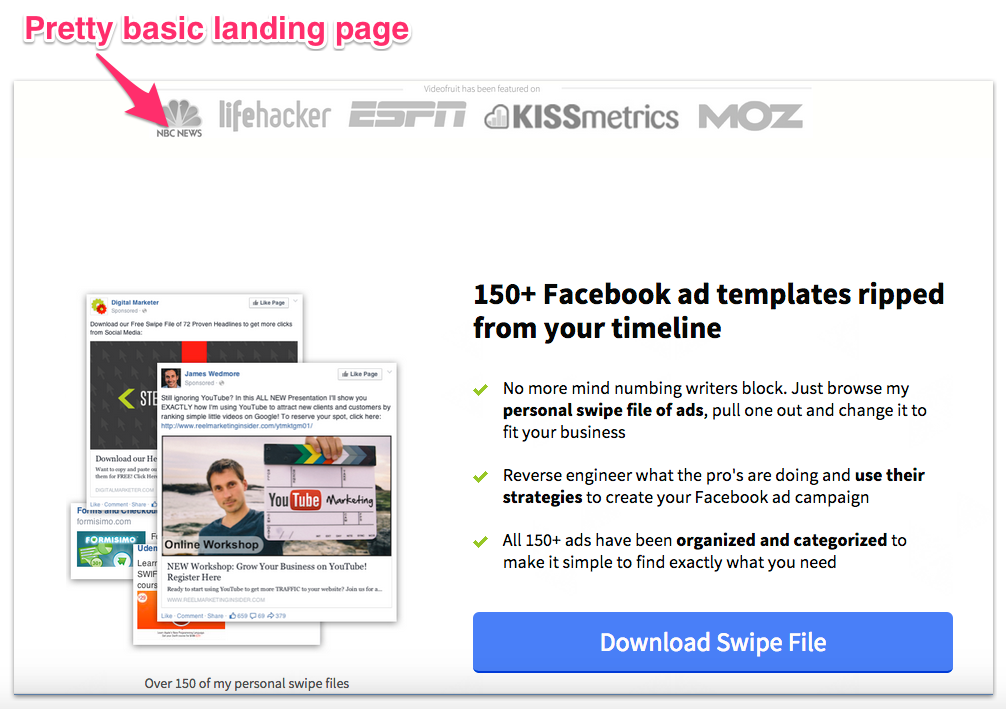
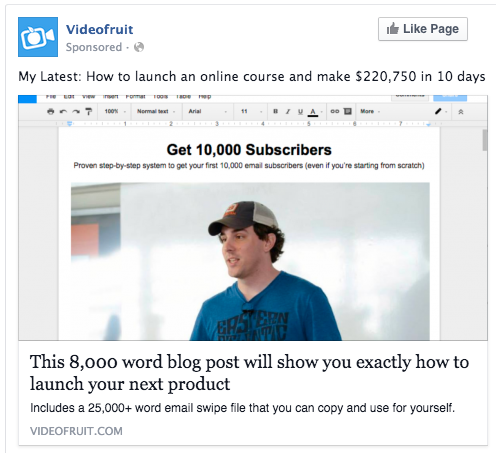
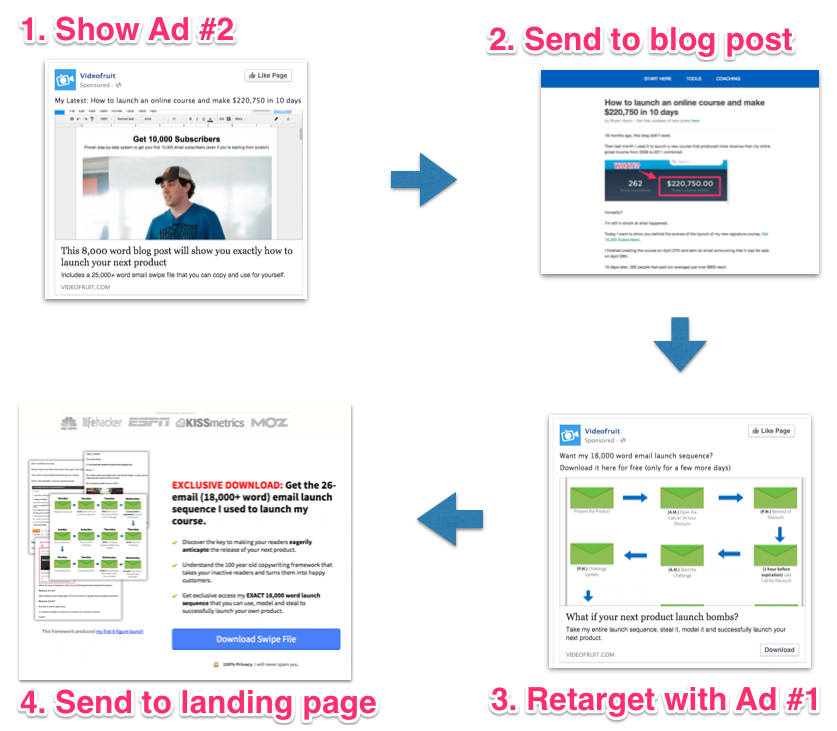
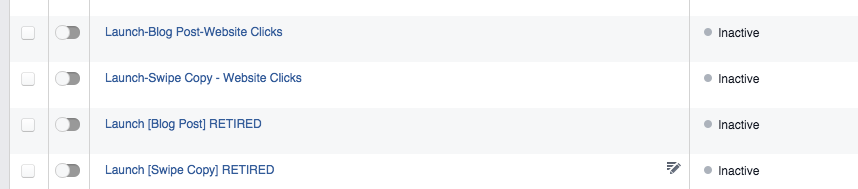
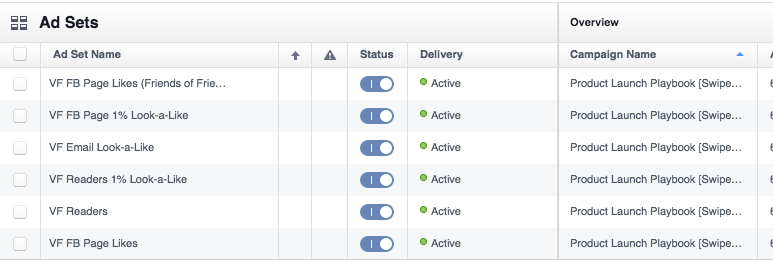
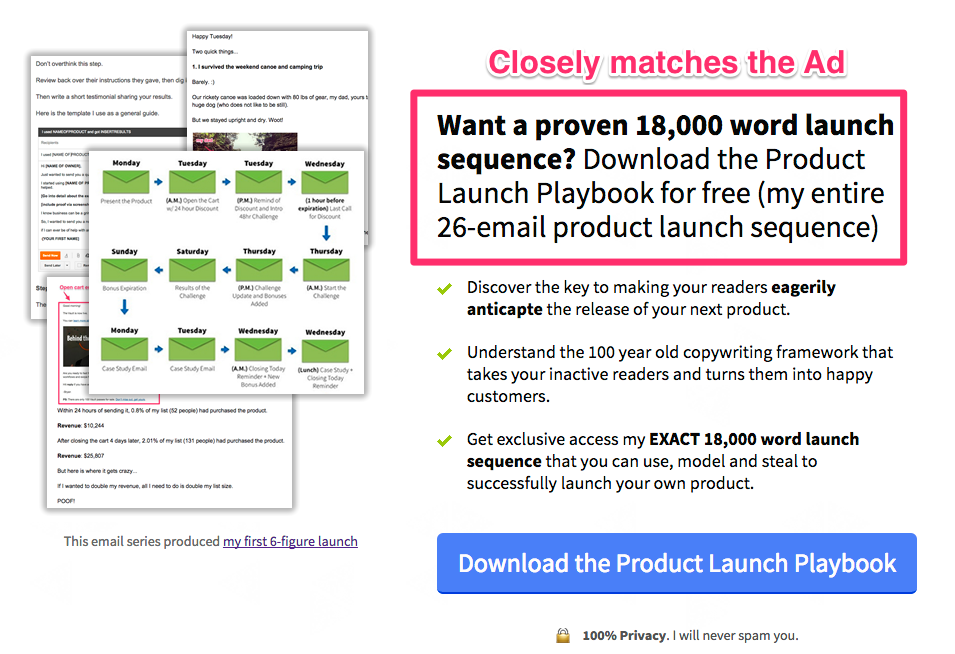
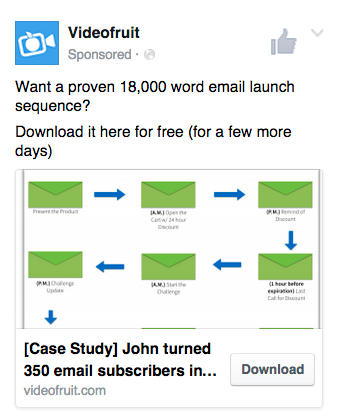
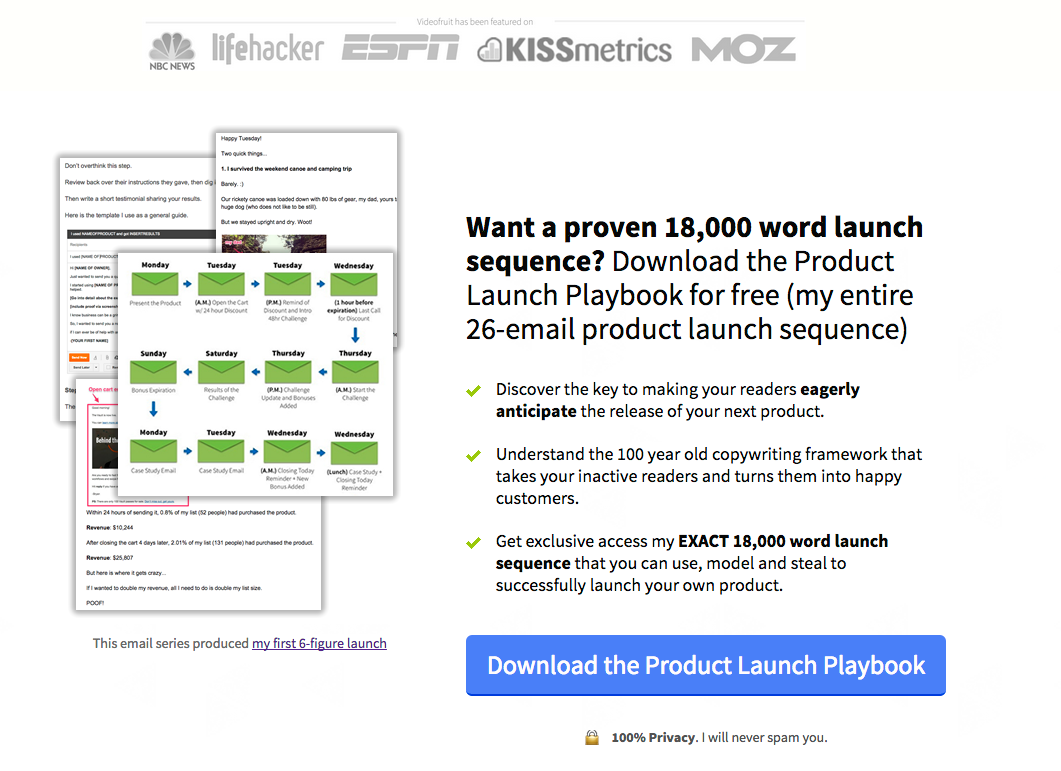
Due Date: EOD Monday July 27th. Another intimidating part of Facebook advertising is deciding who to target with your ads. There are so many options it’s paralyzing. You can target other Facebook pages, specific countries, age groups and on and on. But before we dive off into that complicated split-testing menagerie, I want to start by targeting people who ALREADY know who I am. People who have visited my website or have liked my Facebook page. Facebook allows you to drop a little bit of code on your site and then display ads to people who have visited your site. This is called retargeting. And according to a lot of smart people I’ve talked to (h/t to Brennan Dunn), it’s the best ROI for your ad dollars. Sounds easy. So I like it. There are three different groups we’ll target with our ads: Group #1: Existing website traffic. Group #2: Existing look-alike audience based on our email list. Group #3: Existing Facebook fans. Due Date: EOD Monday July 27th. Quick review… First, we’ll be setting up 3 ads. Those ads will be based on tweets that have already proven to be popular. We’ll re-create each tweet as an ad within Facebook. Then we’ll create three different audiences inside Facebook to show those ads to. Those audiences will be based on my existing web traffic, email list and Facebook fan page. Seems simple so far. The next decision is deciding where to send the people who click on those ads. All we need is a basic landing page for them. So I took a quick look through existing landing pages I have used in the past and found this LeadPages template: So we’ll use that as the template for our first two ads. Ad #1: My 18,000-word email launch sequence. Ad #2: How to launch a 6-figure course. The basic funnel will be: See Ad > Click Link > Go to Landing Page > Enter Your Email > Get the Promised Bonus On the first two ads, this is fairly straightforward. For Ad #1 I’ll give away the bonus I include in this post. For Ad #2 I’ll package up this blog post as PDF, design it up nicely and call it an eBook. But Ad #3 is a little funky. It’s a video. What do I do with that? It would be weird to make people opt in to watch a video. Conversions would suck. Recently I was listening to the “Art of Paid Traffic” podcast and heard Rick (the host) describe an interesting video advertising strategy where you run ads to your video and then retarget all of the people who watched the video with another ad. Listen to him talk about that strategy here. Sounds slightly more complicated than what I would like. But I’m not sure what else to do with this video. I know people like it. I know people watch it. But there is no direct call to action. So this is what we’ll do… Step 1: Set up the video as an ad. Step 2: Retarget everyone who watches it with another ad. Enter Ad #4… This ad we’ll display to people once they watch the video in Ad #3. It’ll be a slightly modified version of Ad #2. Ad Copy: Need help figuring out how to create and launch your next product? I’ll show you every step of the process. Download my exact workflow for free. [insert graphic from ad #2]
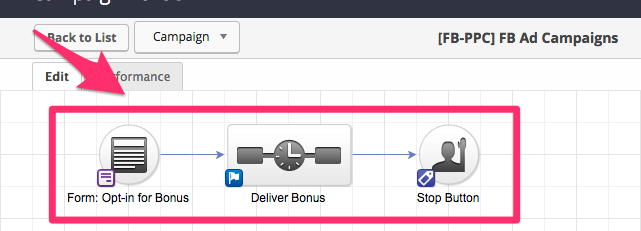
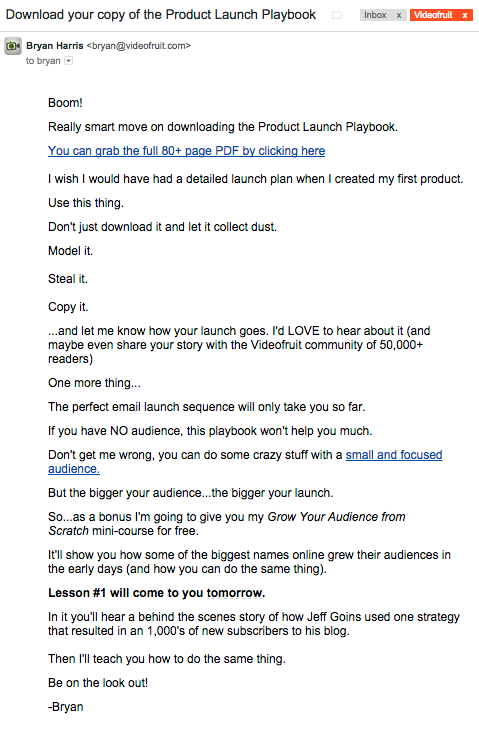
Action Item #2: Create the deliverable for each ad (eBook and PDF). Due Date: EOD Tuesday, July 28th. The last step is to deliver the item they opted in to get and to introduce List Goal to them. To do that I sketched out a quick autoresponder series in my email service. It looks like this… Once someone opts in with their email address, we’ll send them two emails. Email #1: Subject: The thing you asked for Thanks for checking out Videofruit! Here is the [insert name] bonus that you asked for: [insert link to bonus]
Looking forward to helping you get started with [insert subject of bonus]. Quick question… What is the #1 thing you are struggling with on [subject of bonus]? Hit reply and let me know. Would love to help you out! -Bryan PS: The absolute most important thing to [insert desired outcome] is growing your email list. Install my free list-building app to help you do that. [insert link to list goal]
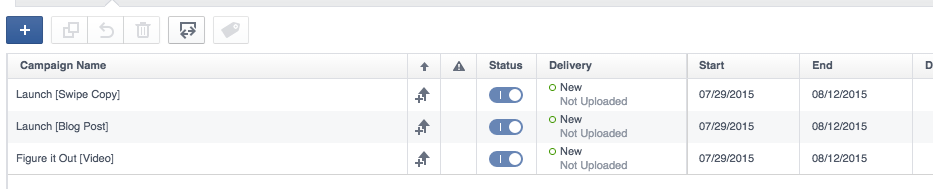
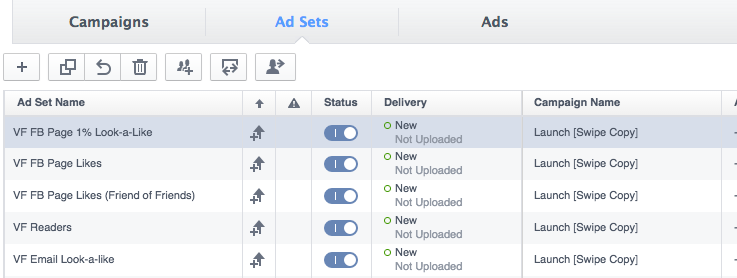
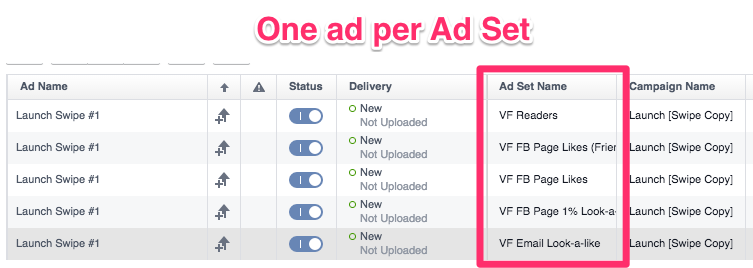
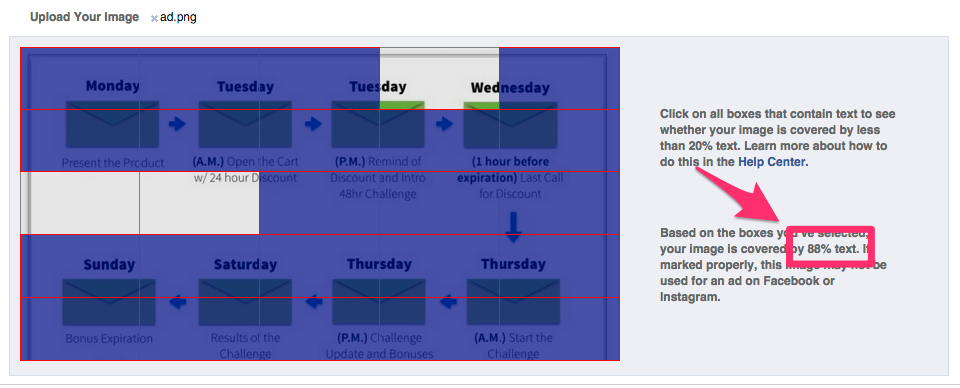
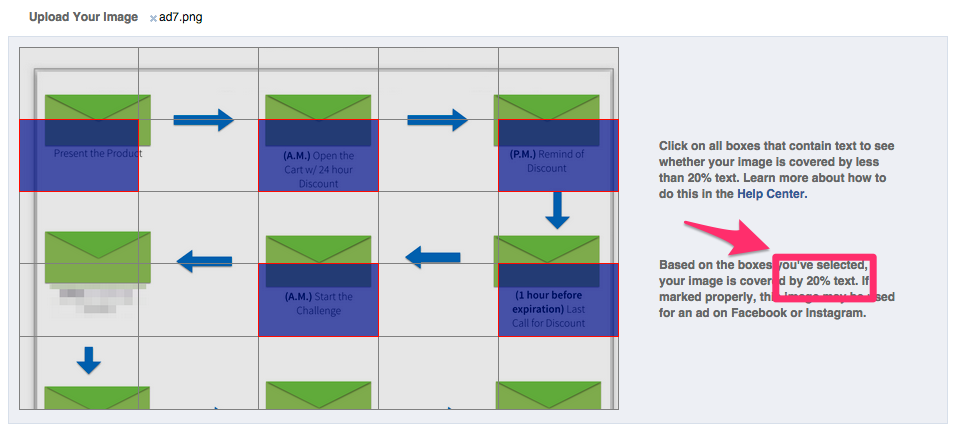
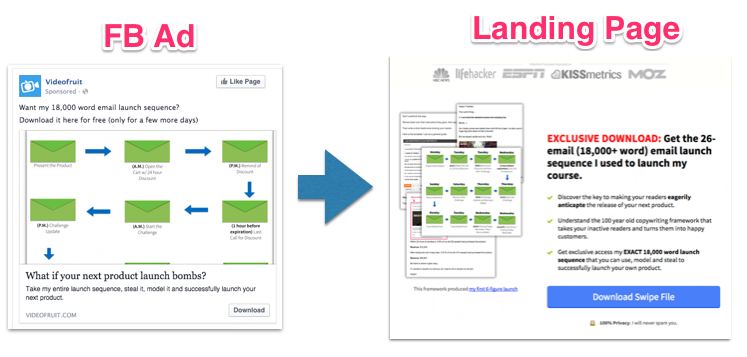
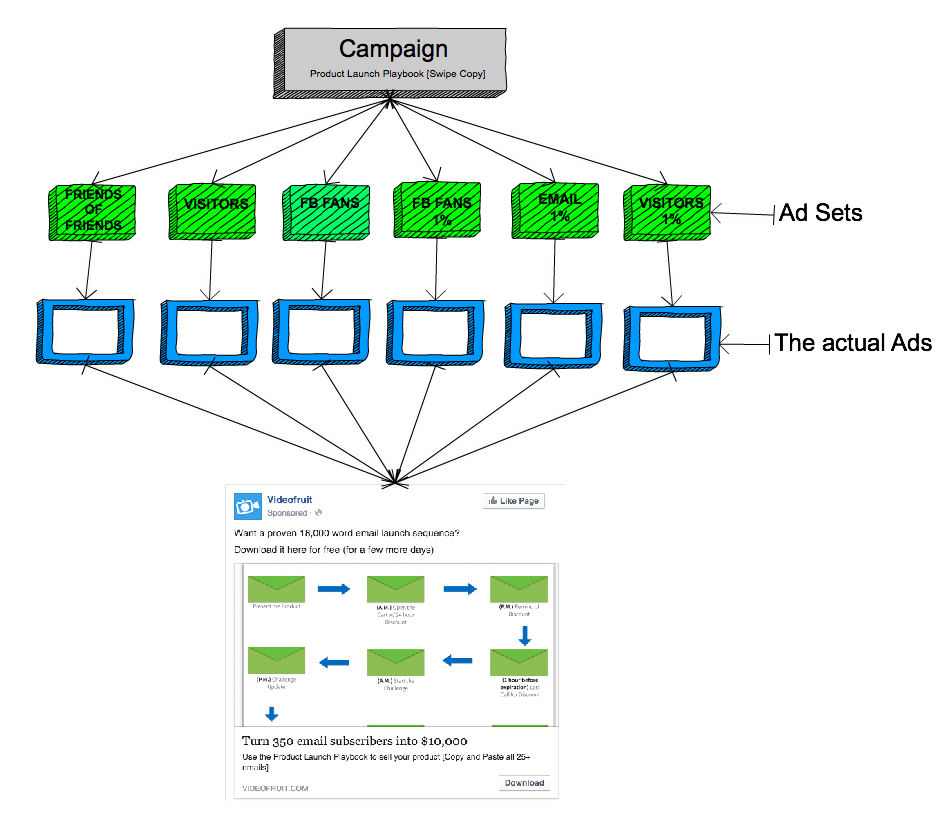
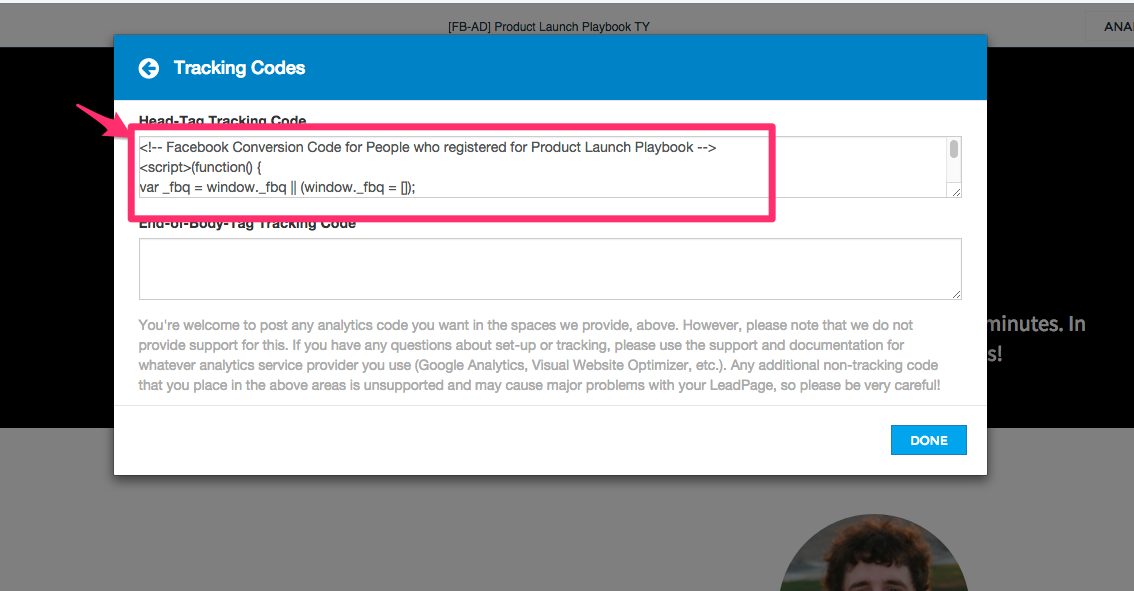
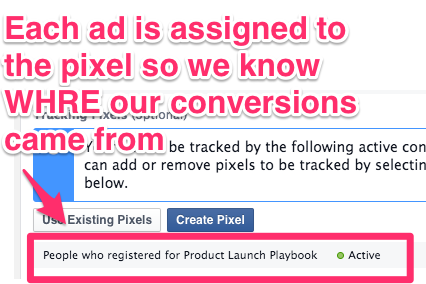
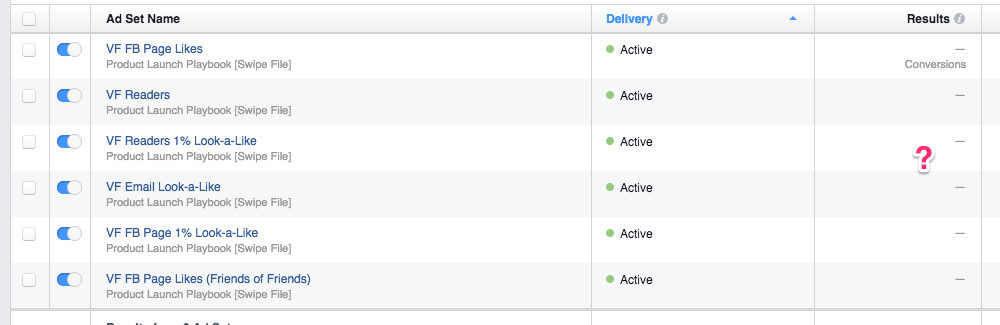
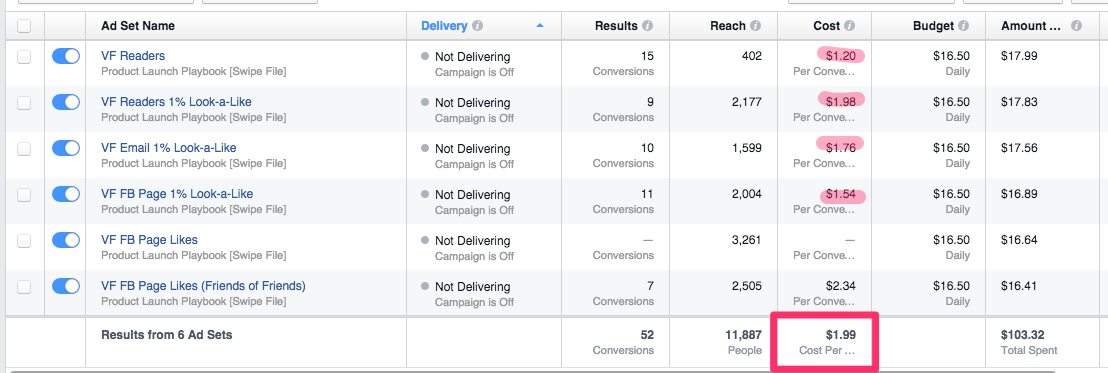
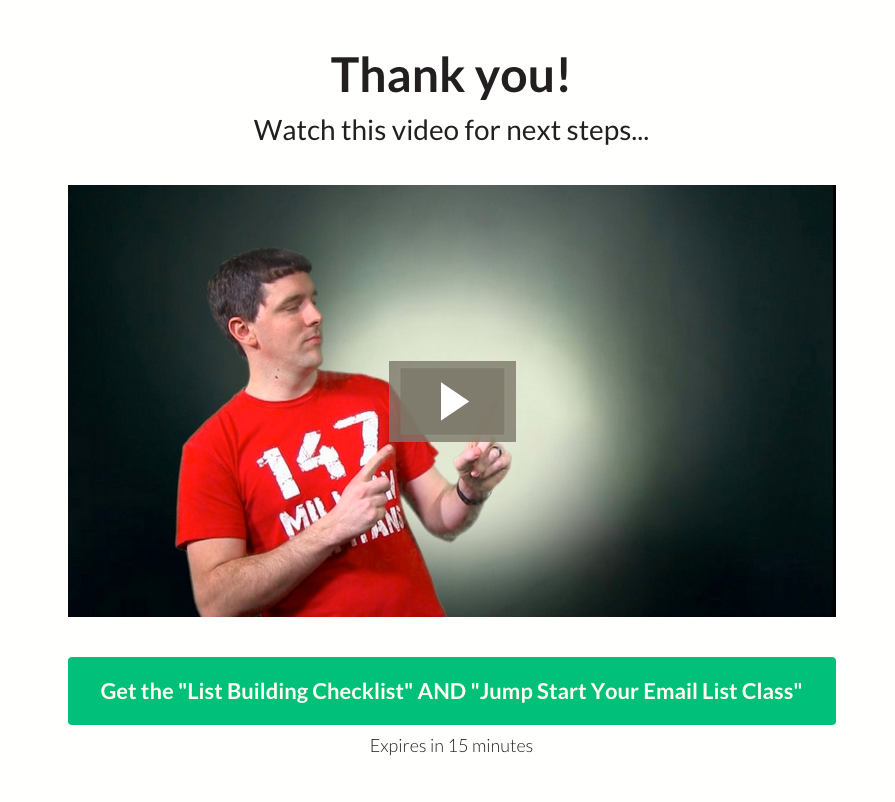
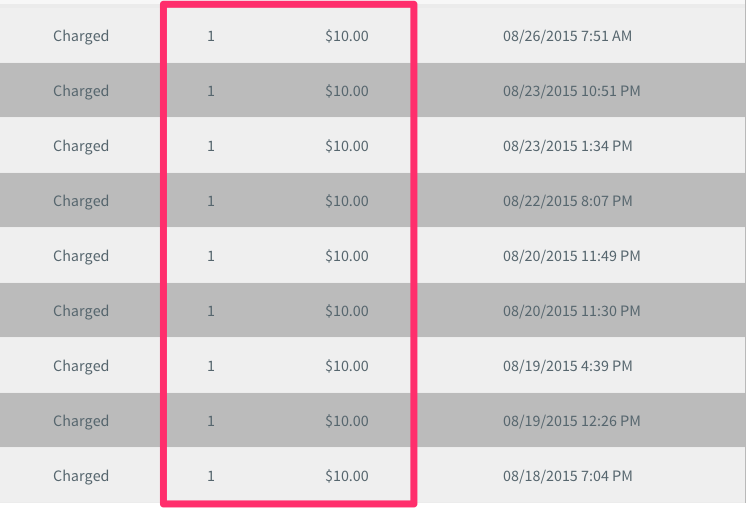
After sending this email, I’ll send this email the next day to anyone who didn’t install List Goal. Email #2: Subject: About your email list Yesterday you downloaded the [insert bonus name]. Good first step to [insert desired outcome]. However, the #1 most important thing you need to do is to start growing your email list. Why? Check out what you’re able to do with even a tiiiiiiny email list. Your homework for today is two-fold… Action Item #1: Read the story linked above. Action Item #2: Pick your list goal for the next 60 days. Action Item #2: Download List Goal and use it to help you hit your goal. Capisce? Holler back at me if you hit any roadblocks. -Bryan The goals of these two emails are to 1) give my new subscribers the item they opted in for; and to 2) introduce them to List Goal and give them a few gentle nudges to install it. Action Item #2: Customize the email series for each ad. Due Date: EOD Wednesday, July 29th And that’s my plan. First, create 3 ads based on past popular social media posts. Second, create landing pages and deliverables for each ad. Lastly, set up a 2-part autoresponder series for each ad that prompts them to install List Goal. The objective is to get 500 new subscribers and get half of those to install List Goal. If this goes well, the next step will be to figure out a way to turn these subscribers into paying customers. I’ll report back on Monday, Tuesday and Wednesday of next week with updates on each step. You’ll get a look at the finished ads, the landing pages and the fully-written autoresponder series. So be sure to check back throughout the week. 🙂 Once everything is set up and ready to go, we’ll turn the ads loose and I’ll show you how they are performing. What do you think? Think we’ll hit the goal of 500 subscribers? I decided to target 6 different audiences in total. 1. Visitors to my blog 2. A look-alike audience based on the visitors to my blog 3. A look-alike audience based on my email list 4. My Facebook fan page 5. A look-alike audience based on my Facebook page 6. A look-alike audience based on friends of people who have liked my fan page Note: I am EXCLUDING anyone who is already signed up to my email list. The visitors to my blog and that look-alike audience will take 24 hours or so to start because Facebook requires a few thousand visitors before it turns on that pixel. Here are the three campaigns I set up: Each campaign consisted of 6 ad sets (one for each target group I’m focusing my ads on): Each ad set contained one ad: Lessons Learned: 2. Traffic-based retargeting audiences take a bit to populate. Set up at least a week before you start your ads. 3. There are three organizational levels to Facebook ads (campaigns, ad sets and ads). 4. Create a new ad set for each target group. Creating the ads was a bit more painful than I would have anticipated. Mainly due to Facebook’s 20% text rule. This forced me to re-configure the images in my ads. I found this grid overlay tool and mocked up a quick grid in Keynote (my photo editor), and then retooled each image to fit inside this graph while having the text fill no more than 5 grids. Original Image: Tweaked Image: The final products were these three ads: Tomorrow I’ll be creating the landing page for each ad, setting up conversion tracking, developing the bonus deliverable itself and setting up a basic email autoresponder series. See you then 🙂 Today’s mission was to set up the landing pages and create the deliverables for each ad. After spending a few hours working on this today, I’ve decided to make a few minor adjustments. After spending 45 minutes trying to figure out how to target people who had viewed the video ad with another ad (one that would send them to a landing page), I gave up. This article makes it look super simple. But in my ad manager and power editor, the option to create this custom audience simply didn’t exist. Bummer. Instead of having 3 ads with 3 different landing pages and 3 different deliverables for each, I decided to make everything much simpler. Here is the updated strategy: I’ll run two main ads (this one and this one). Ad #1 will send people straight to a landing page to download my launch swipe file. Ad #2 will send people to a blog post where I’ll then retarget those people with Ad #1. Why do this more complicated strategy? A few reasons: Reason #1: My theory is that sending people to a blog post will cost us less than sending people to a landing page. Also, the people who make it to the landing page will already be semi-familiar with me and have a high chance of opting in. It’s a more indirect route, so we’ll test it and see how it works. Reason #2: I’m up against a deadline and don’t have time to set up another landing page and create another deliverable for this ad. This way, I can start testing tomorrow and only have to mess with one landing page and email series. Less variables = happier Bryan. Note: I’m not going to link to the landing pages here so as to not skew the results of the test. Once this experiment is over, I’ll send you links to everything so you can check it out. Current Status: Both landing pages are set up. The lead magnet itself is also created. I was able to use the content upgrade I had created for this post as the lead magnet. Tomorrow morning I’ll be writing the email that delivers the bonus, and one additional email that transitions the people who opt in to the subject of list building and then prompts them to install List Goal. Credit: Much thanks to Cathryn for helping me make it look really snazzy and be something I’m proud of. Also, thanks to Manyu for his guidance on helping me set up these ads. If you need a designer or Facebook Ads guru, both are excellent. A few updates. Some good. Some extremely frustrating. Here it is… This is how it will work. Step 1: Someone sees this ad. Step 2: They click on it. Step 3: They go to this landing page. Step 4: They enter their email address. Step 5: They get the email pictured above. Step 6: Then I transition them into an email course that will get them to install List Goal and eventually buy a product from me (to cover my immediate ad spend). This part was extremely painful. Gouge-my-eyes-out painful. After setting up all of the ads on Tuesday, I went to activate them and kept getting random errors. Eventually… somehow… they started working. (Death to you, Facebook Power Editor!) But after a few hours it was obvious that something wasn’t set up right. This is what my reporting looked like… I had spent $29.95. Shown the ads to 2,845 people. But didn’t have a single conversion. Were the ads terrible? Was something set up wrong? No idea. After a few hours of asking around, my theory was that the goal of the ads was incorrect. Instead of the goal being “conversions” it needed to be “website clicks.” So I re-made all of the ads and ran that campaign over the last 24 hours. Here are the results: I spent $80.37. The ads were shown to 11,349 people and 72 of those people clicked the ad and went to my landing page. A quick look in my email account shows that 8 of those people converted into email subscribers. For a total cost per subscriber of $10.04. That’s 10x my original goal of $1 per subscriber (remember, we’re targeting people already familiar with me). Ugh. If we were at $2 to $3 I’d be happy. Shoot, even $5 would feel like we were close-ish to being able to make this happen. But we’re at $10+. GAR! Anyhow, this is the plan… Here is what I’m going to try over the weekend: 1. Turning back on the conversion-based ads. 2. Making sure all of the conversion tracking is correctly set up on my landing pages. 3. Turning off Ad #2 (this one targeting the blog post). 4. Focus exclusively on Ad #1 until I feel confident things are running correctly and that I have some semblance of a clue as to how this stuff works. A few lessons learned so far… Lesson #1: Over-complicating things is MUCH easier than we realize. Lesson #2: Facebook Power Editor is massive pain in the butt. Lesson #3: Doing things for the first time takes 100x longer than we think it should. Lesson #4: Doing new stuff is fun (despite the pain). Last update, I was pretty disappointed by this entire experiment. Power Editor was annoying. The price we were paying for leads was annoying. The amount of time I was spending on this without any results was annoying. So I decided to take 3 days off from messing with any of it. “Just let it sit and come back Tuesday morning with a fresh approach” was my plan. This morning I hopped back into Power Editor to find that Facebook had re-skinned the entire app. And… surprisingly… the new design is MUCH easier to use. I started executing the plan we laid out on Friday. Mission: “Simplify Everything.” In this campaign are 6 ad sets. For those like me who have no idea what an ad set is, it’s just another level of organization for your ads. Level 1: Campaigns Level 2: Ad sets Level 3: Ads (what you actually see) I am using ad sets for targeting. Each ad set has exactly the same ad in it but is set to target a different group. This is what the ad sets look like: So this is the basic structure of the new campaign: Paid advertising is pretty basic at its core. I spend $1 and make more than $1. Then I take the difference between the money I spent and the money I made and re-invest it back into ads to make more dollars. The key to knowing if the money I’m spending on ads is making money is tracking. In a perfect world you would know every click on every ad and whether or not that click led to someone leaving their email with you. And then if that email subscriber turned into a customer. All of that requires you to set up your tracking correctly. Currently this entire campaign is simple. There are three content pieces involved in getting someone’s email address. Piece #1: The ad Piece #2: The landing page Piece #3: The thank-you page This morning I went back through each piece to make sure it was set up correctly so we could tell how many people who clicked on the ad turned into a subscriber. To do that I set up a new conversion pixel (which is just a little piece of tracking code). It looks like this: I put the conversion tracking pixel code on my thank-you page. So now any time someone visits that page, Facebook will count it as a conversion in their reporting tool. Since the only way someone can access this page is by clicking on the ad and then entering their email address, the tracking is simple. How many people clicked on the ad? How many people loaded the thank-you page? Facebook will charge me based on the number of people who clicked the ad. We’ll simply be able to divide the clicks by conversions and know exactly how much a conversion is costing us. The goal of this experiment is to be at or below $1, which means clicks need to be well below $1 because only a small percentage of the people that click the ad will convert. Make sense? Good 🙂 With the new conversion pixel code installed on the thank-you page and that pixel code attached to each ad, the tracking is good to go. With the new campaign set up, ads created and conversion tracking set up correctly, it’s time to turn everything on. I set a budget of $100 per day for the entire campaign. The goal is to run these ads for 24 hours and see what our baseline is. If we’re in the $2 to $5 per conversion range, I’ll start tweaking the landing page copy and design. If we’re in the $5+ per conversion range, I’ll throw something across the room and punch the wall. 🙂 Nah. If this test is an abject failure then we’ll re-evaluate and figure out what to do next. So… stay tuned. The ads are all on. This time tomorrow we should have some results to talk about. Any ideas on how I could improve my results? Let me know in the comments. (I read every single one.) BOOOOOOOOM!!!! My original goal was to pay $1 per subscriber. The first run-through produced subscribers for $10.04 each. Wayyyy off my original goal. Then yesterday I scrapped my entire plan. Started back super simple and the cost dropped to $1.99 per lead, with one ad set producing leads at $1.20 each. That’s fun! 🙂 We’re getting closer. Here is the plan for the next 24 hours: I’ll make these changes, then run another $100 worth of ads for the next 24 hours and see if we’re able to get the cost per subscriber down from $1.99 to closer to $1. The cost per subscriber for the four top performing ad sets was $1.52 each. By focusing exclusively on these ads and narrowing the focus even more, my hope is we can get to $1.25 per subscriber. If we hit that number, I’ll start split-testing images and copy tomorrow. Curious thing happened over the last few days. After our last round of changes, the cost per lead went UP across the board. There are two reasons that this might be the case: Reason #1: The initial sample size was small, thus not representative of long-term results. Reason #2: Since I’m re-targeting my own traffic, I could be running into issues of showing the ads to the same people over and over again I was a bit discouraged by seeing the “VF Readers” ad set go up in price. My theory is that I need to lower my spend on that ad set until I have more traffic to my website. I could just be burning those readers out, causing the price to jump. Here is my plan for the next 72 hours: Action Item #1: Lower my ad spend on VF Readers (the ad group that directly re-targets anyone who lands on the blog) and distribute that ad spend across the other three ad sets. Action Item #2: Refine my email sequence to get more people to install List Goal (my secondary goal of this experiment). Action Item #3: Spend $300 over the next 72 hours to get a good baseline of where we are at on both metrics of this campaign (cost of acquiring a subscriber and getting those subscribers to install List Goal). Sound good? After this I want to transition into sending these new subscribers through a free email course that sells them on a paid product. (More on this in the next update.) First off, I’m trying something new. Daily-ish podcast updates for the Facebook Ad Experiment. Here is the first one: Now for the juicy details not in the podcast. 🙂 The final numbers are in: The original goal was to spend $500 in ads and get 500 new email subscribers. The actual results? I spent $500 and got 279 subscribers. I fell short of my goal, but considering I had no context for what was possible and more or less just pulled that number out of thin air, I’m very happy. The secondary goal for this experiment was to get 50% of my new subscribers to install List Goal. This part is strange. No one installed the app. Not a single person. At first I thought perhaps my tracking had broken, but then I went back and checked. Everything was set up correctly. So… not sure what to think about that. The basic workflow was: Step 1. Sign up for the lead magnet. Step 2. Get an email with the lead magnet. Step 3. In that email are two calls to action to install List Goal. Here is the email I sent after they opted in: Confounding indeed. Asking people to install directly after getting their freebie is obviously ineffective. However, I need to dig deeper. I still have a hunch something else might be going on here. .. Diving back into the primary goal of the campaign (email subscribers for $1 each)… Check this out: For Wednesday the 12th, the “email look-alike” target group absolutely killed it at $0.77 per subscriber. Overall this ad set performed the best throughout the entire experiment, with an average lead cost of $1.34 each. The most effective targeting groups in order were: #1: Email list look-alike audience #2: Re-targeted website visitors #3: Facebook page look-alike audience #4: Website visitors look-alike audience There are quite a few things I can do to get my cost per lead lower. However, I feel confident that I can stay in the $1.30 – $1.75 per lead range with a $100-per-day ad spend. The next step is to convert those leads into customers to cover the money I’m spending for the ads themselves. .. Enter Phase 2 of the 14-Day Facebook Ad Experiment. Operation “Figure Out How to Make Money.” 🙂 There are three primary approaches I have in mind: Approach #1: Send the new subscribers through a free course that upsells them on my $200 paid course. Approach #2: Send the new subscribers to a webinar that upsells them on my $200 paid course. Approach #3: Immediately show my new subscribers a $5 – $15 product offer. (I don’t have a $5 – $15 product but I’m sure I can whip something up.) Which approach do YOU think I should start with? Giving these podcast updates a whirl. In today’s update… • Full update about the monetization strategy I decided to pursue • More info on the actual install numbers of List Goal (my original numbers were wrong) • Action items I’m working on over the next 24 hours Listen below: Over the last 24 hours I made some serious progress. 1. A new entry-level product was created. 2. Upsell video was shot and edited. 3. The upsell page was created. 4. Everything was plugged up into Infusionsoft. Listen to today’s update for a full rundown: Step 1: Here is the ad: Step 2: Here is the landing page: Step 3: Here is the upsell page (used to be a regular thank-you page): (I chose not to put a link to the video in this post because the video has a direct link to the checkout page and I don’t want to skew the results.) The Results? 2 hours ago I pushed the new funnel live. I’m tripling the ad spend over the next 24 hours so that we’ll have some tangible results by this time tomorrow. What do you think will happen? How many copies will we sell? What will the conversion rate be? .. The numbers are in! We sold 4 copies of the List-Building Checklist… boom! It’s incredibly fun to create something, then have random people you’ve never met pay you money for it. Even if it’s only $7. Here is the full update: Action Items for next 24 hours: Action Item #1: Increase price of the product to $10. Action Item #2: Add a sales sequence into the Jump-Start Your Email List class to upsell my $200 email list-building course. I decided to let the action items from the last update sit for a week to get a big enough sample size to draw some solid conclusions from. First, let’s review over the actual changes I made. That was done. The results? 121 people saw the $10 offer and 9 people bought it. That’s a conversion rate of 7%. With the $7 price we were seeing around a 10% conversion rate. In the end the math works out about the same. Main takeaway: Increasing the price lowered the number of people that bought but total revenue stayed the same. This is what the entire Jump-Start Your Email List class > Launch sequence looks like now. There are three main things that happen here: Step 1: Someone joins the Jump-Start Your Email List class when they buy the $10 checklist. Step 2: After completing the class, they enter a bridge series that gets them synced to a “day of the week” sequence for the launch series. Step 3: They go through a private launch sequence for the Rapid List-Building System course. Here is what that launch sequence looks like… The results? Well, it’s too early to tell yet. No one has started the launch sequence yet. The first 6 customers will get the “Intro to Course” email on this coming Monday. That’s one of the bummers about having a course that drips into a launch sequence. It takes 2-ish weeks to start seeing the results However, I’m VERY happy with the overall structure and the way this came together, and I have high expectations for how it will perform. What happens next? I’ve recorded a new podcast to go over the next steps and give you some insight into how I plan to use this new funnel going forward. Enjoy! 🙂 (Oh! And I finally came up with a name for the podcast. Yay!) .. Have you been following along with this experiment? How do you plan to use what you’ve learned in your business? Let me know in the comments below. Step 2: Target people who already know me.
Step 2: Send people who click on the ad to a landing page to opt in.
Step 3: Once they opt in, ask them to install List Goal.
Make your prediction
Update #1: 6:35 PM on Monday, July 27th
Action Item #1: Set up targeting.
1. The native ad manager sucks. Use the power editor.Action Item #2: Create the ads.


Update #2: 3:45 PM on Tuesday, July 28th
Adjustment #1: I’m killing the video ad (for now).
Adjustment #2: I’m simplifying everything.
Update #3: 9:30 AM on Friday, July 31st
Thing #1: The onboarding email is written.
Thing #2: All of the ads are set up and activated.


Update #4: 11:00 AM on Tuesday, August 4th
Step 1: Kill all of the old campaigns.
Step 2: Set up ONE new conversion-based campaign.

Step 3: Make sure all conversion tracking is set up correctly.
![]()
Step 4: Set the budget and turn them loose.
Update #5: 1:45 PM on Wednesday, August 5th
Step 1: Kill the low-performing ad sets (the ones based on FB Page Likes).
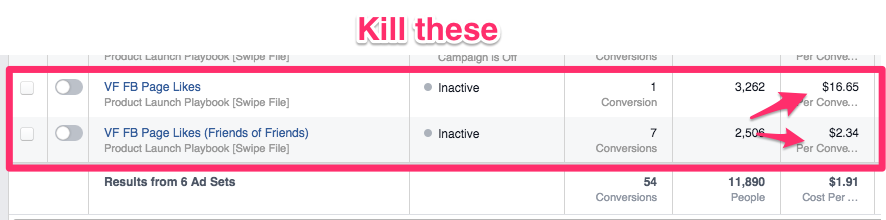
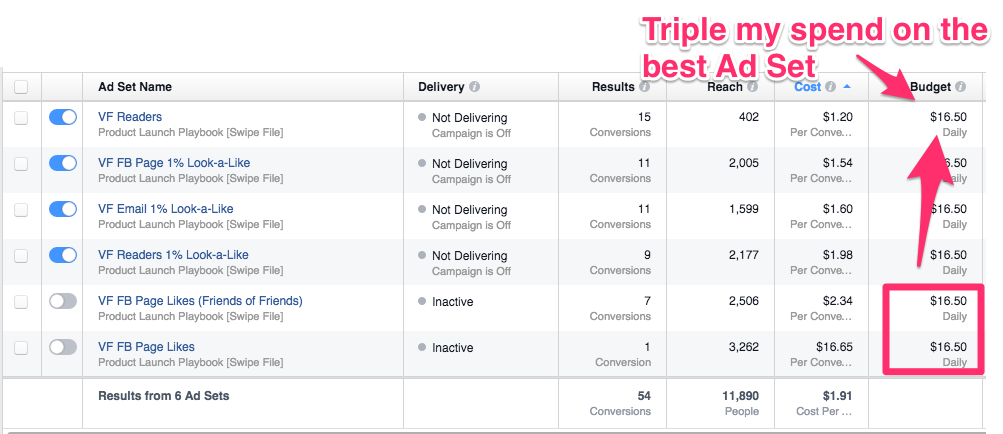
Step 2: Dump the budget for both of those ($16.50 per day) onto the top-performing ad set.
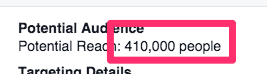
Step 3: Narrow the look-alike audiences down to 300k-500k people (based on relevant interests).

Step 4: Match the copy in the ad to the headline on the landing page. (This supposedly will increase relevance and lower the cost.)
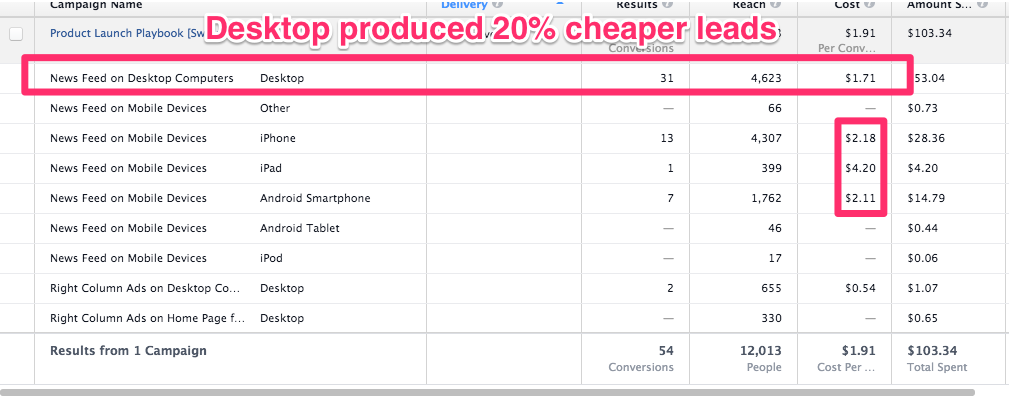
Step 5: Only run the ads on Desktop.
Update #6: 11:00 AM on Tuesday, August 11th
Update #7: 10:30 AM on Wednesday, August 14th


Update #8: 12:30 PM on Monday, August 17th
Update #9: 1:30 PM on Tuesday, August 18th
Need a refresher on how this whole funnel works?
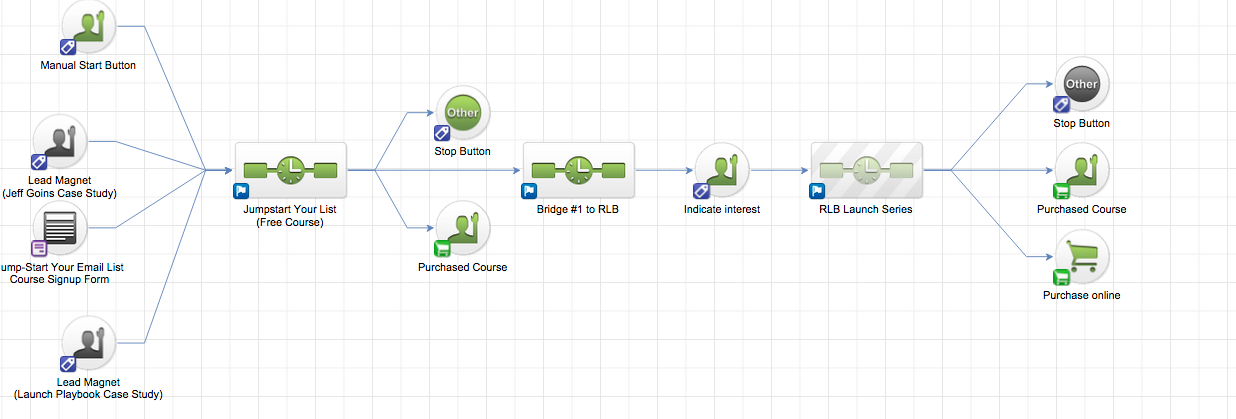
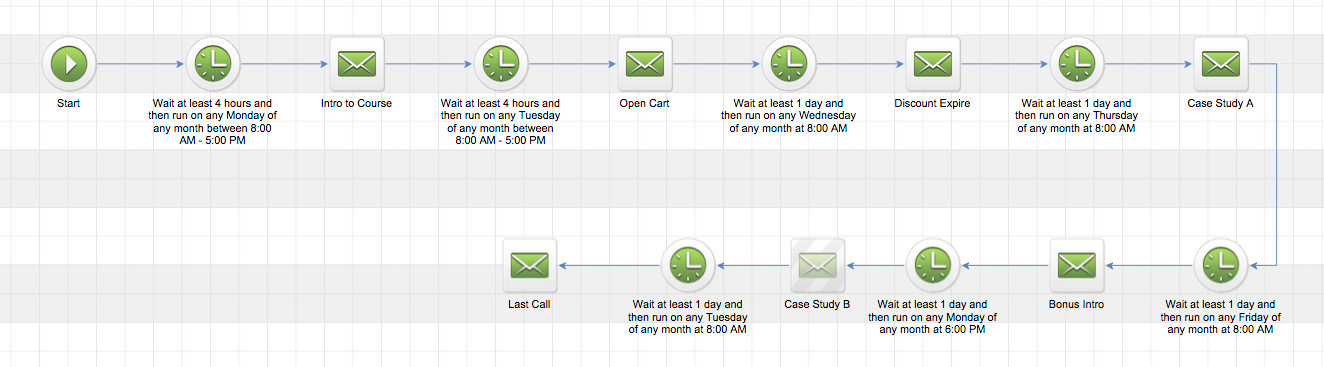
Update #10: 1:30 PM on Wednesday, August 19th

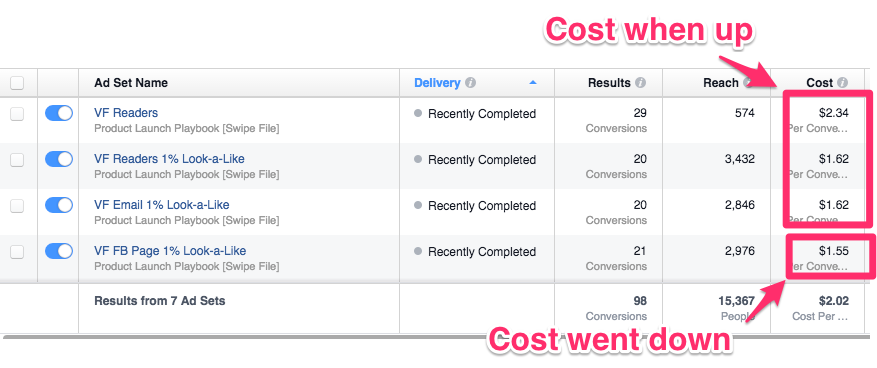
Update #11: 11:30 AM on Friday, August 28th
Action Item #1: Increase the price of the List-Building Checklist from $7 to $10.
Action Item #2: Add a launch sequence to the end of the Jump-Start Your Email List class that sold my $200 course