This post is a step-by-step guide for the system we’ve used to create, validate, and sell more than $1M ARR in online courses ourselves. It’s the same plan we’ve taught to hundreds of Growth University students. And it’s the plan we walked our client, Jacob McMillen, through when he made $11,000 on course presales (more on exactly how he did it to come).
To use this plan to create and sell your own online course, you don’t need a teaching degree.
You don’t have to be a business genius.
And you don’t have to be a “digital marketer.”
The four most common course creators we interact with are:
- Coaches who are ready to dial back their hours, productize their knowledge, and help more people without losing income or sleep.
- Agency owners who are overworked and ready to monetize in a way that doesn’t eat into their crammed schedule.
- White-collar pros, often overworked and underpaid for their expertise, who have a specific method or technique other people would pay to learn from. Think anyone from medical experts to accountants.
- Blue-collar pros who are great at what they do and whose everyday lives would be transformed by income from creating and selling an online course. For example, a carpenter selling a home-improvement course.
Can you see what they all have in common?
Existing knowledge which others would pay to learn.
If you have that, you can build a successful online course.
You don’t need to have perfect clarity on what you’ll teach right this very second. We’ll teach you how to get that.
You don’t need to have 10,000 email subscribers eagerly awaiting your first launch. We’ll teach you how to get the number you need.
You don’t need to wait till you have more time. It’s okay if you’re busy. It’s okay if you’re working two jobs already. To be honest, building a course takes months. Some people spend years preparing for it. And anyone who tells you otherwise is lying.
But plenty of people get lost doing things they don’t have to do. Or never launching because they’re always tweaking something in their course. Or launching without validating it and ending up with poor sales.
We’ll show you how to prioritize only what’s needful at each stage of the journey so you can spend your time where it counts.
Here’s the step-by-step process we’ll cover:
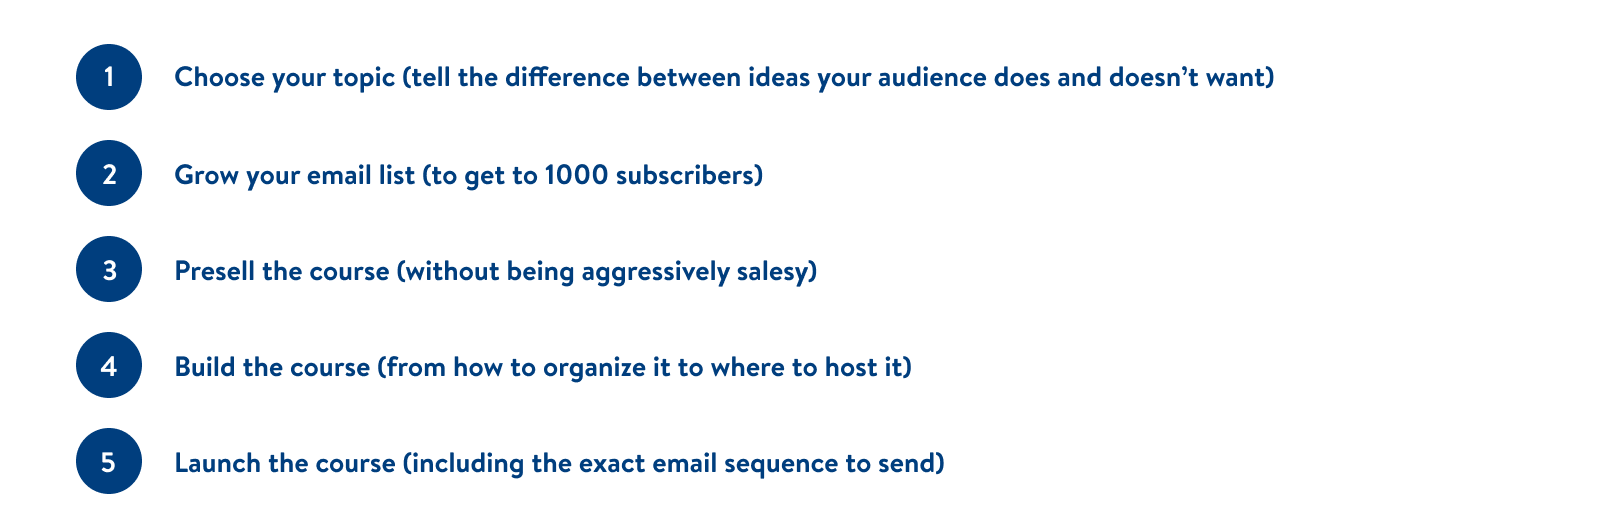
And before we get into all that, we’ll cover five common mistakes that could keep you from success.
By the way — if you’ve already made and launched a course before, this post is relevant for you, too. You may find steps you overlooked the first time around, and we have specific recommendations at the end of the post on how to get those purchases rolling during your launch.
If you’d like to skip ahead, here are the jump links:
Want help building and launching your course? You can book a complimentary strategy session where we’ll audit your business strategy and talk through a 90-day plan to skyrocket revenue.
5 Common Mistakes That Will Keep You From Launching a Great Online Course
Before we get into the steps, we need to touch on where you might get stuck. If you ever find yourself thinking:
- “No one will buy my course because someone else already sells a course on that topic.”
- “I don’t have time to make everything from scratch.”
- “It needs to be the most comprehensive course on the topic ever made.”
- “I have to do everything myself.”
- “I have to have a great idea before starting.”
… then this section is for you.
Mistake #1: Quitting When You See the Competition
If someone else is selling a course on your topic, that doesn’t mean you should quit. In fact, it’s a good sign that there’s demand in your space.
The way you approach your topic and explain it to your audience will resonate more with some people than with others. Remember: There’s room in every niche for competition.
If you follow the steps we explain here, you will validate demand for your course, so you’ll have proof that you can succeed before putting all the work into your product.
So tell the imposter syndrome to take a hike and get working.

Mistake #2: Thinking You Have to Make Everything From Scratch
New course creators think they need to build their course entirely from scratch. But that isn’t always true.
If you have an existing online business and audience, you’ve already created valuable content throughout the years. Sometimes, course creation is less about finding something new and more about organizing everything you have.
If you’ve done any of these:
- Webinars
- Live events
- Podcasts
- YouTube videos
- eBooks
- Blogging
… then you can use them when you make your course.
Important note: We’re not suggesting you dust off old content and present it as-is. Instead, find topics that make sense to include (we’ll teach you how to tell which topics are the best to pursue), retool them, and add more value to these ideas when you package them into your course.
Mistake #3: Making the Course Too Long
Course-creators are ambitious. They want to load their programs with all the information a person might need to become an expert on the topic.
But that takes a really long time. It’s easy to burn out while you’re creating the content. And it’s equally easy for your students to burn out while taking the course.
Think about how much your audience knows on the course topic. If your audience is completely new to it, give your students the very basics and not much more. Take them from beginner to intermediate, not beginner to advanced.
Alternatively, if you have an advanced audience, don’t cover the basics extensively before moving on to harder topics. Offer a recap to get everyone on the same page, then dive into the advanced material they paid for.
Ultimately, course length is a judgment call you’ll have to make. If you pre-sell the course like we recommend in Step 3, you’ll have early-access students taking it. Use their feedback and progress to gauge whether the course needs to be lengthened or shortened in certain places.
Mistake #4: Trying to Do Everything Yourself
You might assume you have to do every single part of the course creation process yourself.
The truth is, you don’t.
Yes, even if you are solo, have never started a business, and have no employees.
You can outsource tasks that you’re not the absolute expert on to freelancers. For example, don’t spend hours researching and shopping for camera gear when you can hire a professional videographer. Or rather than editing video lessons yourself, turn to an experienced video editor to handle that for you.
Remember, you only need to be an expert on what you’re teaching. If you can afford it, paying others for their expertise will improve the quality of your content while saving you from a constant cycle of learning new techniques, trying them out, and tinkering with the results. (And if money is an obstacle, remember that you’re going to collect some presale income. You could choose to invest it in the course creation process.)
Mistake #5: Thinking You Need a Great Idea With Zero Research
What if you don’t have a million-dollar idea right this very second? That’s cool. You’re like most people who have built and sold successful courses!
You want to know the real secret to a great course idea?
Research.
In our process, the market always has the final say on what’s in a course.
You have to talk to people and understand what they need. Then, go build it. We’ll teach you exactly how to do this below.
5 Steps to Create and Launch Your Online Course
In this section, we’ll dive into the 5 steps of creating and selling an online course:
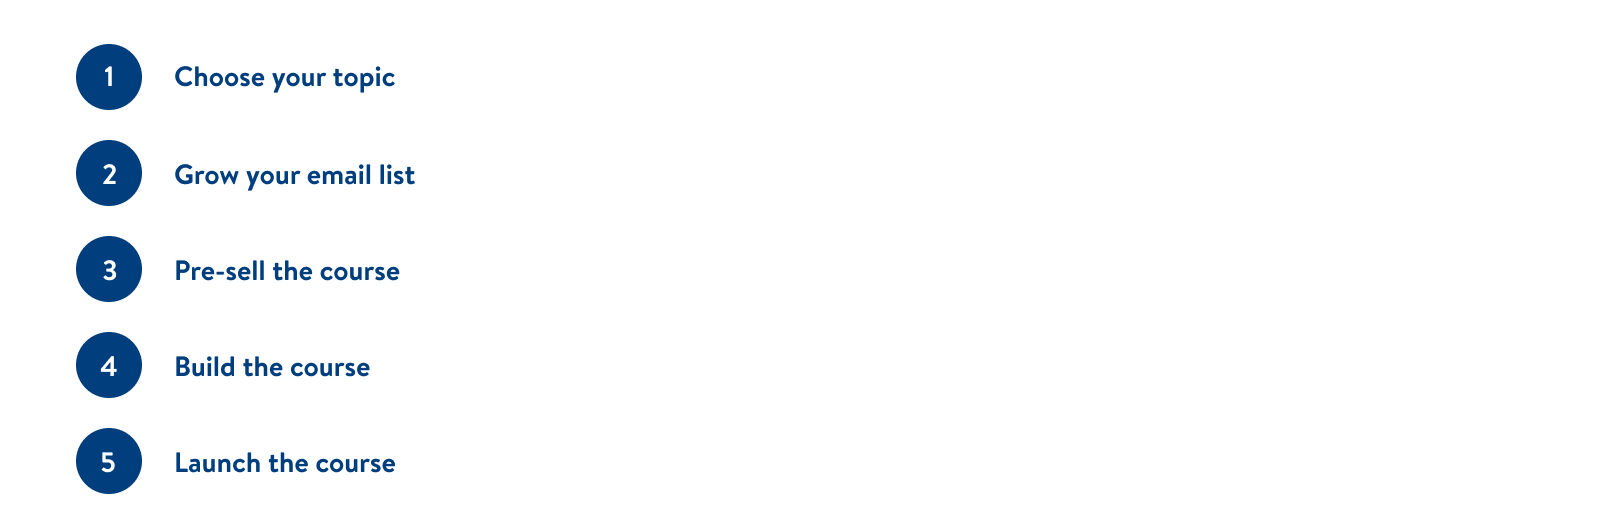
We’ve included detailed instructions, templates, and examples so you can execute our process. Let’s dig in.
Step 1: Choose Your Topic
The first step to creating an online course is to decide what it will cover. That might sound simple, but this is the most important step of creating and selling online courses — and yet it’s the step most people don’t do at all.
Here’s what it involves:
- Find out what resonates with your target audience.
- Know the difference between casual interest vs purchase potential.
- Check out the competition.
- Make a mind map.
- Choose your topic.
Repeat after me:
“I will not sell an online course without finding out what my target audience wants — by asking them.”
Step 1a: Find Out What Your Target Audience Wants
This step is so important, we wrote an entire guide on it, which you can read here: How to find a profitable niche. It will walk you through four steps:
- Honing in on your exact audience.
- Understanding the problem they’re facing.
- Deciding how you do and don’t solve that problem.
- Testing your messaging.
If you’re confident you have your niche pinned down, you can skim or skip that guide and use the shorter method presented here instead. (If we’re being honest, you should probably just go read the niche article).
If you’ve already been publishing content, then you can analyze its performance to see which topics resonated the most with your existing audience. If you’re targeting a completely new audience or haven’t published content, scroll down to the alternative options.
Here are the shorter methods of figuring out what your audience wants.
Use Your Existing Content
Look at your existing content to see what your audience liked the most. Here’s how:
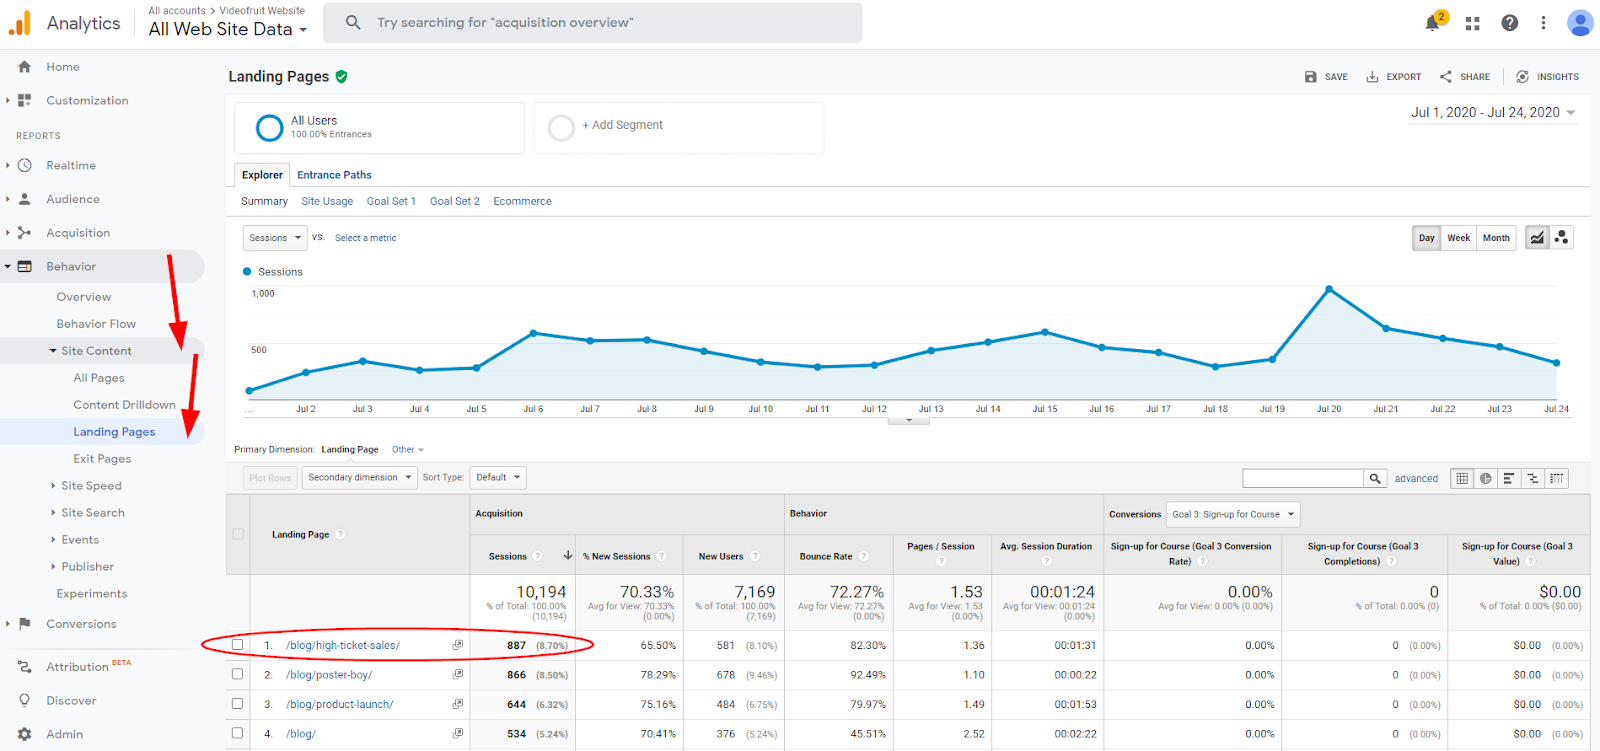
- If you blog, round up all the topics that generate the most traffic to your website. You’ll find this information in Google Analytics (follow the link for a tutorial on how to use it).
- If you host a podcast, which episodes had the most downloads? If you have comments enabled, which ones had the most discussion? Why?
- If you produce video content, which videos are your most commented-on or watched? What drew people to engage with them?
What if you don’t have content, a podcast, or videos?
If you have an audience but not much content, email them a short survey. Ask free-response questions (Yes or No answers are not often helpful) that dig into what they’re trying to do and what’s standing in their way. For example, “Why do you subscribe to my emails?” and “Of these topics [list a few in bullet points], which do you want to learn more from me about and why?”
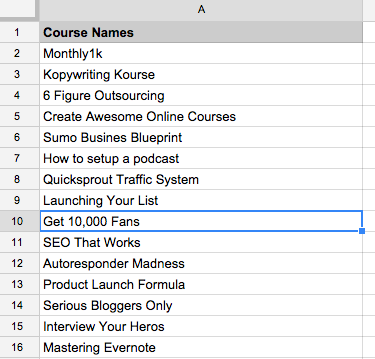
When you’re done, you should have a list of your five to 10 most popular topics. Like this one Bryan made while building his Get 10,000 Subscribers course:
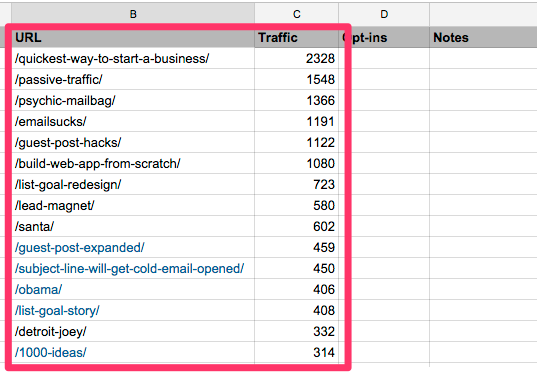
Keep this list and head to Step 1b.
If You Can’t Use Your Existing Content (or Want to Do More Research)
If you don’t have existing content or an audience to survey:
- Look at keyword volumes in an SEO tool such as Ahrefs or Moz to see what people in your audience are looking for. If you need a free tool, use Google Keyword Planner or Keyword Surfer.
- Investigate user forums and Facebook groups on topics related to your course idea.
Here’s an example of each.
Say you’re an amazing pet sitter, and you want to make a course for other pet sitters. Should you focus on the processes you use to work efficiently during the day? Should you focus on how you market your services to pet owners?
Here’s what you’d see if you went to Ahrefsand typed “pet sitter” into their Keywords Explorer (you can get a 7-day Ahrefs trial for $7):
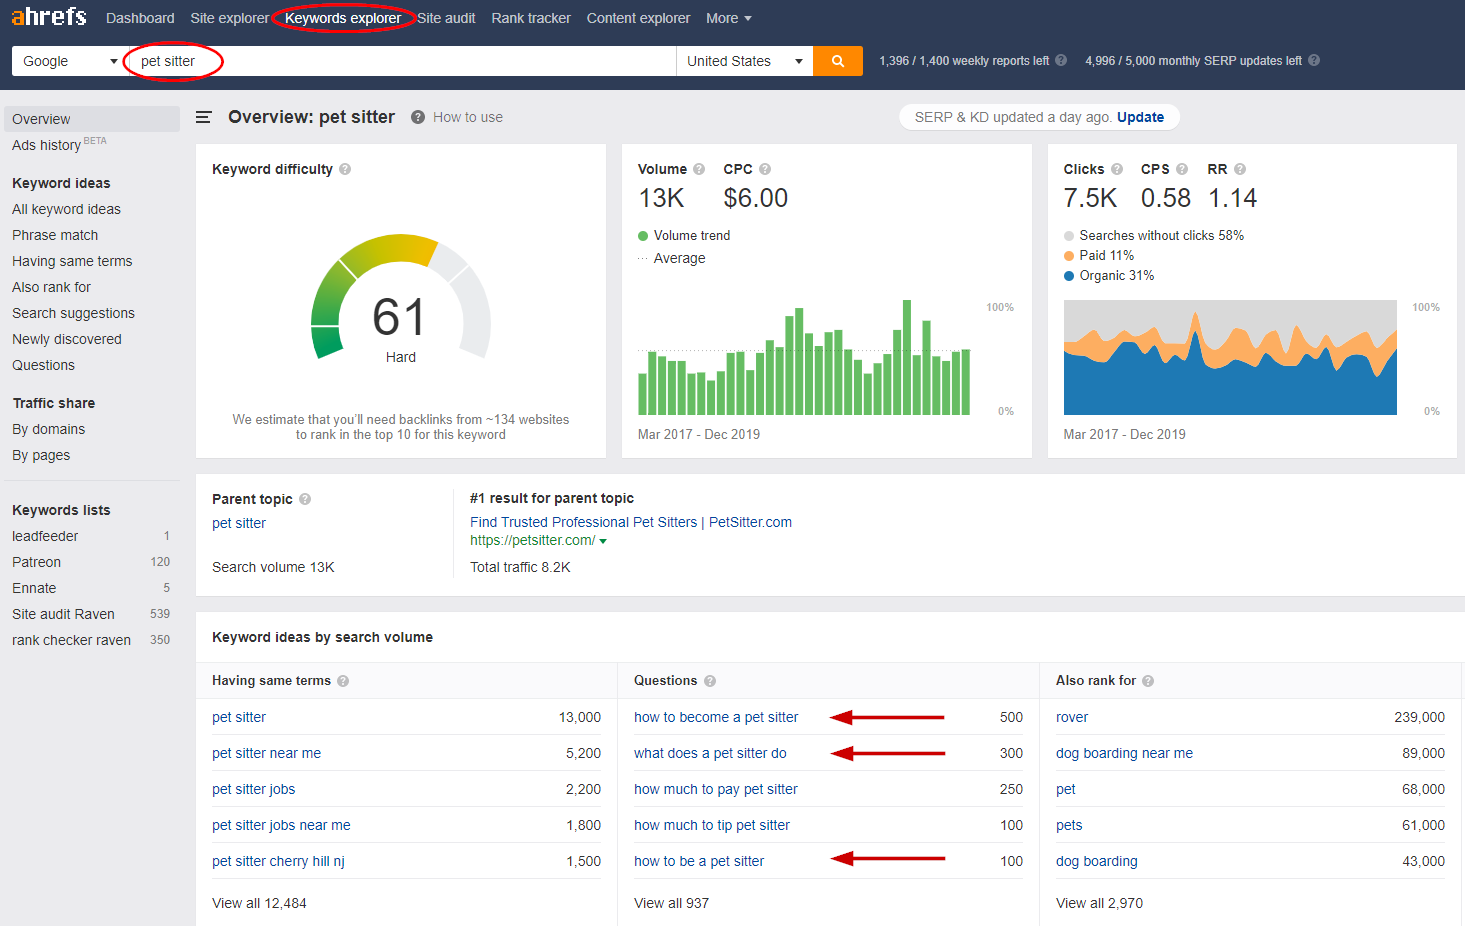
“Pet sitter” is a vague term, but the results get you access to questions people ask about pet sitting. At this stage, you want to know what other pet sitters are asking about the topic. “How to become a pet sitter” is a little too vague to tell you anything useful. But if you click on the “Questions” tab, it takes you to a bigger list of search engine terms.
Here we see questions such as “how to be a good pet sitter,” “how do I get a job as a pet sitter,” and “how to become a certified pet sitter.”
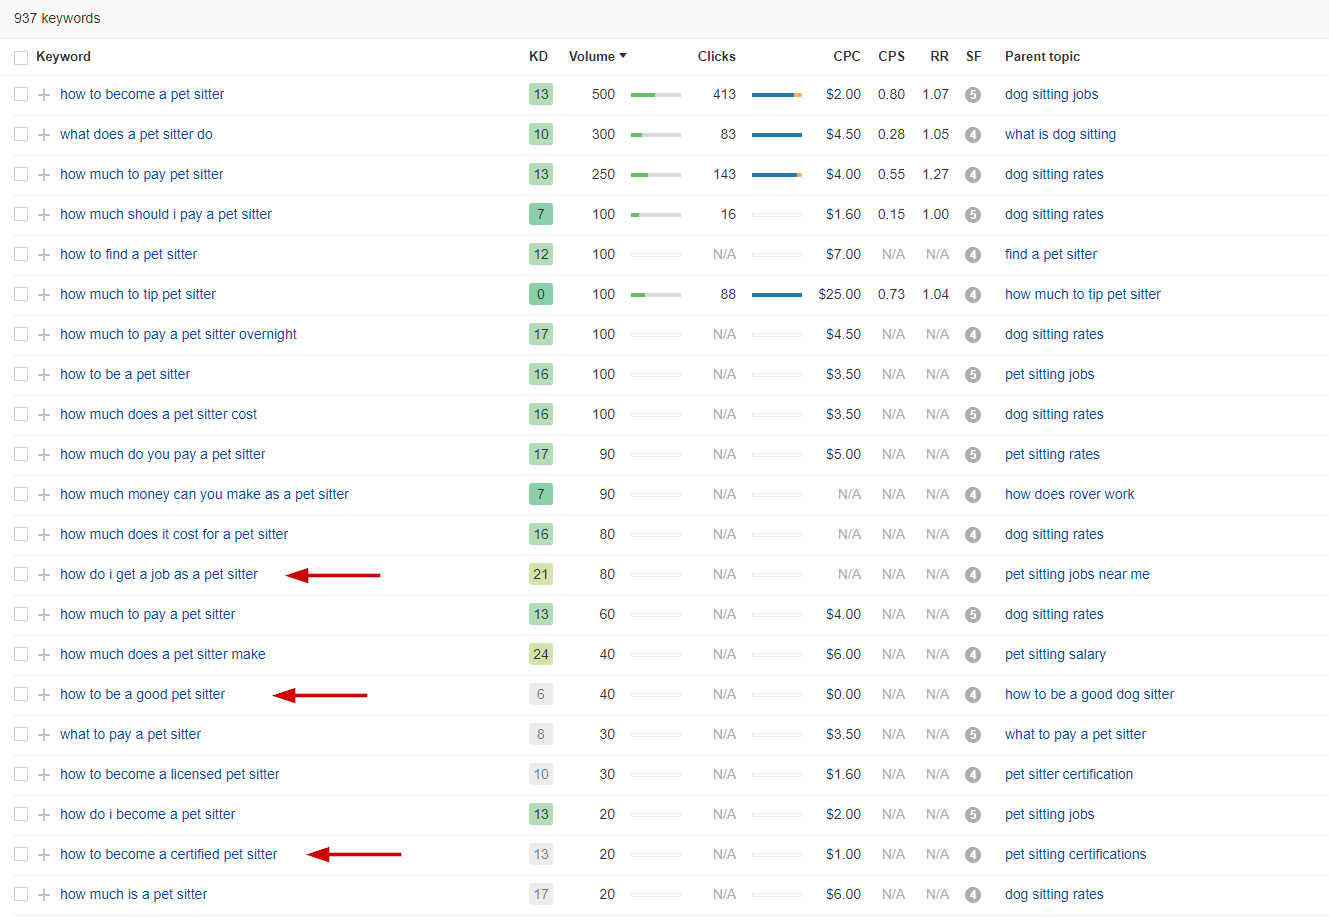
Aha! “Certification” is a more complex topic, one that you might include in a course that teaches people how to become a great pet sitter. But if your target market is current pet sitters who want to improve their business, you’ll need to get even more specific.
Sometimes, you’ll find those very specific questions in Ahrefs that tell you exactly what kind of knowledge your audience is looking for. Other times, you’ll need another resource. So for the current topic, Google searches aren’t enough. We’ll need to look at forums and Facebook groups.
In this case, when we Googled “forums for pet sitters,” a Reddit pet sitting community came right up. A quick glance through current posts shows that pricing is a big pain point for pet sitters. They are asking or talking about topics such as how to set your rates, how to handle bonding and insurance, and how to handle difficult clients, along with operational issues such as scheduling.
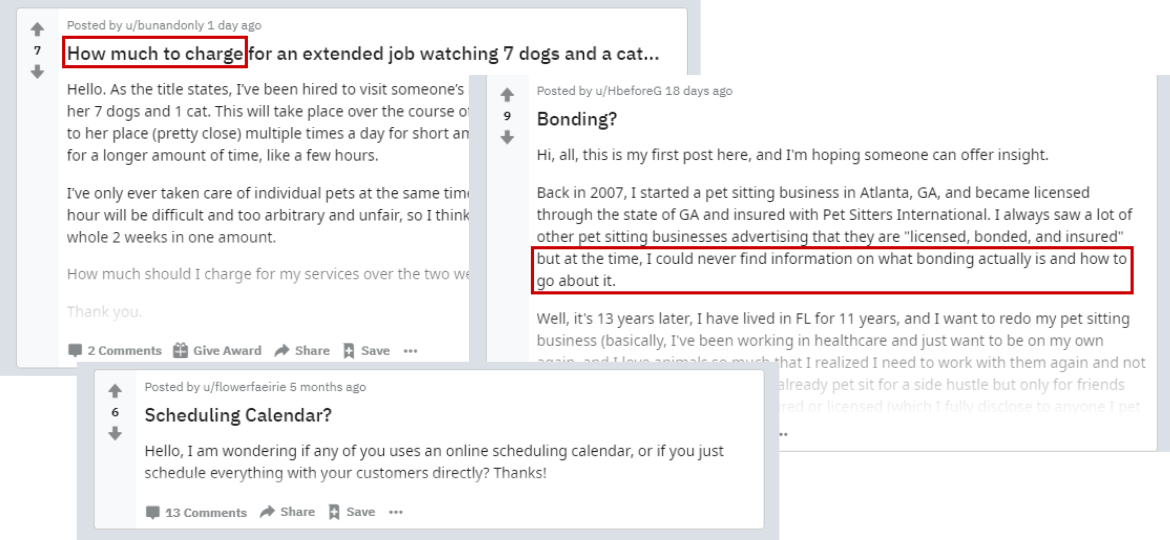
Keep a (rough) tally of:
- How often these questions are asked.
- How experienced the asker is.
For example, you might notice that inexperienced pet sitters ask about general pricing, but experienced sitters ask about how to handle price increases.
This information is helpful because it tells you, on a topical level, who in your audience is experiencing which problems.
So by the end of the exercise, you might have a table that looks like this: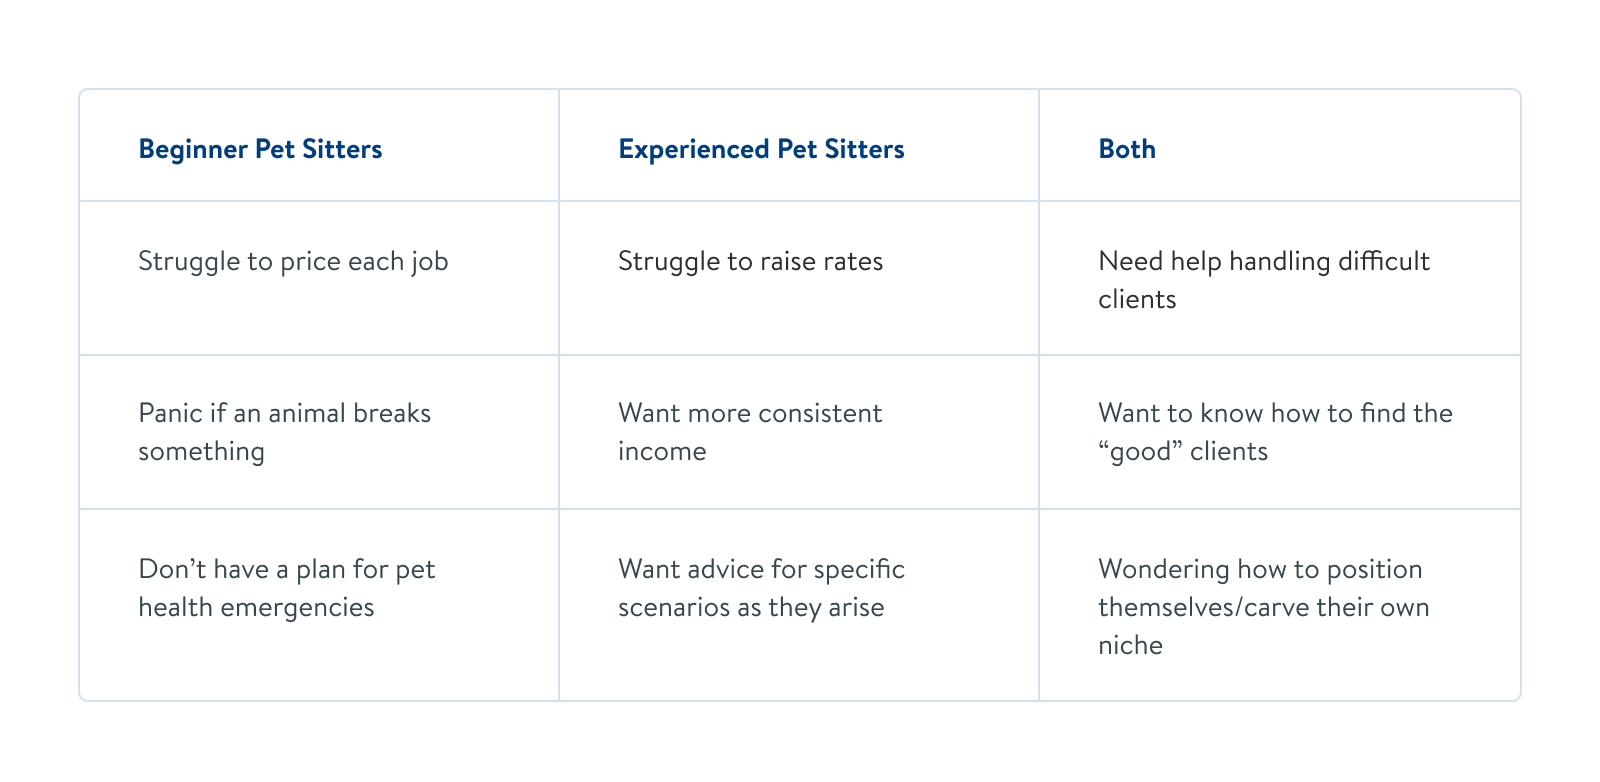
Some of these problems could be large enough for a whole course, e.g. “How to earn good, consistent income as a pet sitter.” Others, like “How to raise your rates” would be better as a subsection in a course.
Don’t worry about organizing them perfectly yet; we’ll cover that in Step 1d.
Once you have two to three course ideas and five to 10 supporting topics, move on to the next step.
Step 1b: Decide What Topics People Will Pay For
Just because a subject generates traffic doesn’t mean it’s a topic your target audience will pay to learn about.
For each topic, ask these questions:
- Is your target audience already spending money and trying different solutions to solve their problem?
- Does the solution to their problem require specialized knowledge?
- Is solving their problem labor intensive, frustrating, or otherwise difficult to do with free information and content?
- Is this actually a big issue for them vs. a minor inconvenience that they complain about but don’t care enough to fix?
If the answer to any of those questions is “Yes,” keep that topic on your list. If the answer to all those questions is “No,” drop the topic.
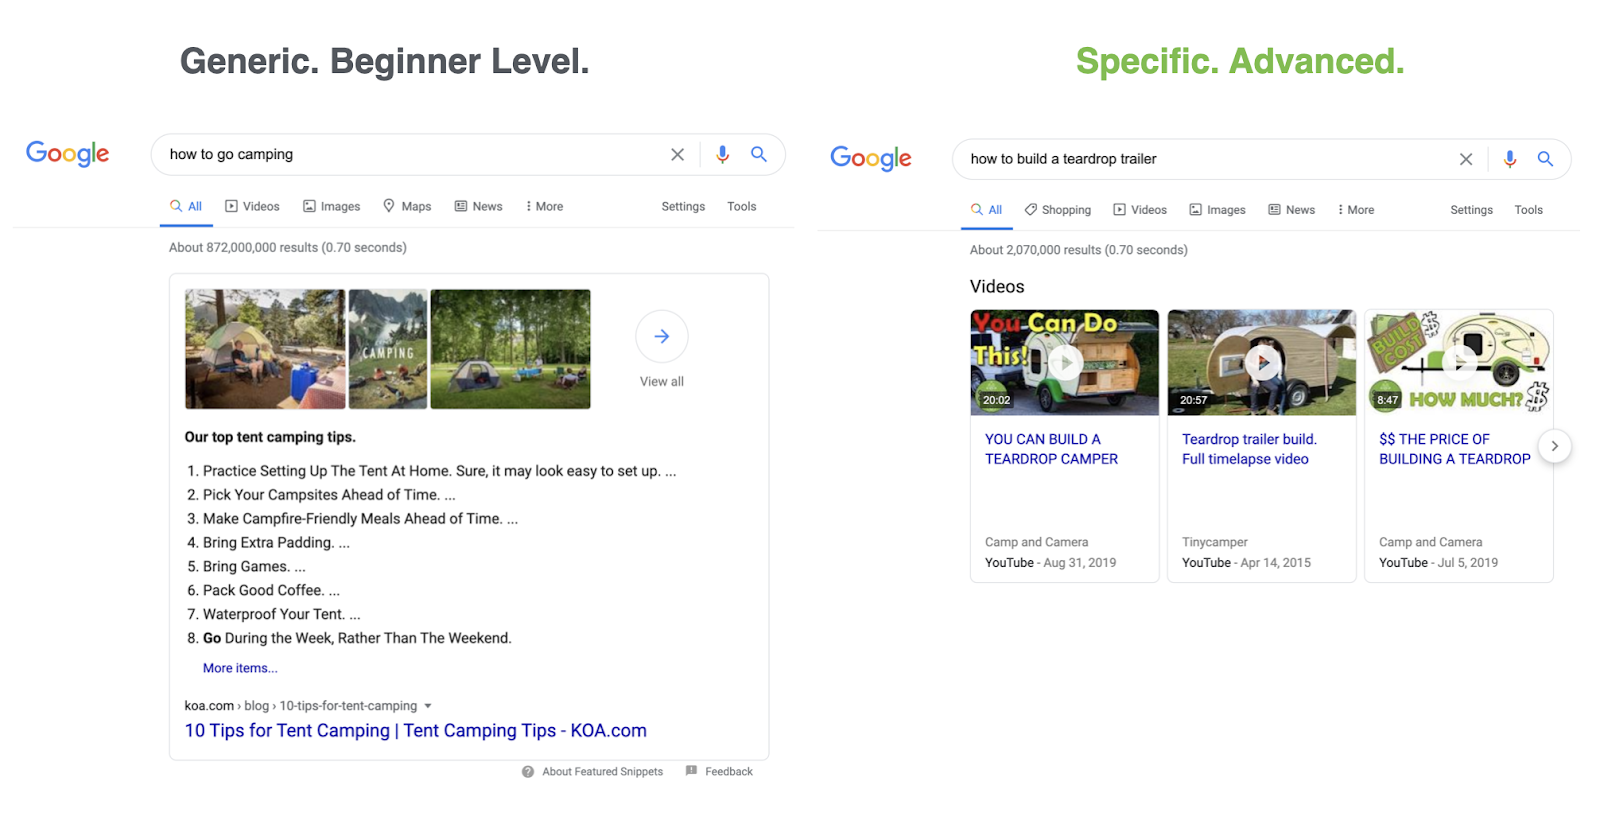
For example, a topic like “How to go camping” is too generic. You don’t know what they’re really asking for, and it’s so beginner that tons of free blog posts with camping tips are probably enough. It might get more visitors, but high volume doesn’t always equal high quality.
On the other hand, “How to build a teardrop trailer” is specific. There are lively communities and YouTube channels about teardrop trailers and camping with them. It’s not a skill someone can easily learn just by watching free videos online. And people who want to build a trailer for much less than they’d pay for a pre-built trailer are more likely to pay for an extensive tutorial.
Step 1c: Research Your Competitors
If other people are selling products in your niche, that’s a good thing. It (probably) means someone’s buying what they’re selling.
But this step isn’t to verify that there’s demand for your product. (We’ll get to that part shortly.) This step is all about figuring out what your competitors are doing wrong so you can do a better job and stand out to your audience.
Here’s how:
- Find any courses that cover the same subject as the one you’re creating.
- Look for gaps in their content, mistakes in their positioning — anything you can improve upon in your own course.
- Jot all of these down.
Let’s use the “Build a teardrop trailer” example again.
Say you’ve scoured the internet and found two people who sell plans (but not courses), a few books that leave out what you think are important steps, and one other person who has a course.
Maybe you notice the course only covers trailers with a steel and aluminum frame, but you know a better material to build it with. Maybe it skips information true beginners would need, such as instructions on welding. Or maybe your course could provide more options, letting students pick and choose the features they want their trailer to have.
The more in-depth your research is, the more clearly you’ll start to see examples of what you can do better, or at least differently, than your competition.
Note: In case you’re wondering, yes, this involves purchasing other people’s paid content. So if you want to wait to do this until Step 4 after you’ve collected presale money, that works too. And if you’re really strapped for cash, you can skip this step altogether.
Step 1d: Make a Mind Map
Once you have two or three rock-solid ideas for your course content, create a mind map to narrow your focus. Put your main topic in the central circle, key subtopics in the next round, and further sub-topics from there.
Here’s an example mind map on creating and selling your first online course:
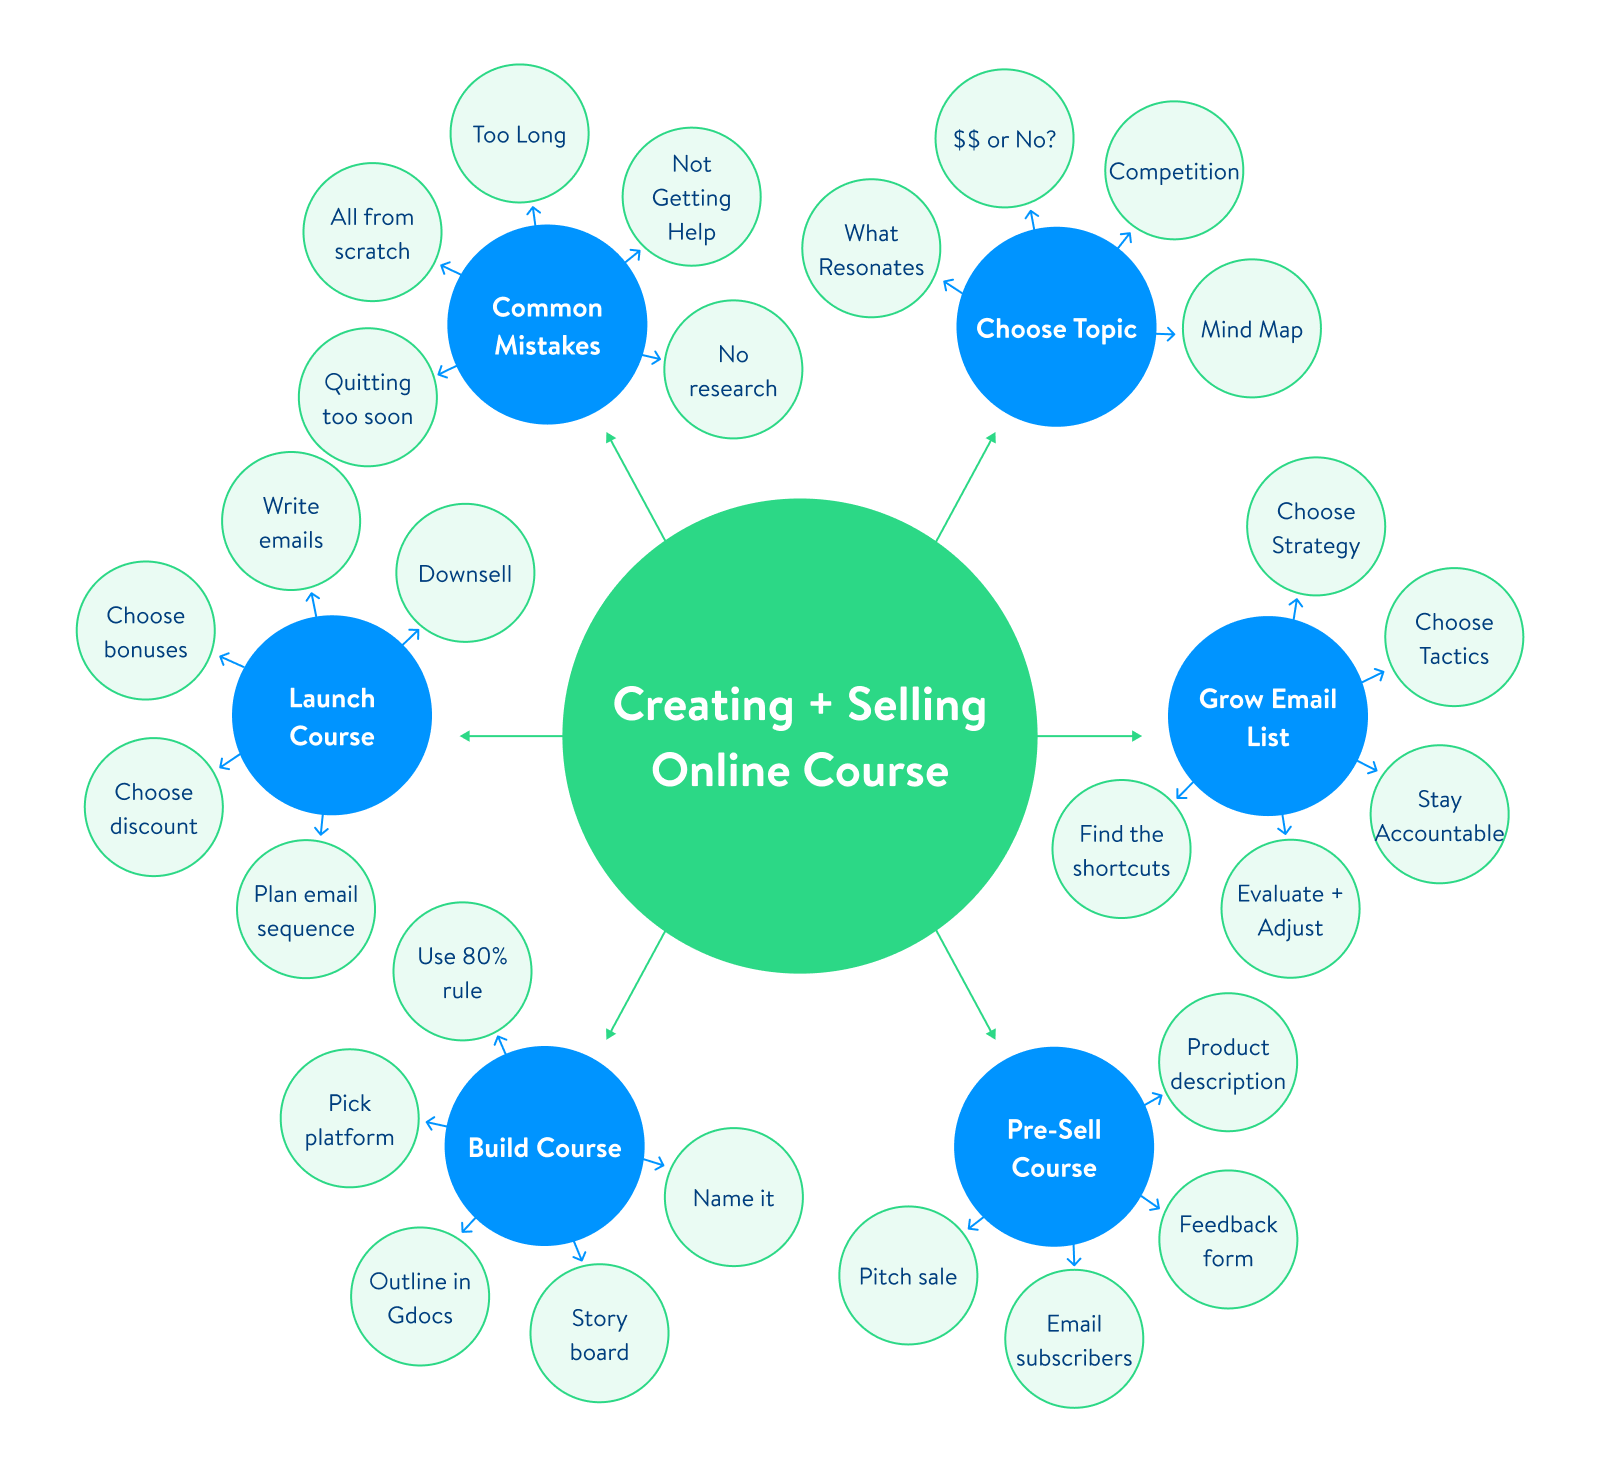
If your ideas are all related, you could make one large mind map and decide how many subtopics to include. If your key ideas are fundamentally different topics, make a separate mind map for each.
Once your mind maps are made, you should have a clear picture of roughly what you’d cover for each topic. Pick the one that seems the most promising, according to:
- What you’re most interested in teaching about.
- What your audience’s biggest, most painful problems are.
Step 2: Grow an Email List to 500-1000 Subscribers
Once you’ve finished Step 1, you should have a clear idea of what you’ll teach and who you’ll teach it to.
Next, you need hard proof that they’re willing to buy a solution from you. To get that proof, you’ll need an email list.
If you already have 500-1000 subscribers on your email list, you can skip to Step 3. But if you have fewer subscribers, or no list, and want to know how to grow your list faster, read our post:
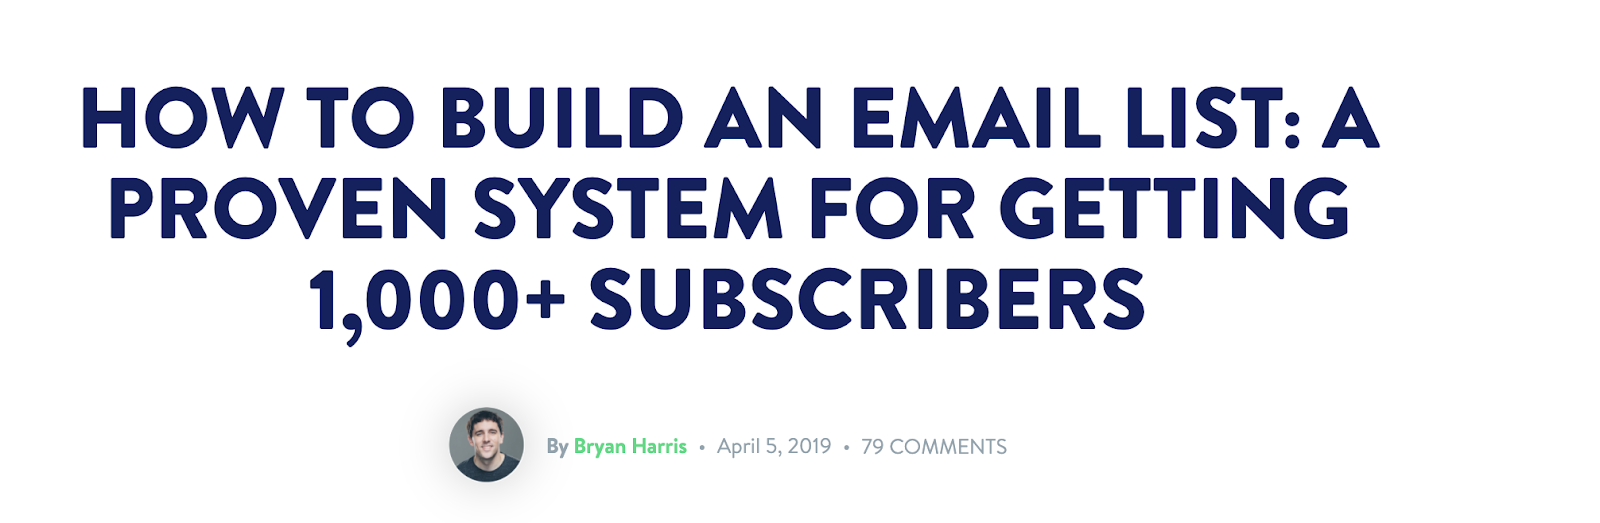
In the post, we dissect the exact method you can use to grow your list to 1,000+ subscribers. It walks you through five steps:
- How to choose your overall strategy for email list growth.
- How to pick two to three tactics out of 15 examples to execute as part of that strategy.
- How to stay accountable to your goals (so you actually build that list).
- How to evaluate and tweak your approach.
- How to find shortcuts.
One of the nice parts of building an email list is that while you build it, you can find your best (or most likely to buy) prospects because you’re usually offering free, useful content to readers in exchange for their email.
For example:
One of our clients, Jacob McMillen, has a website about copywriting and content strategy. He has two audiences: beginners who recently started freelance work (making under $2k/month), and more seasoned folks who have been making over $2k/month.
He has a newly-created course for the beginners; the more advanced followers can join his paid-access community. When someone visits his site, they can sign up for an email crash-course on how to become a six-figure freelance writer.
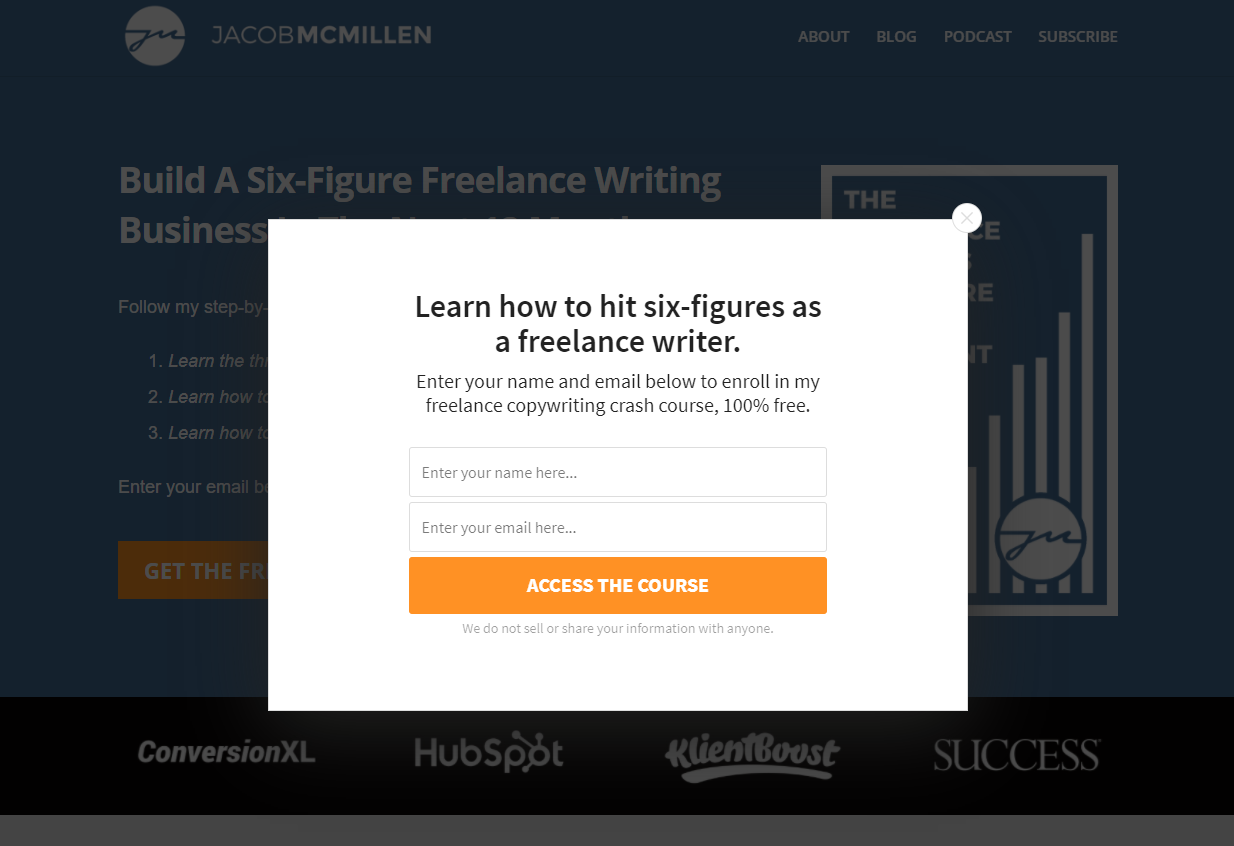
If someone signs up for the crash-course, that’s a good signal that they’d either be a good fit for his course or his community. He can then put potential customers on a designated welcome email sequence that ends in a pitch to buy his course.
But you don’t have to have an offer lined up to use a method like this (a free mini-course). Giving away free content in exchange for an email still does two important things:
- It gets more people on your email list.
- It tells you they are interested in your topic.
That indication of interest makes them prime targets for the presale offer you’ll create in Step 3. And it lets you use email marketing to launch your course when it’s ready.
Step 3: Pre-Sell/Validate Your Course
Pre-selling or validating your course is absolutely one of the most important steps.
This is where you’ll figure out what your audience will pay for.
This is where you’ll make sure that when you launch, you know people will buy.
Now, pre-selling does not mean you have to approach your audience with an offer out of the blue and hope for the best.
Here’s what it actually involves:
- You draft your product description (an early version of your sales page).
- You identify your most engaged subscribers (we call them your focus group).
- You make a feedback form.
- You ask your focus group to A) read the product description and B) fill out the feedback form.
- On the feedback form, you ask them if they’d buy the course if it were available now.
- If they say yes, respond with a discounted early-access price.
- Watch as your course-creation process funds itself.
It’s the lowest-pressure way to get someone to buy your stuff. Ever. You can do it even if you’ve never made a sale in your life.
Don’t skip this step. I don’t care if you “don’t feel ready” to make your audience an offer. I don’t care if you’re totally confident you can sell online courses like hotcakes.
Don’t ever make a product without validating it first. Presales give you hard proof that your course will sell if you take the time to build it. No one wants to spend hundreds of hours building something that doesn’t pay off.
Even seasoned copywriter Jacob McMillen didn’t skip this step (even though he wanted to). And once he did it, he was glad he did. Not only did it provide $11,000 to justify spending his time on his course, it also gave him the motivation to keep going.
“Pre-selling put the urgency to actually follow through and get it done,” he told us. “That was instrumental to the process.”
Ready to learn how to do it yourself? Let’s go.
Step 3a: Write Your Product Description
Don’t make things complicated at this step. Instead of staring at a blank Google Doc (yes, we’ve been there before), use this outline that we provide to Growth University clients who go through this exercise:
- Give your Course Name.
- Briefly describe your course.
- Tell a story that illustrates the problem the course addresses.
- Quickly recap 3-4 things you’ve attempted (or your audience frequently attempts) to solve the problem.
- Describe a picture of what life looks like once the problem is solved.
- Give an overview of the product.
- Introduce your product.
- Explain how this product does things the right way.
- Show how the reader would benefit from this product.
- Provide a detailed description of what’s included.
- Use a bullet list to summarize what’s included.
- Reveal the price.
- Answer commonly asked questions (your FAQ section).
You might have noticed that the description we just outlined has a lot of creative writing. That’s because good marketing isn’t about selling. It’s about storytelling. And it’s a lot easier to tell a great story when you have all the comments and insights you gleaned from your target audience in Step 1’s research phase.
If you get stuck on creating your course name, you can get inspiration from other courses.
For example, when Bryan made the Get 10,000 Subscribers course, he wrote down the names of all the courses he’d bought or thought about buying. One of the more effective names served as a basis for the name he finally chose:
Readers should immediately know what your course is about just by reading the name. Keep it concise and easy to understand.
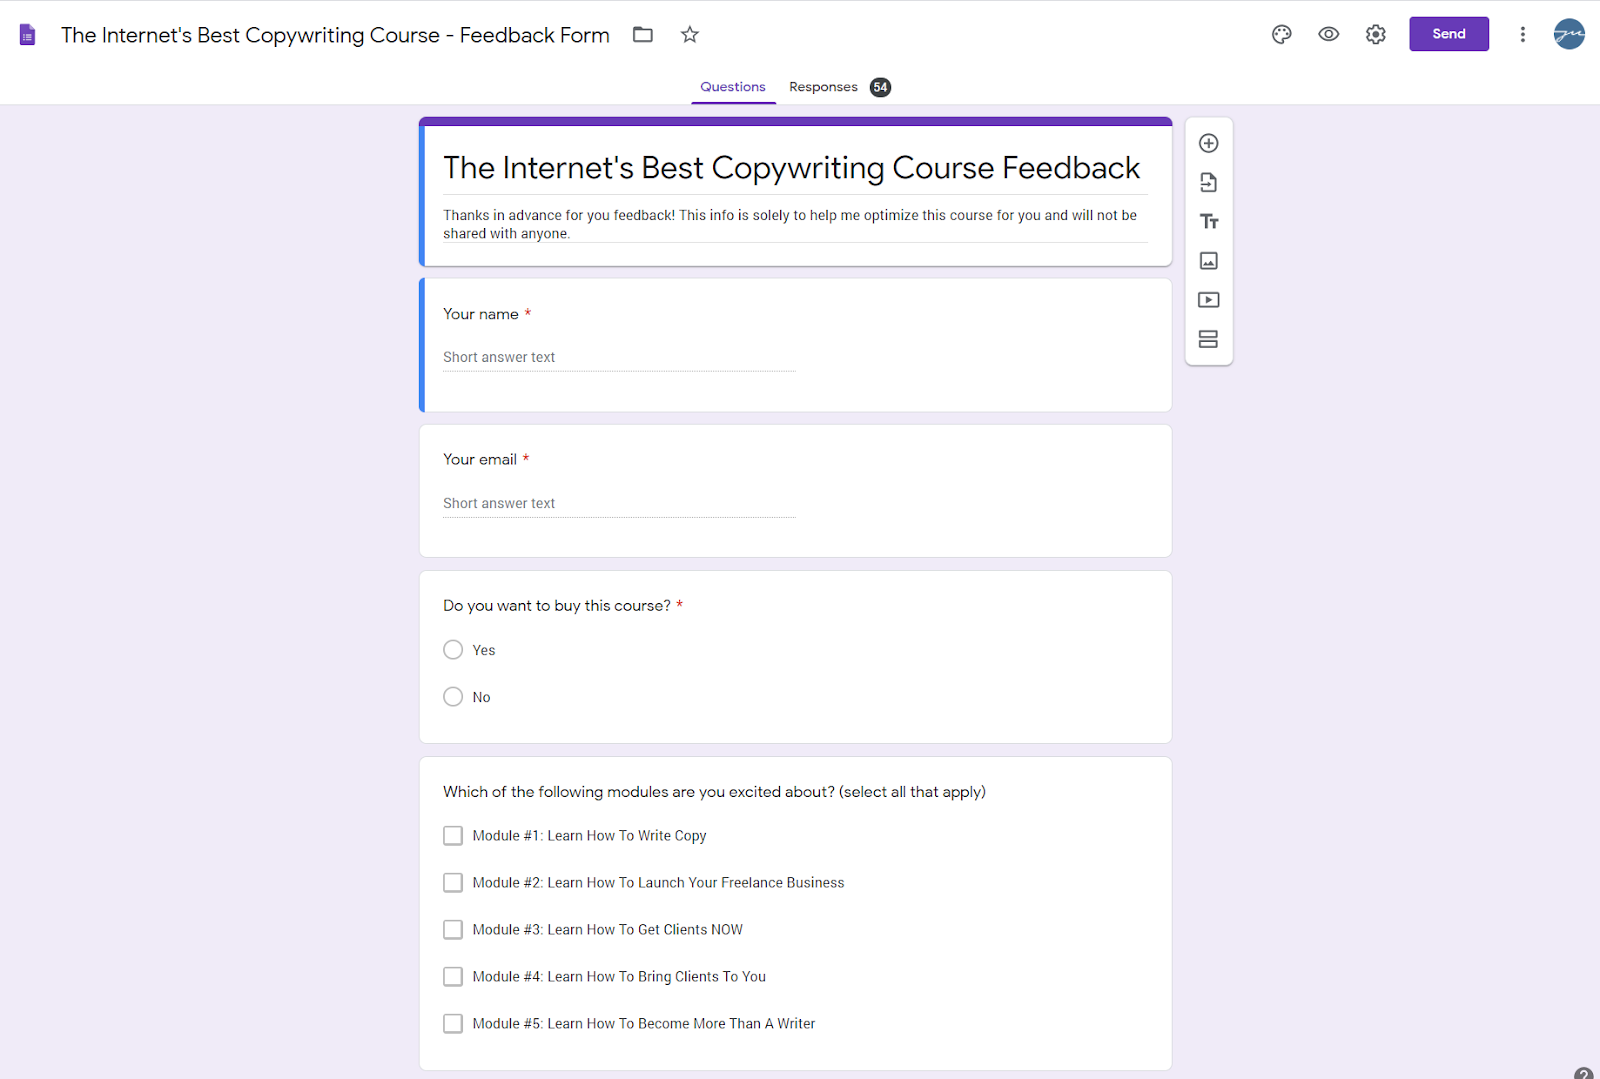
Step 3b: Make Your Feedback Form
This can stay super simple.
Open up a Google form, and ask some variation on the following questions:
- Name.
- Email address.
- Do you want to buy? (Yes/No).
- What feature(s) of the course most make(s) you want to buy? Why?
- What questions did you think of while reading?
- If we added one more thing to the course, what would you like it to be?
Step 3c: Identify Your Focus Group
If you’ve been using a lead magnet or some other offer to keep your list segmented, then this step is easy, too. Just pick 50-100 of those people and make them your focus group.
If your list isn’t segmented, find a guide based on your email service and learn how to segment it. When you’re ready, make a new list with the 50-100 people who interact with you the most. If they:
- Reply to some of your emails
- Open most of your emails
- Engage you on social media
- Comment on your blogs
… and so forth, then they’re worth adding to the list. Go for the most active subscribers and work your way down.
Step 3d: Ask for Feedback + the Sale
You need to write and send three emails to your focus group:
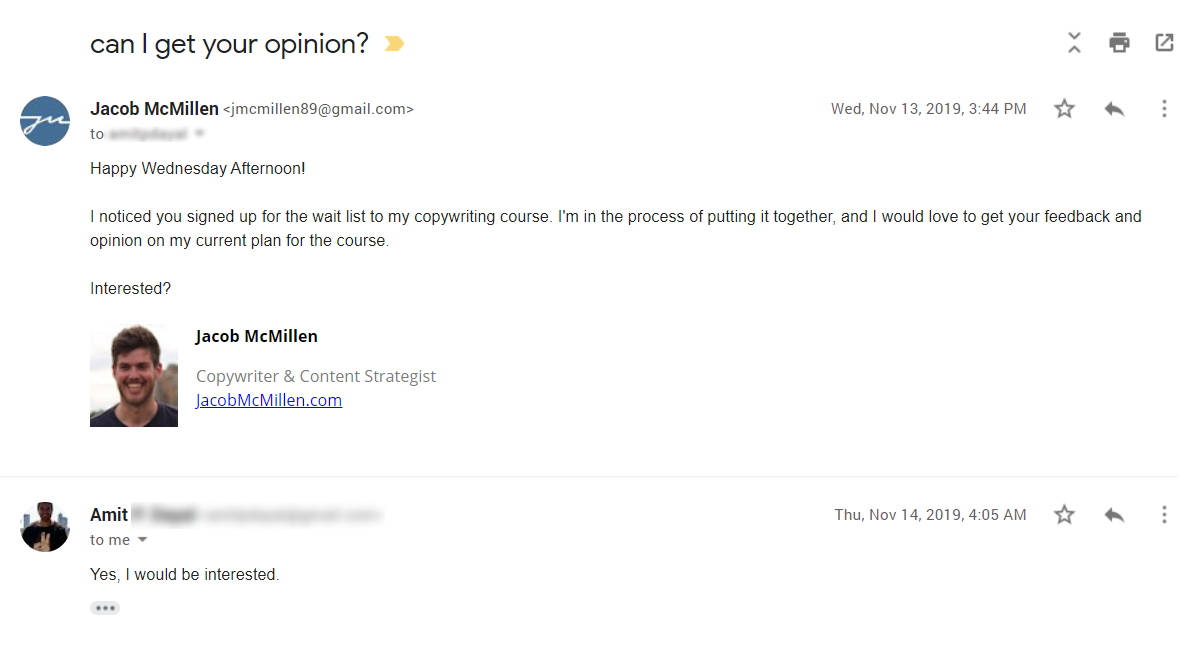
1. An Email That Asks for Permission
In this email, send a short note to the subscriber. Explain that you’re working on a project and you’d love feedback on it, if they’re interested. If they say “Yes,” respond with the second email.
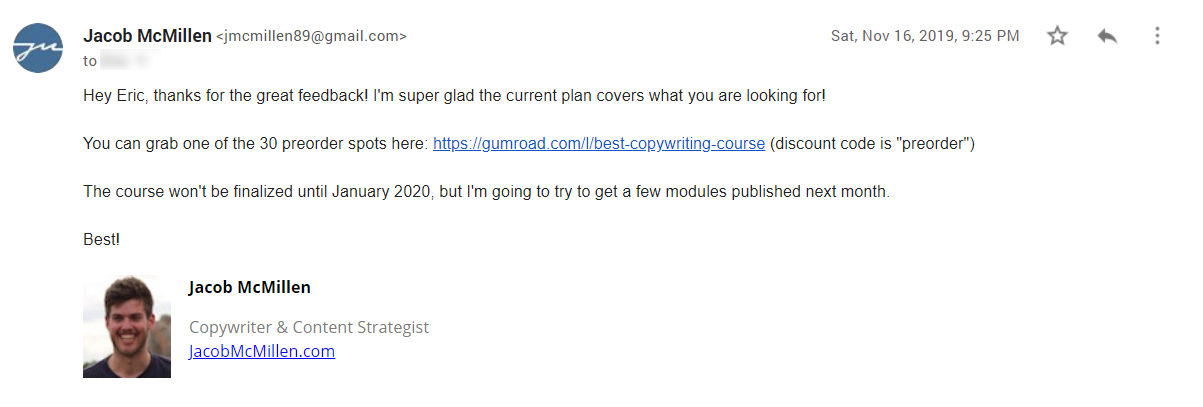
Here’s an example from Jacob:
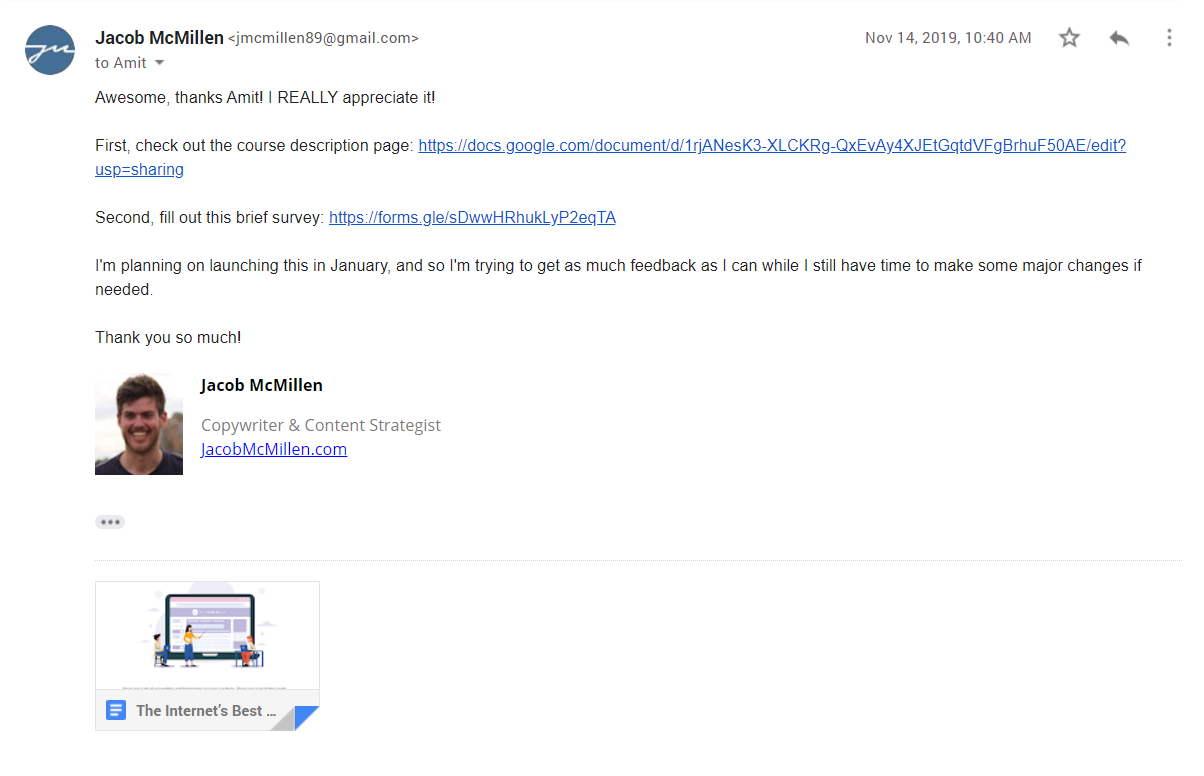
2. An Email That Asks for Feedback
Keep this email short as well. Thank them for their time and give them specific instructions on what they need to do: Read the product description and fill out the feedback form. Remember to include links to each. 😉
When his subscriber, Amit, responded “Yes” to the first email, here’s how Jacob followed up:
3. An Email That Asks for the Sale
If they respond “Yes” to the question, “Do you want to buy?” send them the third email. In this email, you’ll answer questions from their feedback, then offer them a chance to pre-purchase the course at a discounted price.
Amit bought directly from Jacob’s sales page, so he didn’t get a third email. But for folks who didn’t buy directly from the page, Jacob sent this follow-up email:
If you don’t have an order page, you can even use Paypal to collect sales.
Note: If you’re unsure what to charge, make the pre-sale at least half of what you think is a fair price point based on your competitor research, the affluence of your audience, how much this problem aggravates them, and what they’ll gain from your course.
For example, Jacob set the beginning cost of his course at $500, so his pre-sale price was $250: a no-brainer price for a beginner copywriter to learn from him.
Step 3e: Follow Up with Nonrespondents
After you get the first round of feedback from your focus group, update your product description — especially the FAQ section. Put their insights to work!
When you’re done, circle back to the folks who didn’t respond either to the first or second email. If the first, repeat your request for 10 minutes of their time. And if the second, remind them that you’d still love to get their feedback.
You might get a new round of feedback on your improved product description, plus more pre-sales.
Should You Send It to Your Full List?
Jacob followed this process for his pre-sale with a focus group of 60 people. Out of that group, 21 people ended up filling out the survey, and nine of those preordered the course.
He then reached out to his LinkedIn audience as well and had 52 people volunteer to review the sales page and fill out the survey. Out of that group, 33 actually filled out the survey, and four ended up preordering the course.
At that point, he opened up the pre-sale to his full list of around 4,000 subscribers and nabbed another 32 preorders, bringing his total presale launch to 45 orders and $11,205 in revenue.
Whether you open up the pre-sale to your full list is up to you. That said, we typically don’t recommend it for two reasons:
- It’s not necessary once you’ve validated your course with a small group of people.
- Many of the people on your list who would buy a pre-sale offer might just buy the full-price course later.
So it’s dependent on how quickly you need the funds and how seriously you take your pricing.
Jacob felt that, for him, getting the motivation early on and collecting extra testimonials was worth leaving some money on the table. And it hasn’t stopped him from having good sales since: In mid-August, he announced that course pricing was rising from $499 to $699 and he raked in a cool $18,000 in revenue.
Want help hitting $10,000+/month? You can book a complimentary strategy session where we’ll audit your business strategy and talk through a 90-day plan to skyrocket revenue.
Step 4: Build the Course Your Audience Wants
In Step 1, you researched the heck out of your topic to make sure you understand exactly what problem your audience is facing. In Step 2, you grew your email list so you’d have existing followers ready and waiting for your product. In Step 3, you leveraged that email list to validate your course by collecting pre-sale moolah.
After all those steps, it’s finally time to start building your first course.
Here’s what you need to do:
- Pick your course style (Reference or Specific Path).
- Storyboard it.
- Write it in Google Docs.
- Pick a platform and finalize the content.
- Use the 80% rule to know when it’s launch time.
You can read what this looked like in full for Bryan’s Get 10,000 Subscribers course in this article, but here’s a summary of steps and learnings.
Step 4a: Pick Your Course Style
There are two types of courses: a reference course and a specific-path course.
In a reference course, students can jump around and do modules in whatever order they want. They might skip content they think is unimportant. Most courses are built this way.
In a specific-path course, students have to complete lessons in order. The later content simply isn’t unlocked until they’ve done each lesson before it. It forces you to do what you set out to do.
They each have pros and cons.
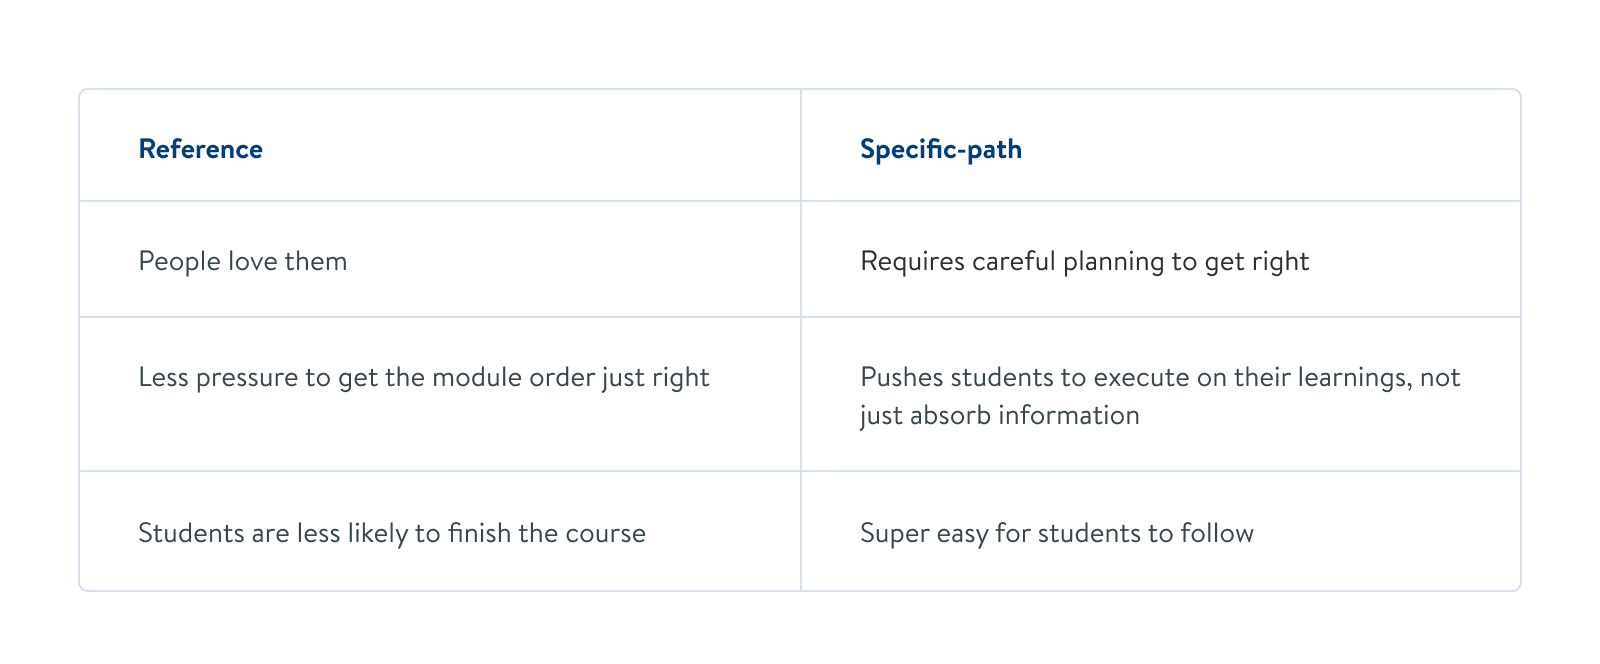
Choose the style that’s right for you and your audience.
Step 4b: Storyboard the Course Workflow
By this step, you already know what you’ll cover in the course. Heck, you should even have it named.
Now it’s time to decide how you’ll approach those learnings.
Write down all your topics. Write down the specific strategies you’ll teach your students. Break it up into groups. It helps to use sticky notes or a Trello board — something that lets you easily move around the pieces until the flow is just right.
Here’s what it looked like when Bryan built his Get 10,000 Subscribers course:
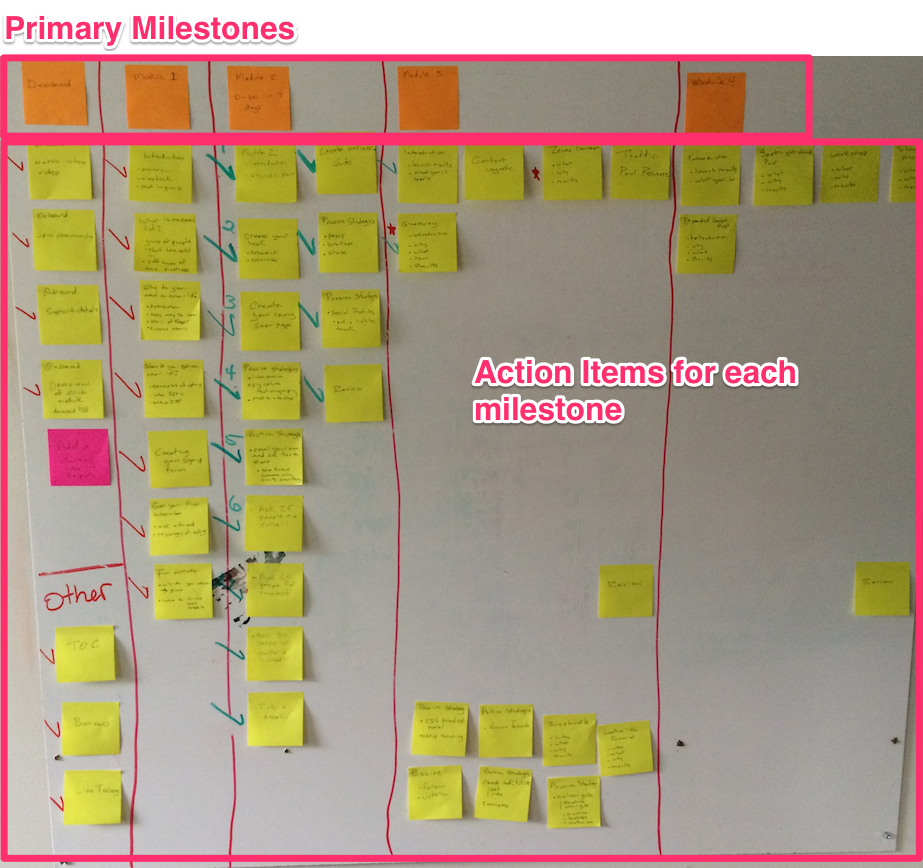
As you work, ask yourself these three questions:
- What is the goal of your course?
- What are the three to four major milestones your students will go through as they work towards that goal?
- What action plan should they follow to work through each milestone?
Step 4c: Create the Course Content
The work you did in Step 4b gave you an outline. Next, it’s time to start writing.
Turn your milestones into modules. Make your action items lessons. And write your buns off.
Here’s some advice for the process:
- Keep each lesson tight. If you try to cover too many ideas or “learning objectives” in one lesson, your students will get confused and distracted.
- Draft everything in Google Docs (or a similar word processing program). Changes are easier to make here than in a course-building platform.
- Build in small wins. Give your students chances to feel accomplished so they can use that momentum and excitement to keep going.
This step will feel like it takes forever. But when you’re ready to quit, remember the pre-sales you made. Think of the people you’re helping. And imagine life when you’re pulling in five- to six-figure launches or thousands in steady, evergreen income.
Step 4d: Get Techy with It
Once your video scripts are finalized, your student worksheets are polished, and the thought of looking it over one more time makes you want to cry:
Take a deep breath.
Get the cameras rolling.
Finish that course.
When you’re done filming and editing (reminder: you can hire people to help you with this), there’s another decision to make: Where will your course live?
Should you put everything on your own website? Or should you use one of the many available platforms to keep things simple?
The answer depends on your skillset and available time. It’s always great to host a course on your own website: that’s just one more thing under your direct control. But if you aren’t already experienced at maintaining your own site, it’s a good idea to pick a platform instead.
By doing so, you’ll save yourself the headache of installing any complex integrations or plugins. And there are plenty of great course marketplaces to choose from, like…
All of these online course platforms have tutorials you can follow to get your course live. A few years down the road, it could make sense to host your course on your own site, WordPress or otherwise. But when you’re a first-time course creator, it’s a lot to manage, even with help.
Step 4e: Use the 80% Rule
Don’t let perfectionism keep you from launching. Use the 80% rule of thumb to call it good enough. It goes like this:
If you can get your course to a place where it’s 80% of the way finished, don’t linger on that final 20%. Ship what you’ve got instead.
Your first try won’t be perfect. It’s better to get it in front of your students (including the early access crowd who pre-paid for the course) and collect feedback. Then, improve your course in between launches.
Want help hitting $10,000+/month? You can book a complimentary strategy session where we’ll audit your business strategy and talk through a 90-day plan to skyrocket revenue.
Step 5: Launch Your Course
There are many exciting launch plans out there, and we’ve written about more than one:
- Bryan’s six-figure Get 10,000 Subscribers launch.
- The “Double-Reverse” Launch.
- Nathan Barry’s Upsell Launch Sequence.
- An affiliate launch plan that 2x’d our income from Get 10k Subs
You get the idea.
You don’t need to try all of them. You just need one, simple, proven process to start selling your course. Once you have this process down, you can add in extra steps (like a seven-day challenge). But your first launch is not the place for that.
KISS: Keep It Simple, Stupid.
These steps are all you need for the launch:
- Line up your special offers (an early bird discount, bonuses, and a down-sell).
- Write your sales page.
- Plan and draft your email sequence.
After that, it’s go time.
But before you go all typing-cat on those emails …
… remember something important: Your course is built. And pre-sale customers get first access. So get them working through your shiny new content while you’re planning the launch.
Step 5a: Line Up Your Special Offers
Launches need a sense of urgency. If you want someone to make a purchase, they need a motive to do it right now and not sometime soon, maybe.
In this step, you’ll decide how to make that happen.
We’ll cover three offers you can make:
- The early-bird discount.
- The exclusive, expiring bonus(es).
- The downsell.
Offer #1: The Early-Bird Discount
For a first-time course launch, the early-bird discount is a foolproof plan (assuming you’ve actually done Steps 1-4).
Some of your students just can’t resist a good deal. So if you run a discount for the first 24 hours of a five-day launch, some of them will buy. Guaranteed.
Don’t make the discount so steep that you wince every time a sale rolls in. But don’t make it so small that no one cares.
For example, if you’re selling a $500 course, offer it for $420. $80 bucks off for pulling the trigger right away? Heck yeah. Those students will go to bed feeling good about themselves and their deal-finding-savvy.
Offer #2: The Exclusive, Expiring Bonus(es)
A good bonus helps your customers overcome their objections or roadblocks and implement what they learn in your course more quickly.
Here are some examples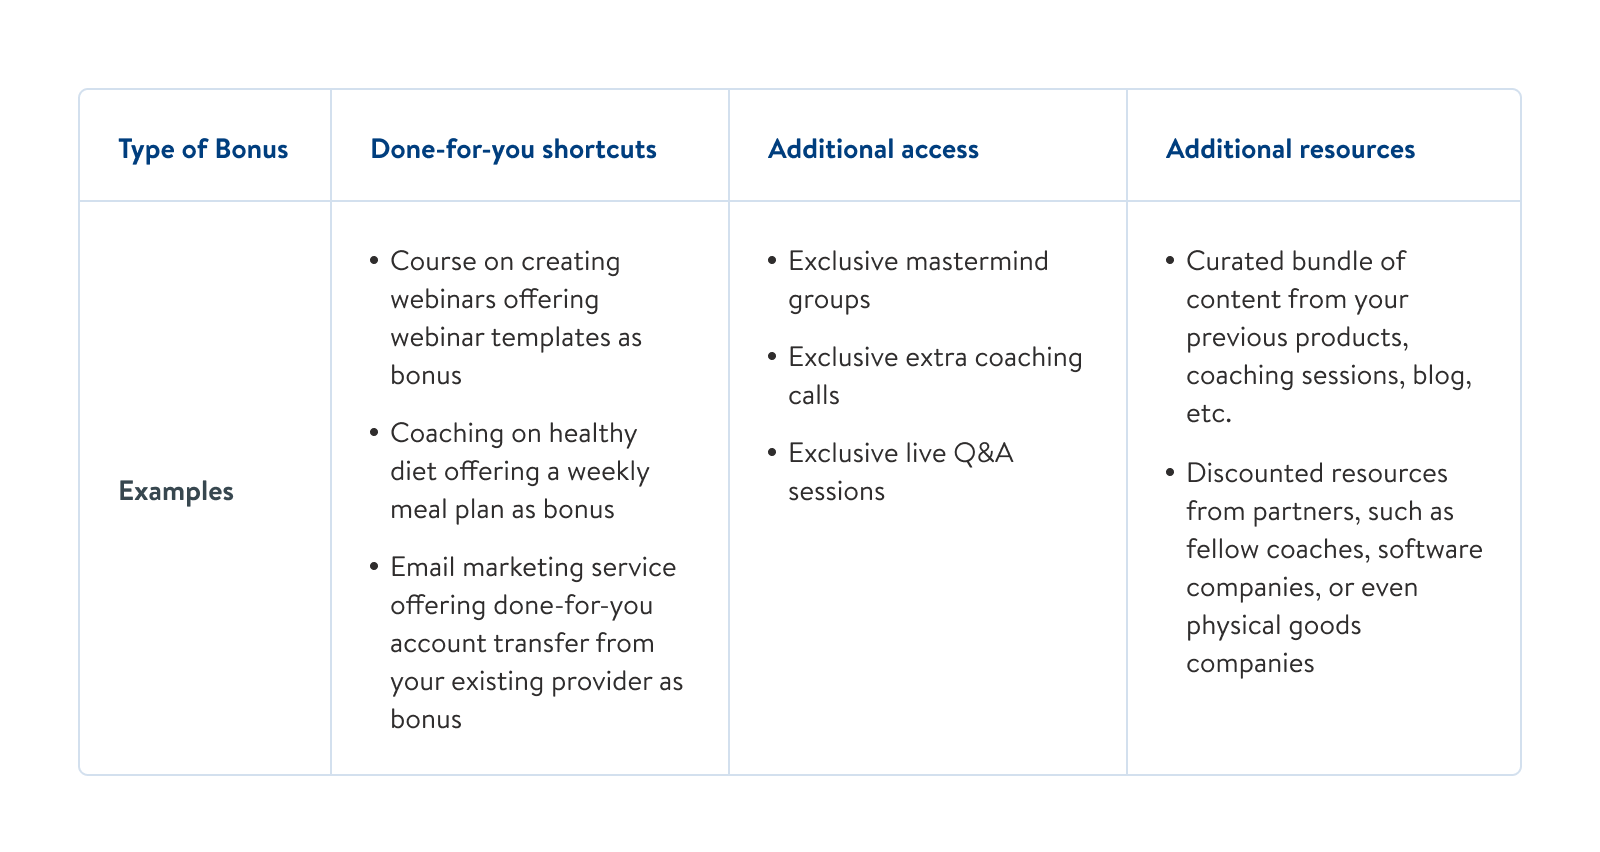
Brainstorm a list of ten, then pick and make your two favorites.
You’ll offer them partway through the week, but before the launch formally ends. Do not offer these bonuses anywhere else. They need to be unique so that your customers are motivated to get them while the getting’s good.
Offer #3: The Down-Sell
No matter how amazing your course is and how convincing copy is, you will not have a 100% conversion rate. In fact, the majority of your subscribers will not make a purchase during your launch.
The down-sell is designed to capture some of them.
What’s something small you could pitch to them? Can you make one of your course modules a stand-alone offering at a more affordable price? Do you have extra resources on the same topic that you could sell for a fraction of the course cost?
Pick one to sell to all the people who didn’t buy your course. You’ll pull in additional revenue and all the work you did to get your subscribers excited will roll over neatly into your final sales call.
Note: The down-sell is optional. It’s great if you can set it up. But if you’re feeling overwhelmed, stick to the 24-hour discount and the bonuses.
Step 5b: Write Your Sales Page
Here’s the good news: You don’t have to write this page from scratch. Remember the product description you made while pre-selling? Yeah. Copy and paste that sucker.
Here’s the bad news: Your sales page isn’t quite finished yet. Sorry.
You need to make some adjustments for the launch, such as:
- Adding a section about your limited-time bonuses.
- Adding a refund policy/guarantee.
- Adding testimonials or social proof.
It’s also a good idea to pretty things up with some photos and videos to break up the text. Maybe a little graphic design. It’s good to make your customers feel like you’re a professional, even if you feel like you’re totally winging it.
Remember that focus group? If you’ve been taking good care of them, they should be more than happy to talk about how your course helped them. You can use their faces and words to sway more customers to buy.
So what should it look like when it all comes together? Here’s an example of the Get 10k Subs sales page. You know, the one that brought in over $220k on its first launch.
This stuff works, folks.
Step 5c: Plan and Write Your Launch Email Sequence
Each email in this list follows a tried-and-true formula.
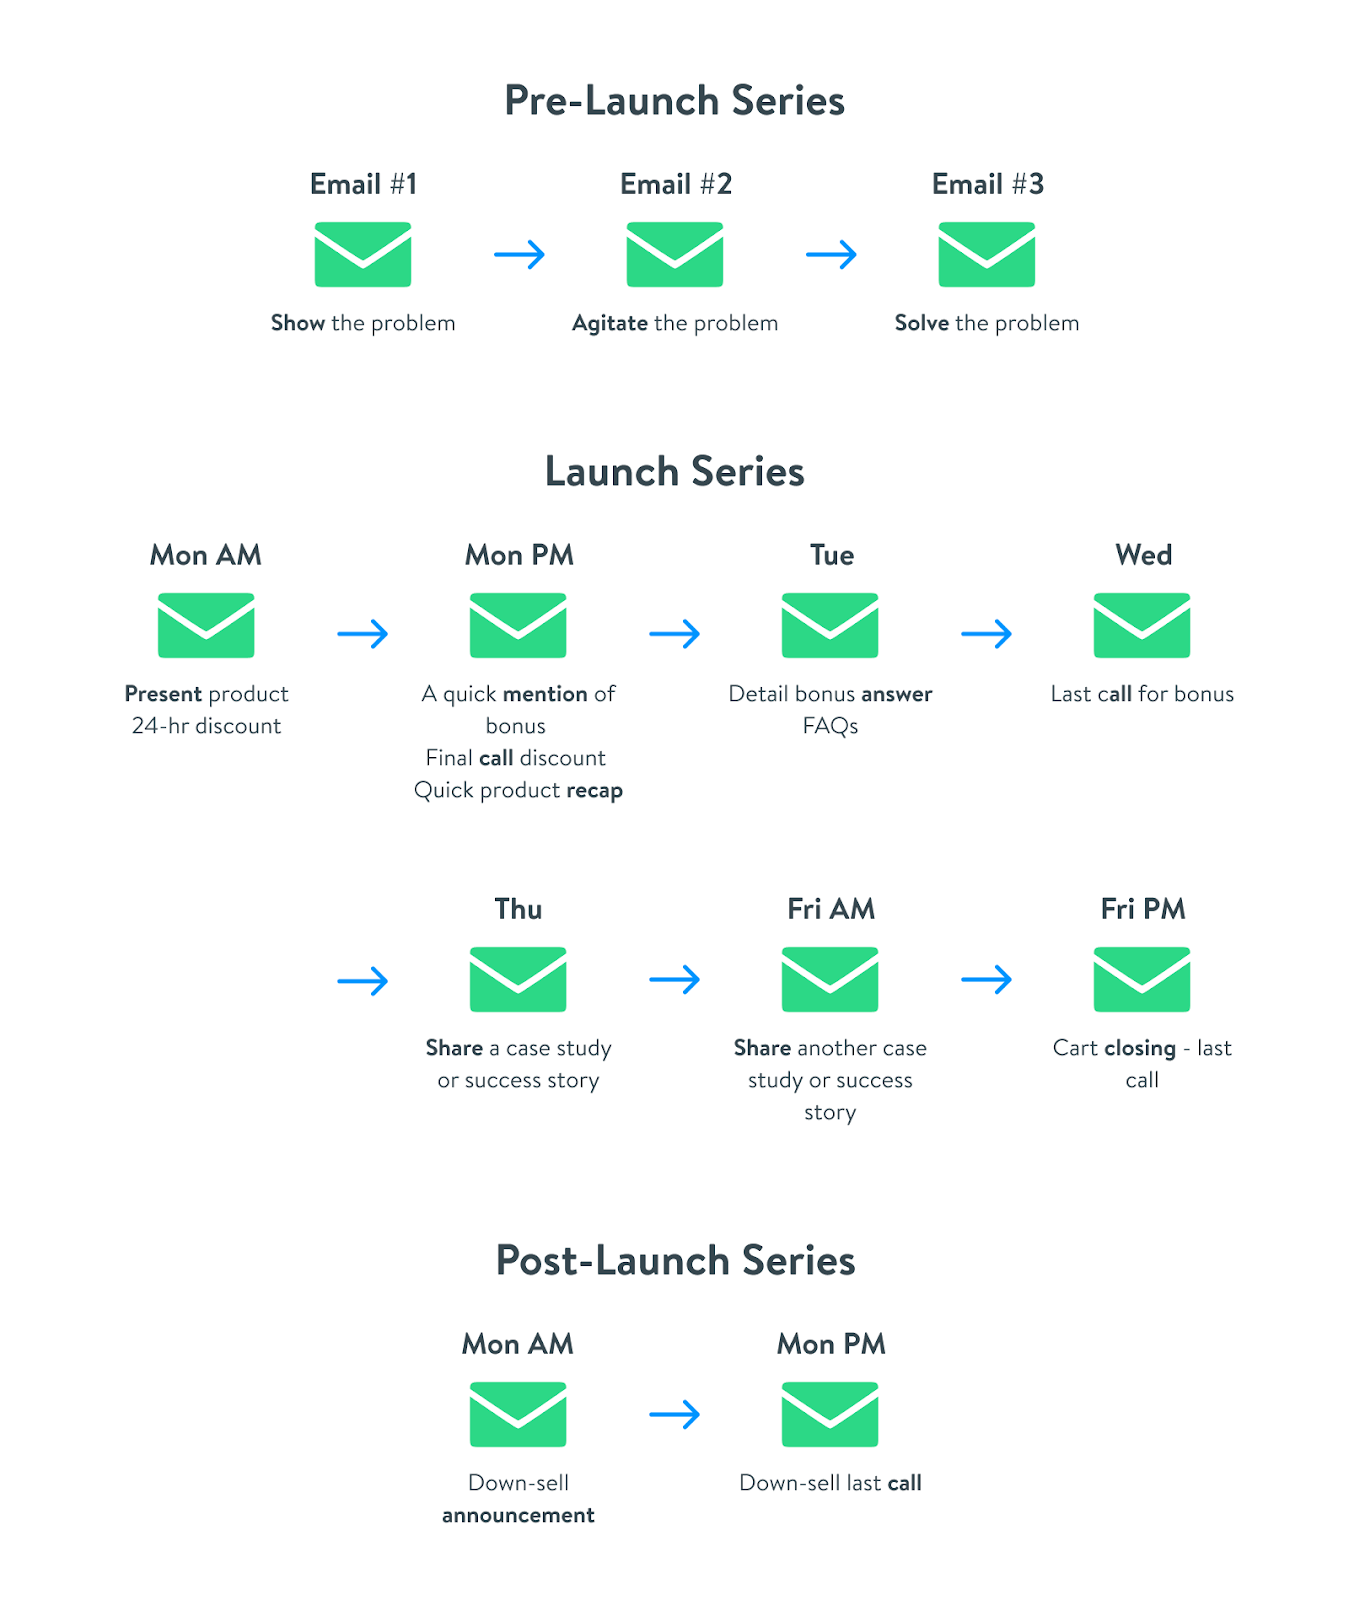
You’ll start with a 3-day warm-up sequence that follows the PAS formula: Problem, Agitate, Solve.
Then, you’ll sequence the launch emails, working in your early-bird discount and your bonuses. Finally, after the launch ends, you’ll target the people who didn’t buy with a down-sell.
Hold Up. How Do I Use ‘Problem, Agitate, Solve’?
Bryan likes to use the example of a marriage counselor to illustrate why PAS is so awesome:
Let’s apply the PAS framework to marriage counseling.
Most any (honest) married couple knows that if they went to marriage counseling on a regular basis, their marriage would improve.
But how many actually do it?
NO ONE!
Why not?
It’s not because they don’t believe in it. It’s because no one wakes up in the morning thinking, “Man I really want to go talk to a marriage counselor today.”
How many of us, though, wish we had a better marriage? Better communication with our partner? On the same page about money? Sex? Kids?
EVERYONE I KNOW.
So, if you were a marriage counselor, the last thing on the planet you want to sell is “marriage counseling.”
What you want to sell is a solution to your clients’ problems.
You want to sell NOT fighting with your spouse, NOT arguing about money, NOT being frustrated about sex.
You can use the PAS framework to do exactly that.
So here’s how that works:
Email #1 introduces the problem your audience suffers from.
Email #2 agitates that problem — really rubs in their face how annoying it is and how much they’re losing because of it.
Email #3 presents the solution to that problem. Or more specifically, your solution.
Here are a few examples: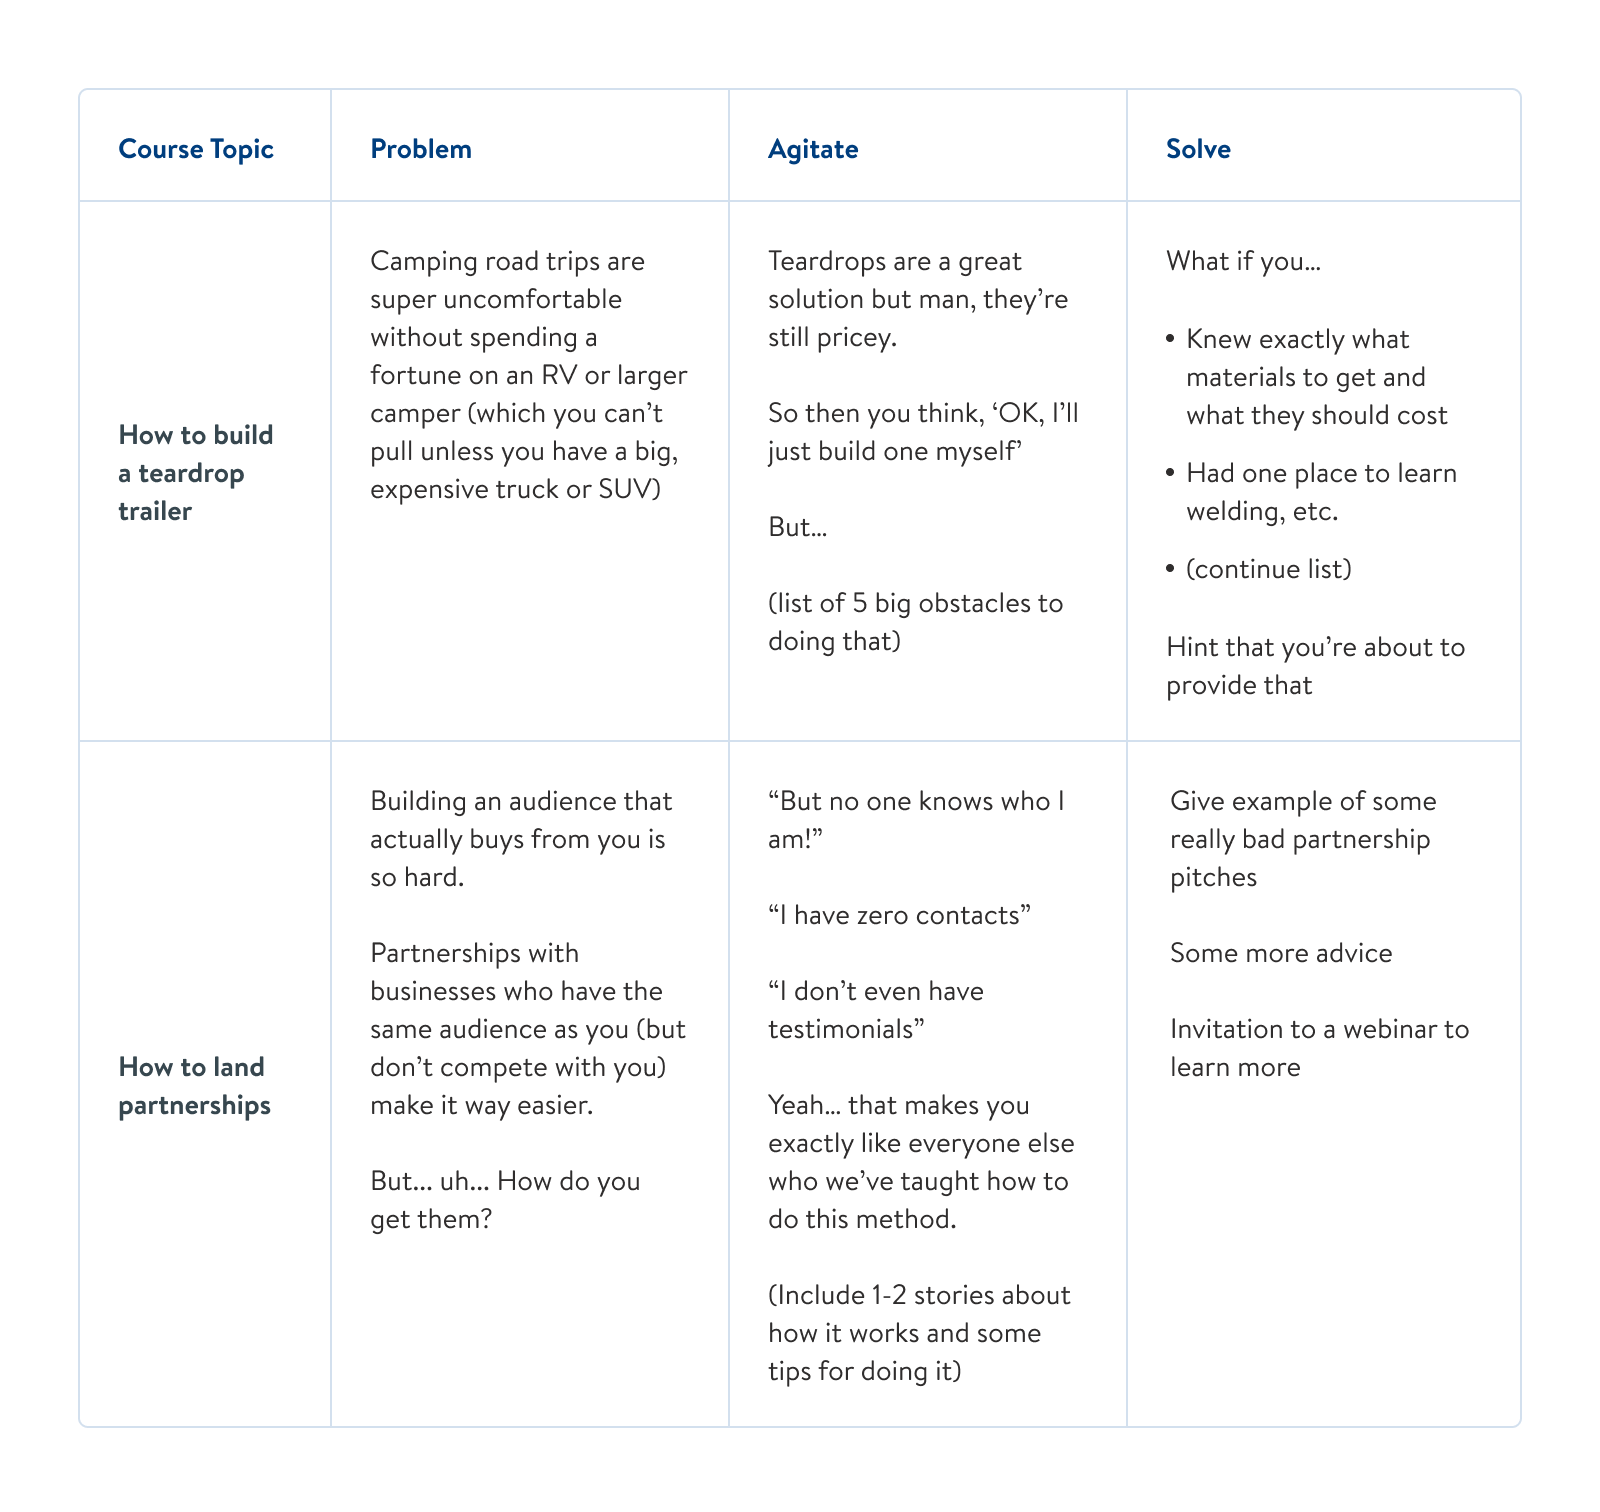
Now for the launch emails. Your actual launch sequence should look like this:
Once you have those drafted, you’re ready to go.
It completes a very simple sales funnel: leads → email list → launch → customer.
These Folks Used This Plan and Killed It
I get it. This post is a lot to take in. But that’s because it’s meant to guide you through the entire course creation process through your first launch. That’s a ton of work. But it can be life changing.
Just ask some of the folks in Growth University. Like Cindy Anderson, who got 100 students in her launch in May. Or Brandice Lardner, who made $4,000 on her course launch in July.
I could go on.
The point is, if they can do it? You can too.
Want help hitting $10,000+/month? You can book a complimentary strategy session where we’ll audit your business strategy and talk through a 90-day plan to skyrocket revenue.