People who successfully build an email list go one of two routes:
Route #1: Publish content that people love, promote it like crazy and hustle their face off for 2 or 3 years.
Route #2: They started a blog 15 years ago when there was almost no competition, and now they just bask in the glow of their millions of visitors every month and go on podcasts telling you how easy it is.
Both of these routes suck.
Then 6 months ago, I heard of a guy who grew his list by 25,000 subscribers in 10 days. When I heard those numbers I immediately reached out to learn more about what he had done. I’ve been studying list building and actively growing my email list for 3 years, and I had never come across a strategy that produced those kinds of results.
Here is what I learned after talking with him…
Takeaway #1: It took about 3 months to set up and run this strategy.
Takeaway #2: The overall strategy is extremely effective and repeatable.
Takeaway #3: This can be used by both early-stage companies and solopreneuers and big, thriving businesses.
So, what did the guy do?
He hosted a Virtual Summit.
Results? That one summit produced 25,000 new email subscribers and generated $350,000 in sales.
This is how a summit works:
1. You pick a topic for the summit.
2. You invite a handful of people to speak at the summit.
3. You interview each speaker ahead of time.
4. You ask each speaker to promote the event.
5. 20-40% of the speakers agree to promote it.
6. You release the interviews with each speaker over a 10-day period.
7. Each speaker sends new subscribers and customers to your list when they promote it.
8. You split the revenue 50/50 with the speakers.
This is the same framework that Chandler Bolt (the guy I mentioned above) used when he first started his business. This is how he grew his email list by 25,000 subscribers and generated $350,000 in sales.
Chandler teaches authors how to publish and market their books.
I’ve teamed up with Chandler in this article to show you show to do the same thing.
*Note* Maybe you aren’t interested in hosting a Summit, but want to book some speaking gigs for yourself.
Meet Agent: Agent allows you to find your next speaking gig in 30 seconds and includes 1,000+ events, email scripts and contact information.
Special Fun Thing #1: Virtual Summit Cheat Sheet (PDF) : This is a great 2-page action plan to help you get started with your first summit.
The 5 Major Phases of a Successful Virtual Summit
Launching a summit is a big project, so you better to be prepared to put in the time and sweat to make this work.
This is not a passive income strategy.
This is not a passive list-growth strategy.
This is a “work your butt off so you can get your business to the next level” strategy.
This Virtual Summit campaign can be broken into 5 major phases.
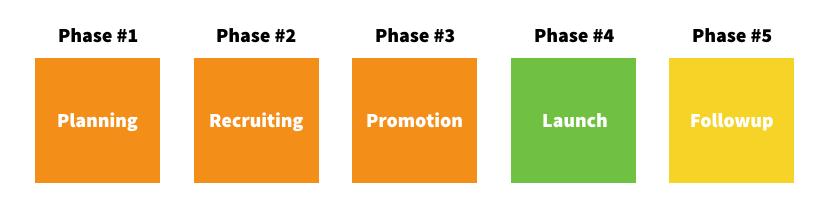
Here is the breakdown of each major phase:
Phase #1: Planning – This is where you’ll do your initial planning of and outlining for the entire campaign.
Phase #2: Recruiting – This is where you’ll recruit your speakers and partners to promote the event.
Phase #3: Promotion – This is where you’ll start the pre-event promotion and prep your partners to promote.
Phase #4: Launch – This is where you’ll actually kick your summit off.
Phase #5: Follow-Up – This is where you’ll close out the promotion and make your final offers.
Each phase takes approximately 30 days to complete.
That means it will take you 90 days to prep your summit, 30 days to host the actual summit and another 30 days of follow-up to close the promotion out.
As we go through this article, we’ll break down each phase independently and show you the major items you need to focus on during each phase.
SIdenote: Quick shoutout to Navid Moazzez for refining and improving the Summit process over the last few years. He was a big help to Chandler and to many other running Summits in recent months.
Phase #1: Planning your summit
There are 3 major things to focus on in Phase #1 of hosting your virtual summit.
Step #1: Choosing the topic for your summit
Step #2: Picking your speakers
Step #3: Setting up your partner program
Here is a basic outline of what your first 30 days will look like:
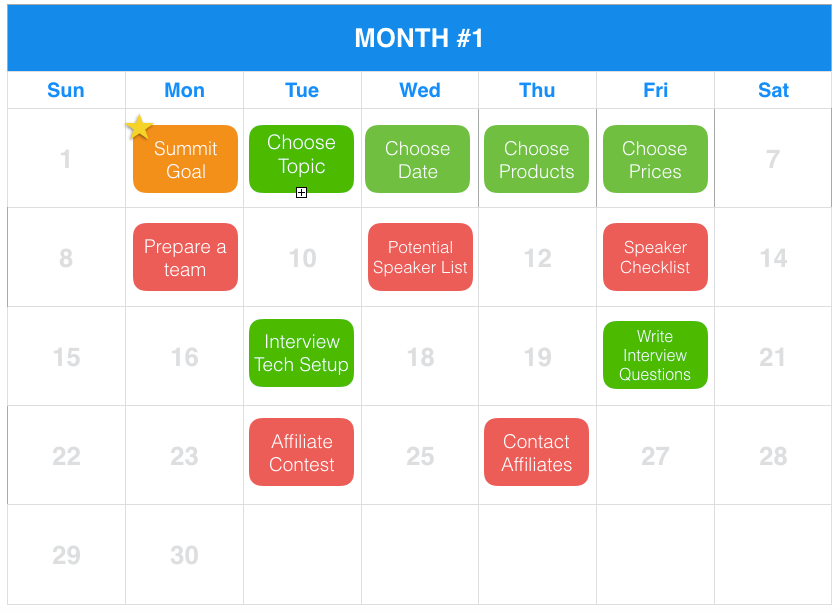
Step #1: Plan your summit topic.
Action Item #1: Set your goals.
Before you start planning your virtual summit, you need to decide what your overall goal is for the summit.
You need to have ONE wildly important goal that you wish to accomplish through this summit. You may have other benefits as well, but what will your ONE goal be?
• Is it to increase the number of email subscribers you have?
• Is it to make a certain amount of money?
• Is it to launch your new product?
• Is it to form relationships with key leaders?
Pick ONE goal for your summit.
Action Item #2: Choose your topic.
Your topic should be directly or tangentially related to the primary topic of your business or product you are going to promote. You want your summit to attract your ideal customers, right? So your task is to find out what they would be interested in learning about.
Here are a few questions you can answer in order to choose your topic:
- What are your current subscribers/ followers interested in?
- What are your most popular blog posts?
- What do your subscribers want to learn more about?
- What are the top blog posts by the influencers in your niche?
- What is the ONE piece of knowledge you want your summit attendees to walk away with?
As you start planning your virtual summit theme, keep in mind the types of topics that would be covered by the summit’s speakers.
It’s best to keep your summit’s topic relatively broad, so your speakers can deep dive into specific niches within that topic.
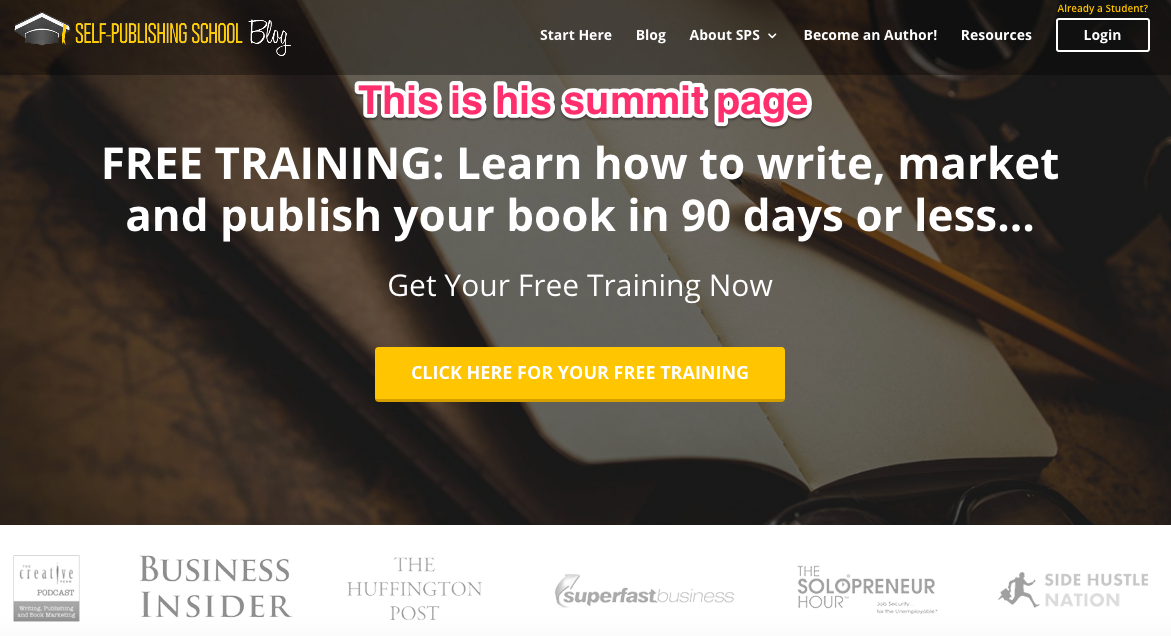
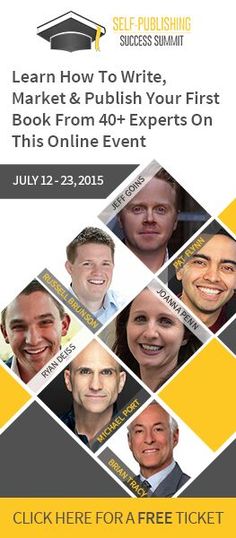
Chandler chose to make his summit focused on his business’s primary theme: writing, marketing, and publishing.
Here are a few screenshots to prime you to pick your topic…
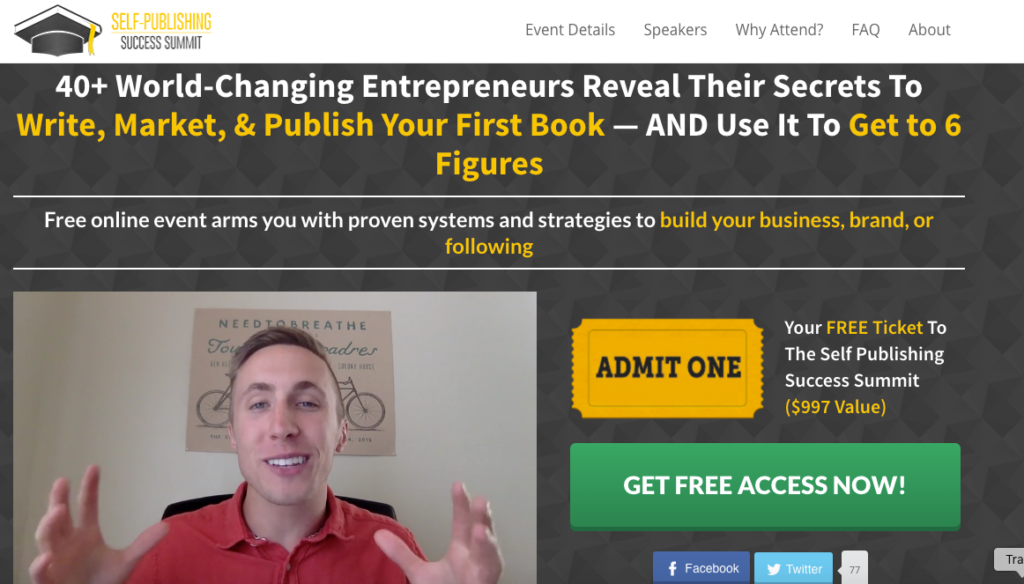
Chandler Bolt’s Self Published Success Summit
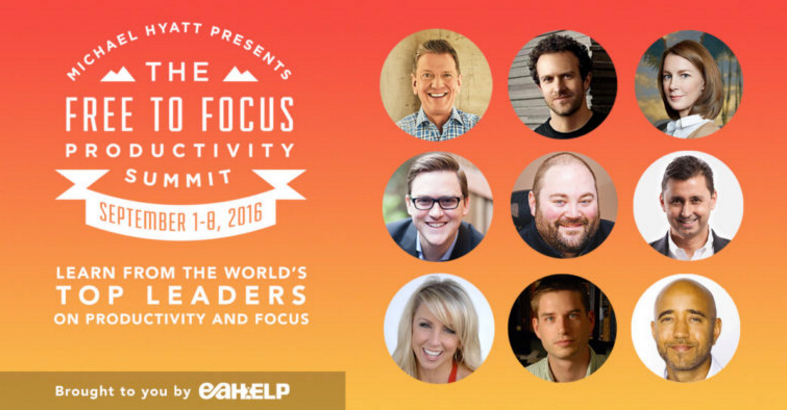
Michael Hyatt’s Free to Focus Productivity Summit
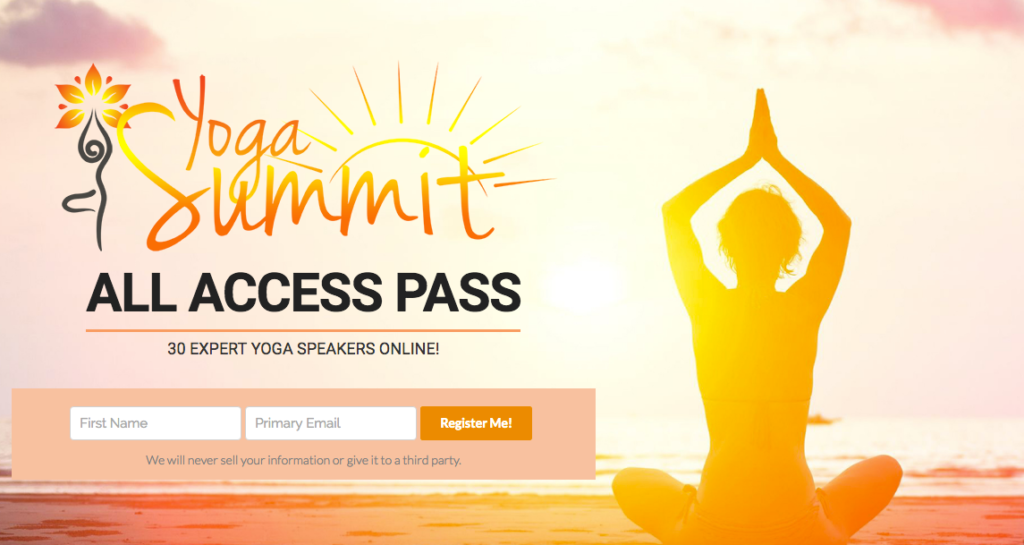
Kate Rieger’s Yoga Summit
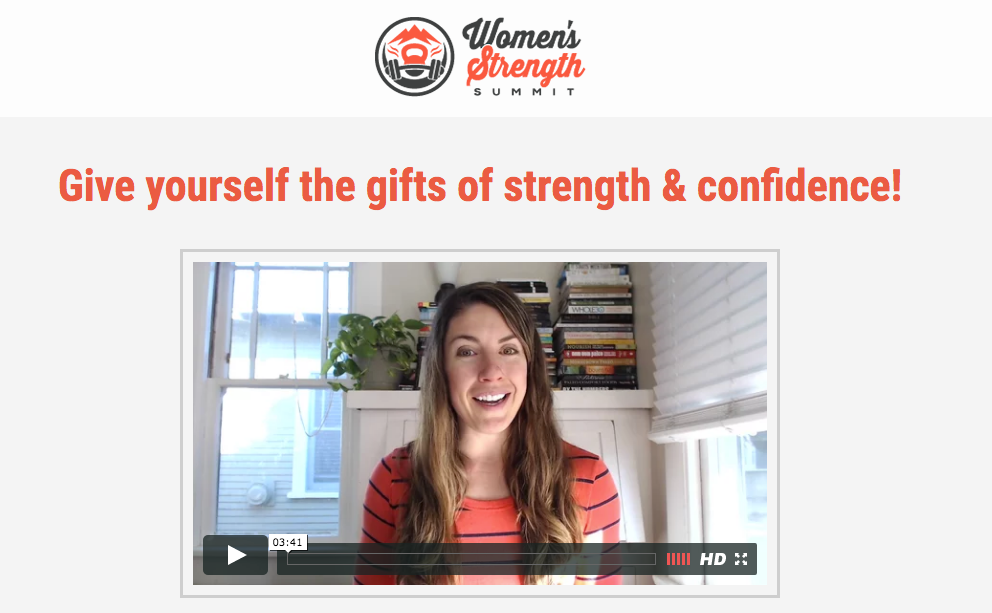
Steph Gaudreau’s Woments Strength Summit
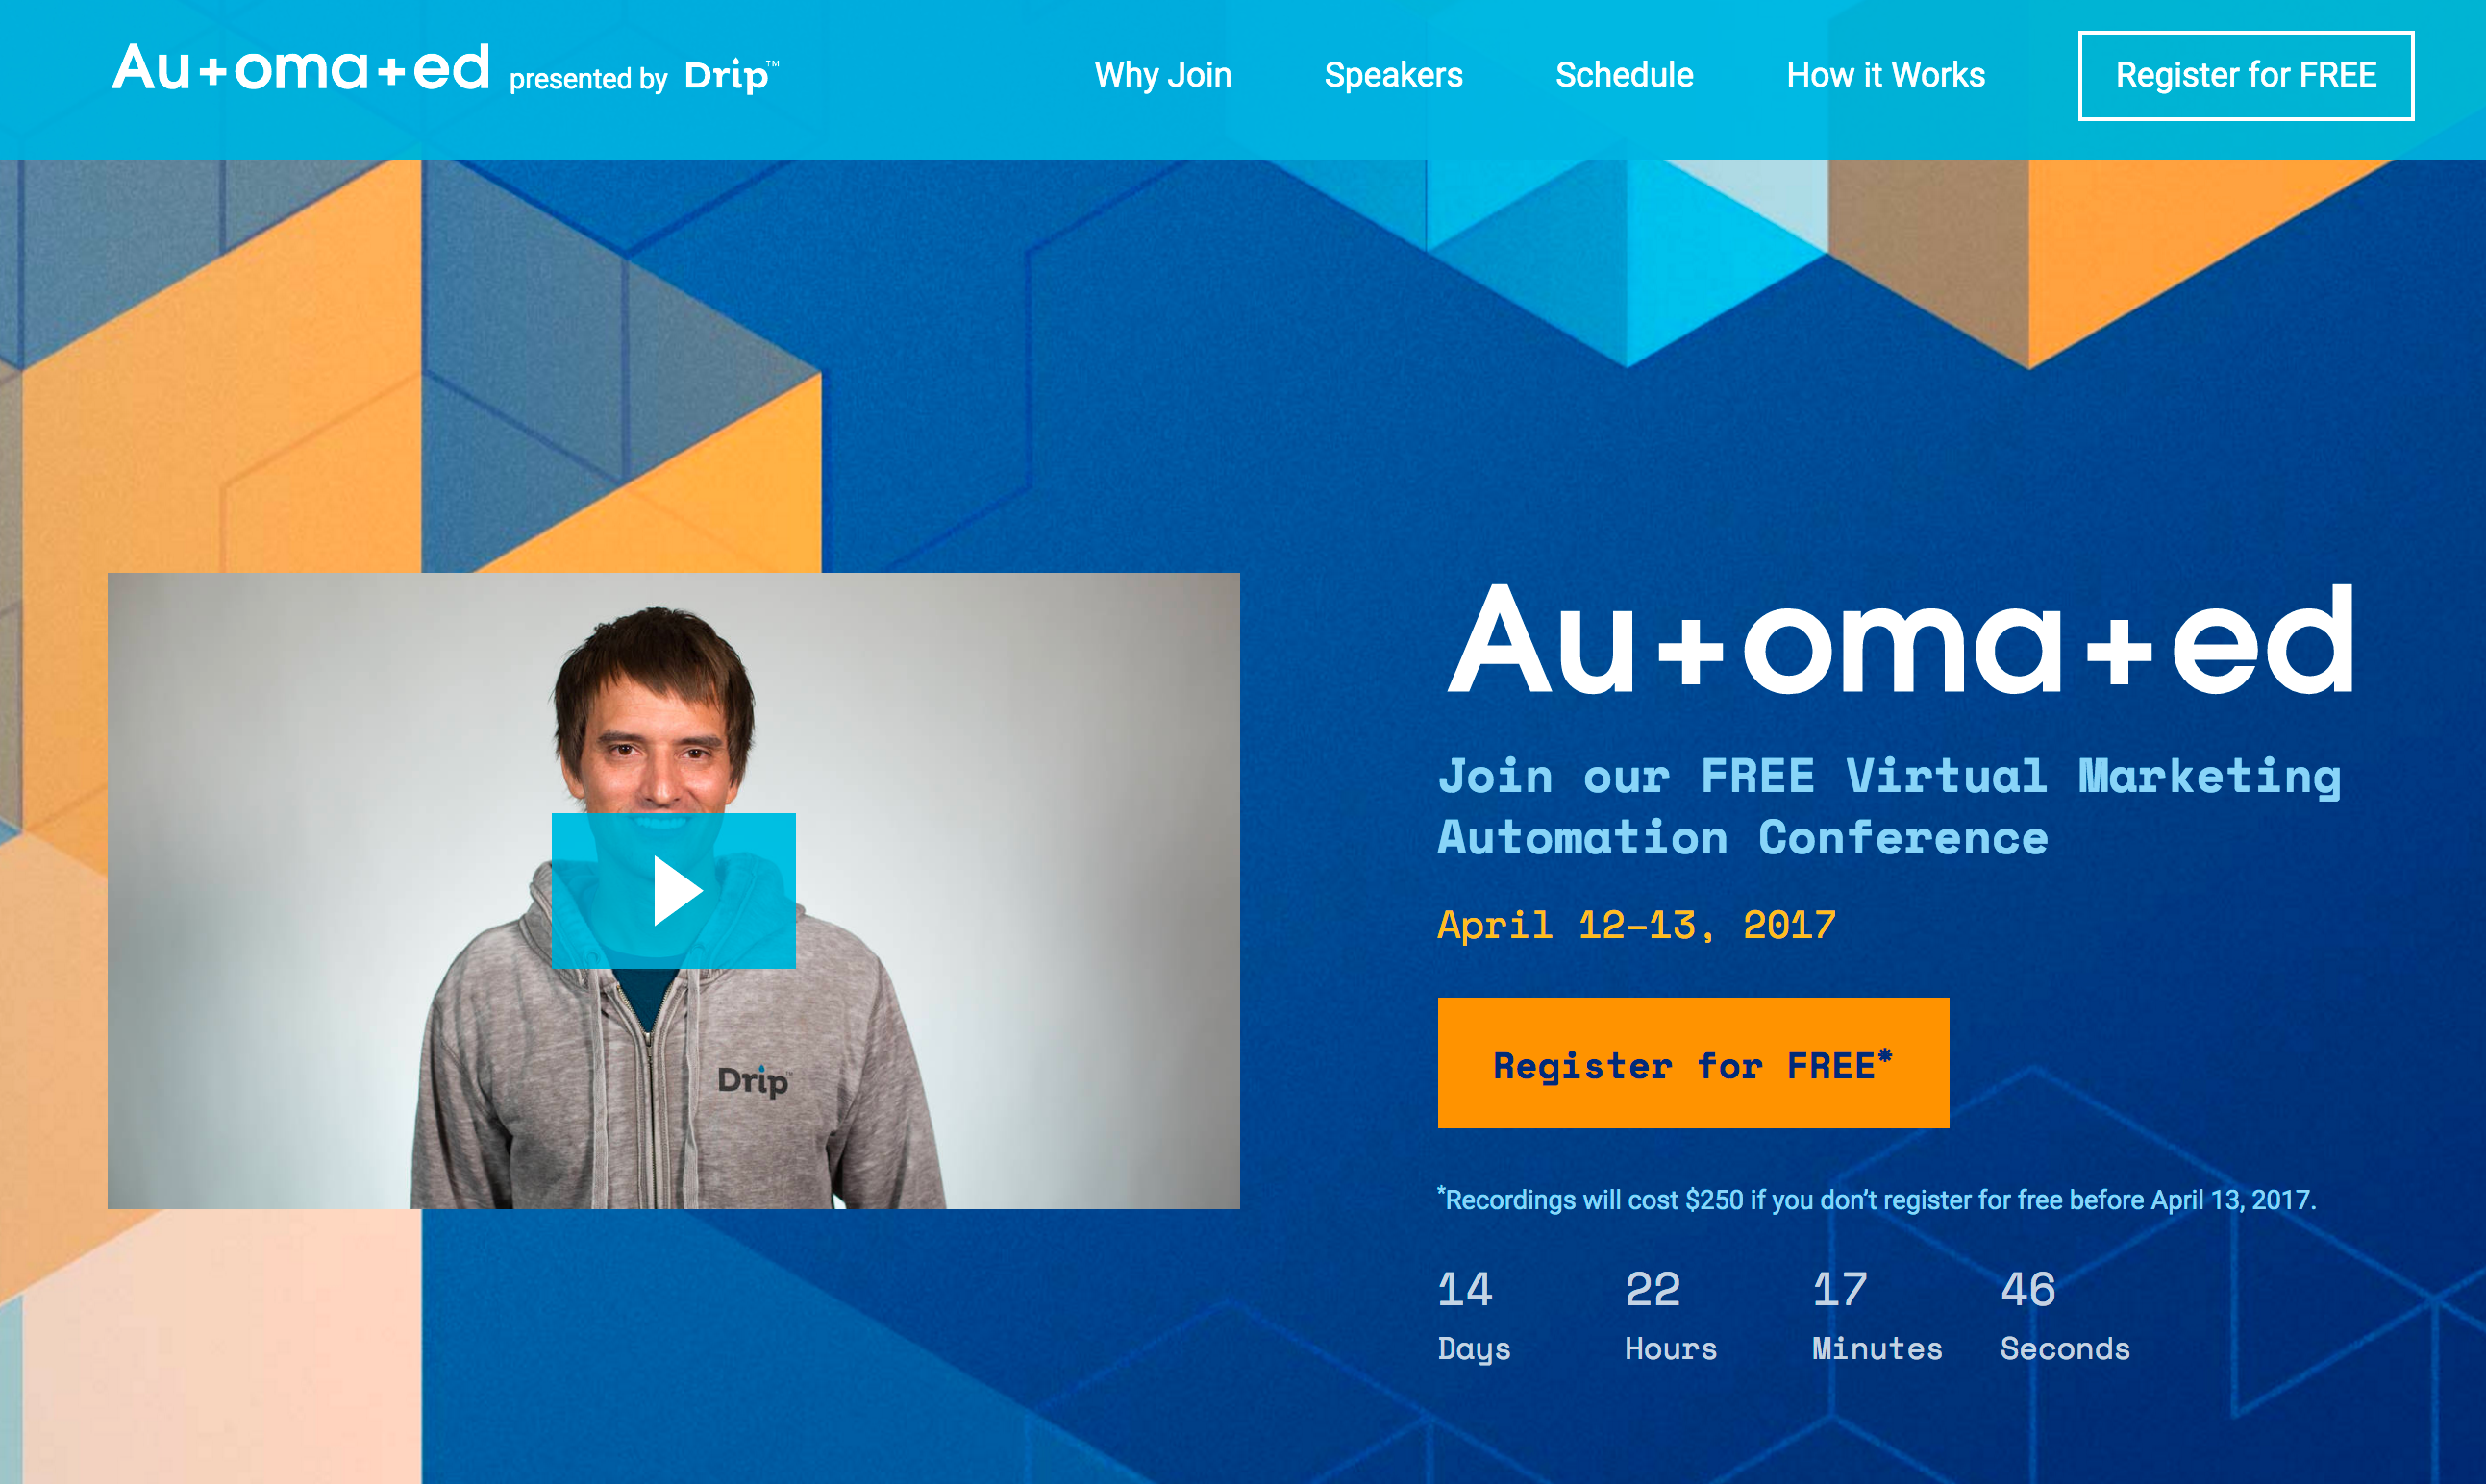
Drip’s Automated Summit
Action Item #3: Decide on your summit’s date.
Once you’ve decided on your summit’s theme, you’ll need to choose the date that you’ll host your summit.
A summit usually lasts for 10 days total. A good rule of thumb is to start your summit on a Monday and end it on the following Wednesday.

Choose a date 4 months out that works for your marketing calendar (i.e., make sure you don’t have any other major product launches or projects happening during those three months) to launch your virtual summit.
Action Item #4: Select the product you’ll sell on the summit.
Chandler monetized his summit by offering an all-access pass to his summit and pitching his course (Self-Publishing School) at the summit’s end.
If you already have a product, you can follow suit, and during the closing presentation and follow-up phase, ask people to buy your primary product.
However, if you don’t have an existing product, you can focus on selling the interviews from the summit itself as the primary product.
Typically during the summit, each day’s interviews are only available for 24 to 48 hours. After that time period, guests would have to purchase the all-access pass to get access.
That all-access pass will be the product you sell.

Step #2: Choose and prepare for your speakers.
Action Item #1: Make a list of potential speakers.
There is still work to be done during Phase One.
You’ve chosen your summit’s topic and products.
Now, you are going to make a list of speakers that you would like to speak at it!
Wondering who would be a good fit to speak at your summit?
Here are some ideas on finding relevant speakers:
- Ask yourself, what would your ideal customer like to hear about? Book speakers for those topics.
- People in a similar niche, without the exact same pitch as you
- People who you already have been following / commenting on their blog / responding to their newsletters
- People with whom you have a personal relationship
- People who are in “your network”
- People whose products or services you want to support
- Once you start booking your speakers, you can also ask if they know someone (in their network) who would be interested in this opportunity
Make a spreadsheet of all the speakers you would like to have for your summit.
This spreadsheet will also keep track of who you have reached out to, who has scheduled their interview, who has submitted their speaker checklist items, and which interviews have been completed.
We’ve created a template for you to use. Click here to access it.

You are going to make a list of 100 people to ask.
I know: It seems like a lot. Do it anyway.
Your goal is to get 30 people to commit to speaking. If you start with a list of 100, that should be easily doable.
Action Item #2: Create a speaker checklist.
You’ll need a few items from the speakers who agree to be interviewed for your summit.
You can organize this by creating a “speaker checklist” to send to each speaker, to let them know what they will need to have for their interview and what items they will need to send to you.
Here’s an example checklist to give your speakers:
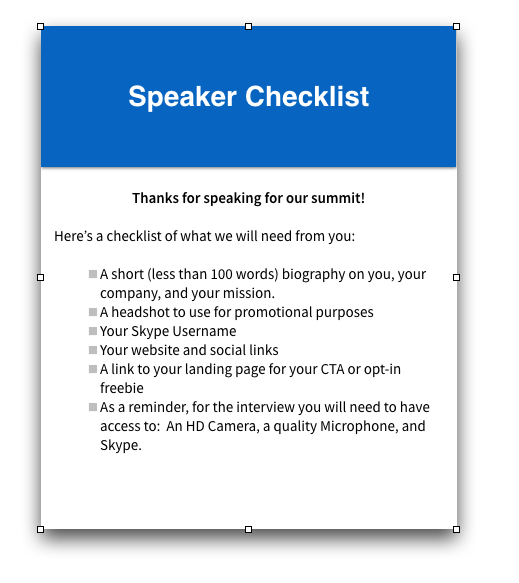
I also recommend sending out the exact questions that you will be asking the speaker during your interview together.
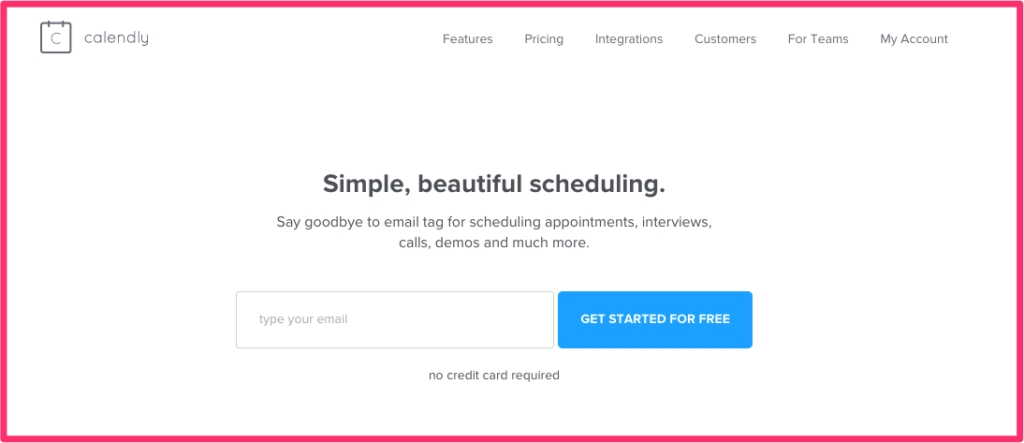
Action Item #3: Set up a calendar on which speakers can book their interview times.
Next you’ll need to set up a basic booking system, so when speakers start committing to your summit, you can easily schedule their interviews.
I recommend Calendly for this.
Calendly is free to join and you can block off the times that you are available and unavailable to host the speaker interviews.
Action Item #4: Set up a platform to record the interview calls.
I recommend using Zoom to conduct your interviews
It’s free, stable and easy to use.
Go grab your free account and play around with it. Jump on a quick chat with a friend and learn the basics.
Action Item #5: Write your general interview questions.
While you will come up with specific questions for each individual, it’s good to decide on a pre-set of interview questions that you will include in your request for the speaker. This way, the potential speaker can know the type of information you will be asking them for during their call.
Here are 8 questions you can use as a starting point:
1. Tell me a little bit about how you got started in your business
.
2. What is the number one struggle you see for people trying to (insert your topic)
?
3. What is the best secret for those wanting to (insert your topic)
?
4. How did this method work for you personally?
5. Give me some examples of people that you have seen this method work for
.
6. What can people expect when trying out this method?
7. What other tips do you have for people trying out this method?
8. How can people learn more about this method? (intro to their CTA)
Step #3 Set up your affiliate program and contest (optional).
Setting up an affiliate contest for your virtual summit is a tactic I hadn’t seen used before, and one to which Chandler attributes a large part of his first summit’s success.
If you are unsure what an affiliate program or contest is, go read this article.
Let’s break apart what an affiliate contest for a summit looks like and how you can create one for yourself.
What is an affiliate contest?
An affiliate is basically someone who promotes on your behalf, usually for some kind of monetary benefit. In Chandler’s case, he reached out to individuals with lists larger than his own to send leads to his summit. He enticed the affiliates with a contest with big prizes in agreement for their promotion.
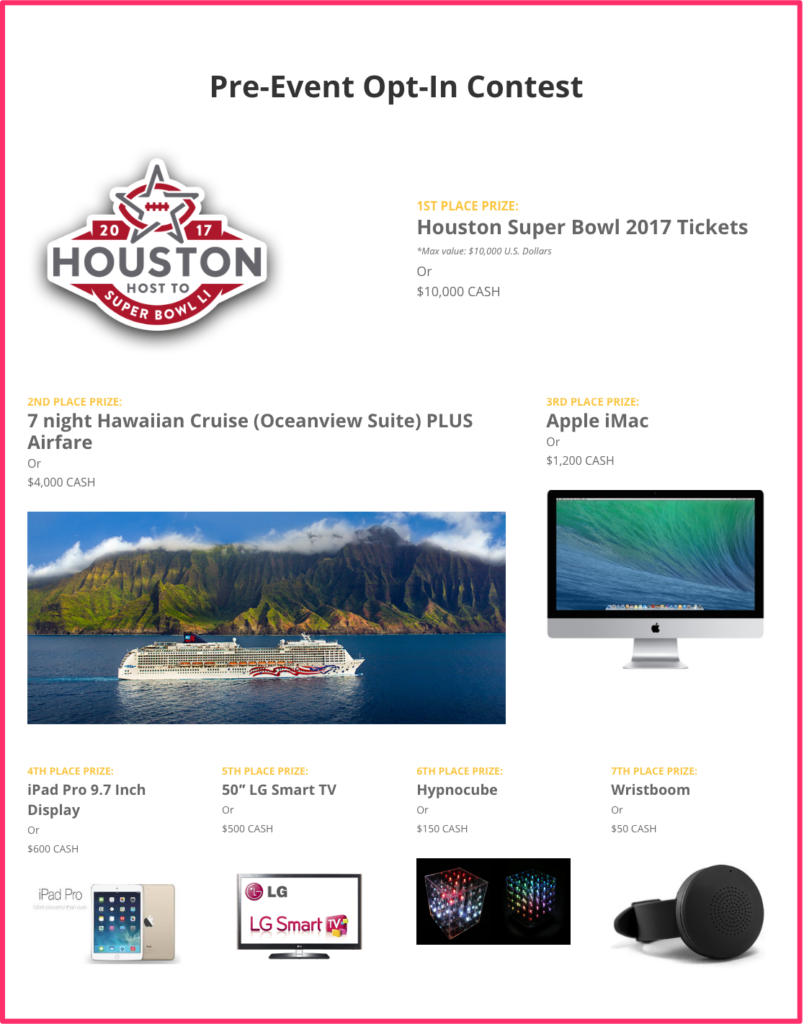
Action Item #1: Decide on your prizes.
Your budget will obviously determine your prizes. If you do the work ahead of time, you may even be able to find sponsors for your prizes. Here are a few of the prizes and incentives Chandler offered to his affiliates:
Action Item #2: Create the terms for your affiliate program and design a landing page.
You want the terms of your affiliate program to be fair for every participant. That’s why Chandler chose the structure of prizes and affiliate incentives that he did.
The best way for you to see what can be offered in an affiliate contest is to check out his landing page. It has all the details of the program spelled out.
Click here to view the full affiliate page with all the contest and incentive details.
Action Item #3: Write email copy / communication schedule for affiliates.
You’ll want to pre-write the emails that you will ask your affiliates to send out. It’s easiest to include these all in a Google document and send them out to affiliates to use as templates.
Since your affiliates are going to have three months to promote your summit, we recommend providing at least 10 emails that they can send out to their audiences about your summit launch.
As you create custom social media images, banners, and other promotional tools for your summit, you can send these along to your affiliates as well.
Action Item #4: Reach out to potential affiliates.
It’s time to reach out to your potential affiliates!
Who makes a good affiliate?
Anyone with a list size similar to or bigger than your own!
Think about who will actually mail the information out to a significant part of their list and who will send high-quality leads your way that will convert into paying customers.
Many of your affiliates may also end up being your speakers, and that’s ok. You can reach out to them at the same time about becoming a speaker and becoming an affiliate for the summit.
Action Item #5: Organize your contest.
Lastly, you’ll want to make sure that your affiliate contest is set up through an affiliate management tool.
Chandler used Infusionsoft. (You can use SamCart). The process included creating the contact in Infusionsoft, signing them up as an affiliate and sending them their unique affiliate link (all created by Infusionsoft). Once an affiliate signs up, you will send them their unique log-in information to the portal to track their affiliate sales.
A few last tips if you choose to run an affiliate contest for your summit:
• Have a leaderboard update that goes out daily to all affiliates so they can see how they are ranking against other affiliates.
• Personally reach out to all top affiliate performers.
• Take care of your affiliates. If one emails you, make sure you respond within 24 hours.
• Hire a qualified affiliate manager oversee this project, as there is a lot of work that goes into it.
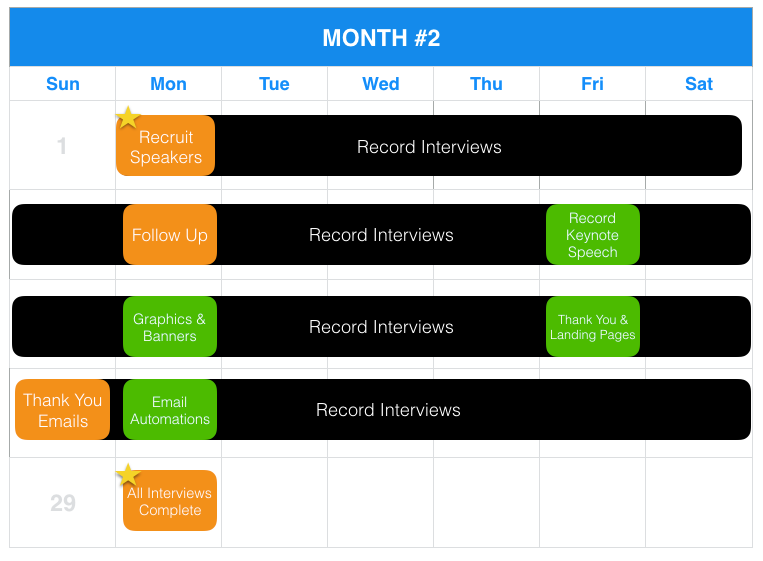
Phase #2: Recruiting and Creating Assets
There are 3 major things to focus on in Phase #2 of hosting your virtual summit.
Step #1: Recruit your speakers.
Step #2: Interview your speakers.
Step #3: Create assets for the summit.
Here is a basic outline of what this phase will look like:
Step #1 Recruit your speakers.
Action Item #1: Start recruiting speakers.
Stuff is about to get real.
Now it’s time to recruit your speakers. That means you’re going to personally reach out to every person on your Speaker Spreadsheet and individually invite them to join in on your summit.
Make these conversations as personal as possible. If you are able to jump on a Skype or phone call with the person, do that. You also want to make sure to cover certain topics during your chat. Here’s a list of what you should cover:
• Add a personal note or greeting. (Make these as personal as possible!)
• What the summit will be about
• What the summit’s dates will be
• What you would like for them to speak on
• Why you want THEM to be the person to speak on this topic
• How the interview process will work
• Give them a few dates / times that you would like to interview them.
• “Please respond to this email and let us know if you would like to participate.”
• “Here’s where you can schedule your call:” (Give them a link.
)
Here’s an example email for you:
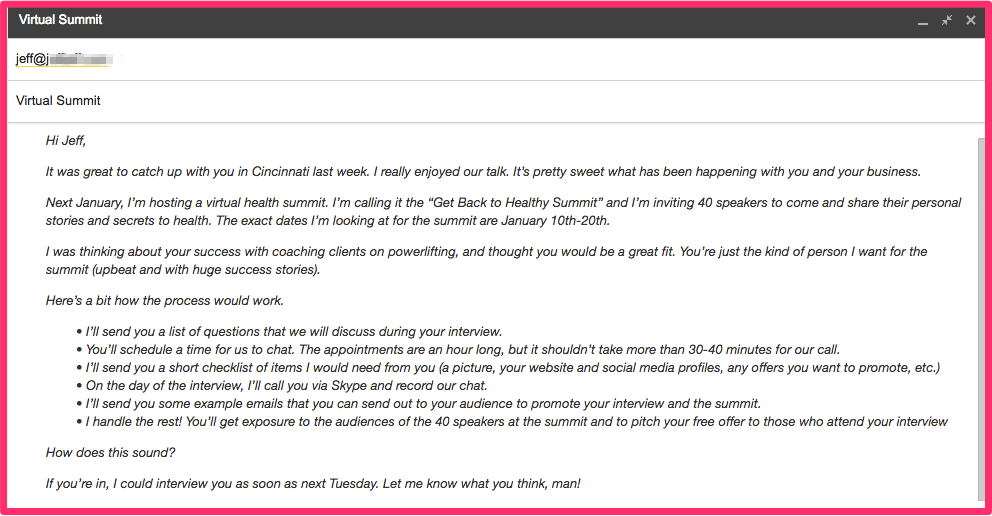
This is just a basic script. I definitely recommend NOT copying it word for word. Use it as a guide to craft your email.
Action Item #2: Follow up with each non-answer.
Make sure you keep track of the speakers that you reach out to and their responses. Use the Speaker Spreadsheet we’ve created to help you do this.
Your main goal during this month is to conduct all of your speaker interviews. That means you’ll need to follow up with those speakers who don’t respond to your initial outreach. Try reaching out every 5 business days until you get a response.
Make sure you are keeping track of all the interviews that get scheduled and that you have them in your own calendar as well.
If they say no to an interview:
Like I mentioned earlier, you will likely have to reach out to 100+ people if you want to get 30+ speakers for your event. That means you’ll be getting a lot of “Nos.”
Even if a potential speaker says “no,” they may be willing to promote your summit or become an affiliate.
You’re going to have to use tact with this. If they seem incredibly uninterested, it may be best just to thank them for their time and move on.
If they seem really disappointed that they are unable to participate, or if they show some level of interest in the summit, it may be worth asking them if they can promote.

If they say yes to an interview:
Congrats! You’ve booked a speaker to interview for your summit!
Follow-up is key here. Once a speaker agrees to be interviewed for your summit:
• Make sure they schedule a time to be interviewed.
• Send them the speaker checklist.
• Emphasize that you will need all the items on the speaker checklist sent to you by the interview.
• Come up with individual questions that you will ask the speaker and add them to your general questions. Email these questions to the speaker.
• Set up calendar reminders for the interview to be sent out three days before and the morning of the interview.
• Ask if there is there anyone else they know of who would be interested in this opportunity.
Step #2 Record your interviews.
Action Item #1: Record your interviews.
Once you start booking your speakers, you’ll need to make sure that you are on track to record your interviews and get them ready for your summit.
The day of your interview with each speaker, make sure to do the following:
• Test audio and video quality before getting on the call.
• Chat with the speaker for a couple of minutes before starting the interview.
• Triple-check that the call is being recorded.
• Conduct the interview and then thank the speaker for their time.
• Tell them what their next steps are / how they can promote the summit.
• Check off in your spreadsheet that you have interviewed them.
Action Item #2: Record your keynote speech.
The keynote speech is the last interview of the summit. It’s your closing speech where you will recap highlights of the summit, teach on the primary topic of the summit, and then promote your primary product at the end.
Once you are in full-on summit mode, it’s going to be a bit crazy to plan your own keynote speech, so it’s a good idea to get this done ahead of time.
Step #3: Create graphics, banners, and promotional tools.
Action Item #1: Create graphics and banners.
The sooner you are able to start creating graphics to promote your summit, the better.
These graphics will be used on your website, sent to your speakers and affiliates, used on social media, and used in paid advertising for your virtual summit.
Your graphics should include:
• Top or big-name speakers
• The summit’s name
• The summit’s theme (i.e, What will attendees walk away with?)
• A call-to-action (e.g., “Get Your Free Ticket Now!”)
If you have never created graphics before, you might want to hire a designer to take care of this for you.
You can hire someone off Fiverr (low-end) to help. You can also use a free program like Canva to create your graphics.
Here are some examples of the social media images that Chandler created for his summit:
Image: Summit Logo
Explanation: Create an individual logo created for your summit.
Example: Here’s an example of the Self-Publishing Success Summit Logo.

Image: Speaker Image
Explanation: Create an individual image for each speaker. This is an image that you and your speaker can share on your social media profiles.
Example: Here’s an image for the Self-Publishing Success Summit speaker Grant Cardone.
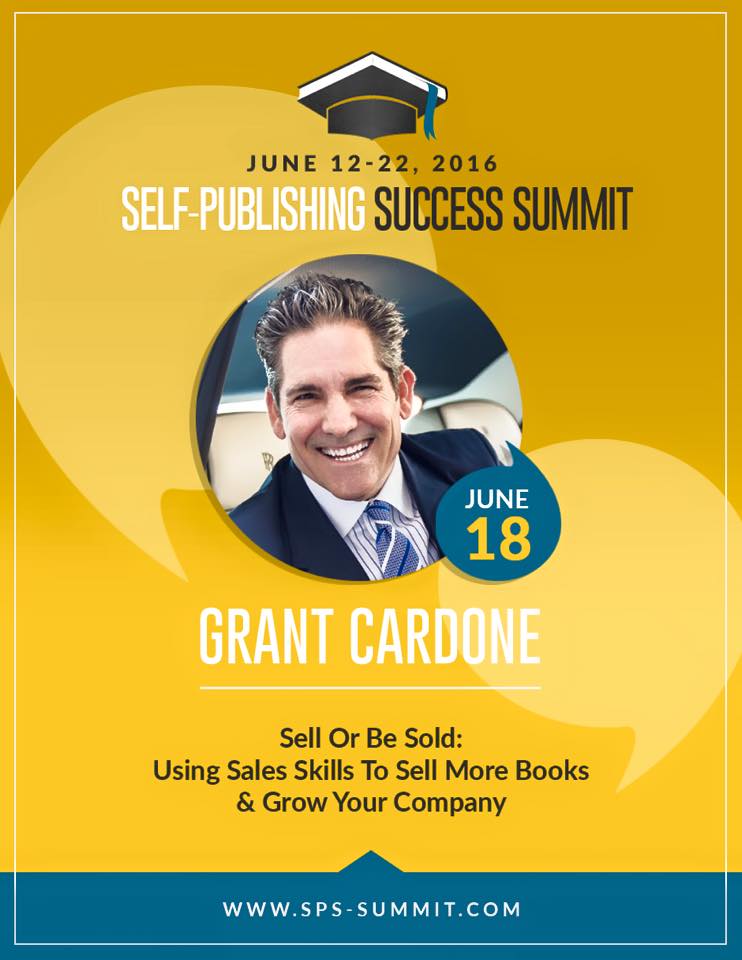
Image: Quote Cards for Speakers
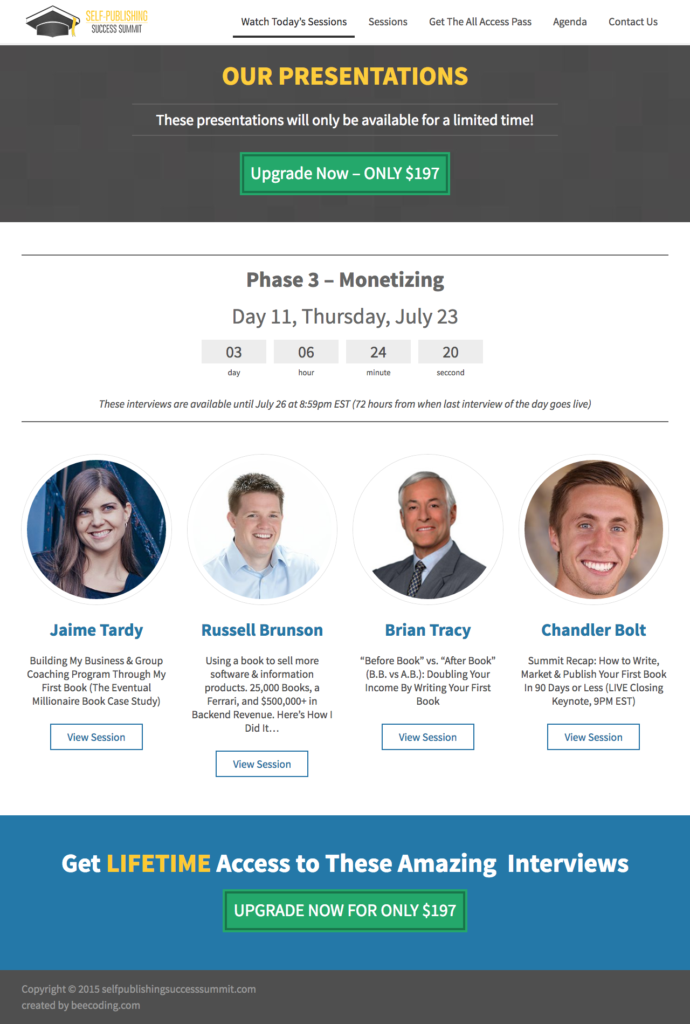
Explanation: For each day of the Virtual Summit, Chandler’s team had unique quote cards to share on social media. He shared this image as well as that day’s agenda of speakers.
Example: Here’s a look at a Facebook post made with a quote card and that day’s agenda:
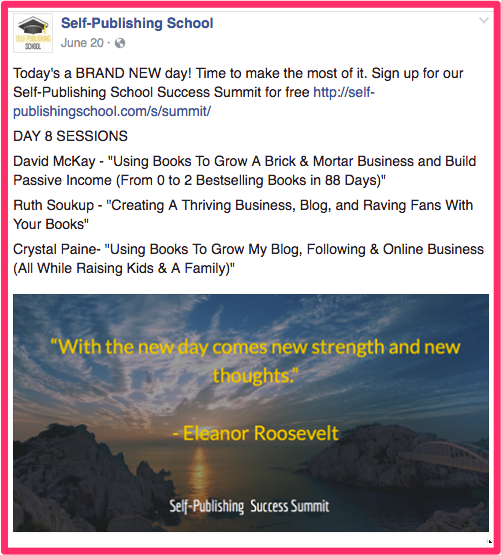
Image: Social Share Images
Explanation: You’ll want a few images that give an overall view of your summit, to be used in social media advertising.
Example: Here are a few examples of images Chandler’s team created for his Self-Publishing Success Summit.
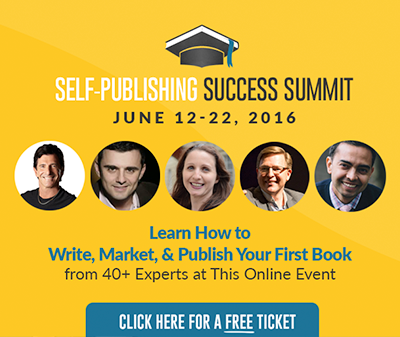

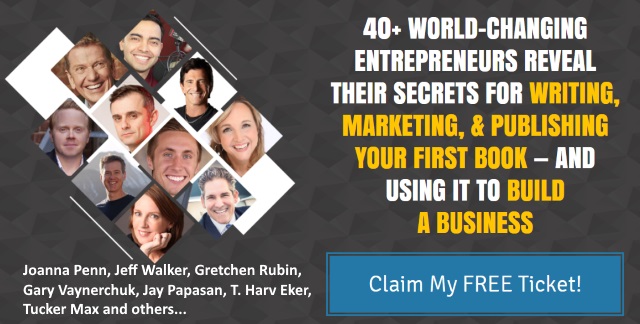
Image: Site Banners
Explanation: These are banner images that you can put on your own site or give to your affiliates to promote the summit.
Example: Here’s a site banner that was created for the Self Publishing Success Summit.
Step #4 Develop initial landing and thank-you pages.
Your ultimate goal is to start promoting your summit (via your list, you speaker’s lists, your affiliate’s lists, and paid social media advertising) for a full month before your summit begins.
To start promoting, you’ll need a landing page and a thank-you page created to capture the sign-ups for your summit.
This is what you’re going to do during this step.
Action Item #1: Create your landing page.
A landing page is a simple page that will promote your summit and capture email sign-ups for those who want to attend.
Chandler created a custom landing page using WordPress, but you can also use a drag-and-drop page creator like LeadPages.
What should your landing page include?
• Summit’s name and dates
• Summit’s theme (what attendees will walk away with)
• Top speakers
• Video explaining the summit
• Compelling Images that show off what the attendee will learn
• FAQs
• A sign-up form integrated with your email service provider
This is the FIRST page that you will want to create. It’s best to create it as soon as you are able to, and then make changes if needed. The sooner you have a landing page, the sooner you can get people to sign up for your summit.
Don’t wait until you have every speaker booked and a perfect page created. Put together a basic landing page and then update it as you gain more high-influencer speakers.
Example:
Here’s an example of Chandler’s landing page for his 2016 Self-Publishing Success Summit. You can see the full page here.

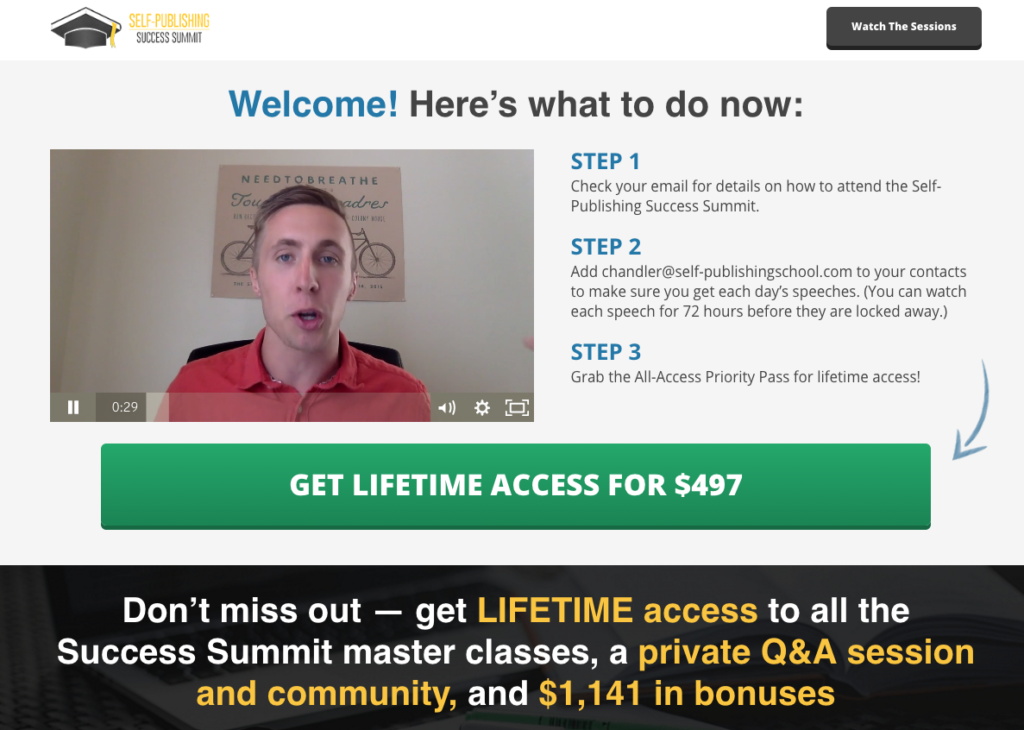
Action Item #2: Create your thank-you page.
The thank-you page is the page that your attendees will see directly after they sign up for your virtual summit.
The absolute BEST thing to here is to have your thank-you page be a sales page for your all-access pass.
The person who visits this page is obviously already interested in your topic, so this is a perfect time to upsell them on your all-access pass.
You can also choose to have a regular thank-you page here, which includes information on the summit and what they should do next. (However, you’re probably really missing out if you choose this!).
What should your thank-you page include?
If you are going to promote your all-access pass on your thank-you page, it should include:
• A “thank-you” for joining the summit
• Notification that an email was sent with summit details
• Encourage attendees to add your email address to their contacts.
• Remind them of the summit’s dates, and that all interviews will be available for 48-72 hours (whatever you have chosen).
• Information on how to purchase an all-access pass for the virtual summit
Example:
Here’s an example of Chandler’s thank-you page for his 2016 Self-Publishing Success Summit. You can see the full page HERE.
Action Item #3: Write your automated thank-you email.
On your thank-you page, you should indicate that the details for your virtual summit will be sent to them via email. Make sure that you have this email automation set up through your email service provider before you start promoting your summit.
Here’s the email that you got when you signed up for Chandler’s Self-Publishing Success Summit:
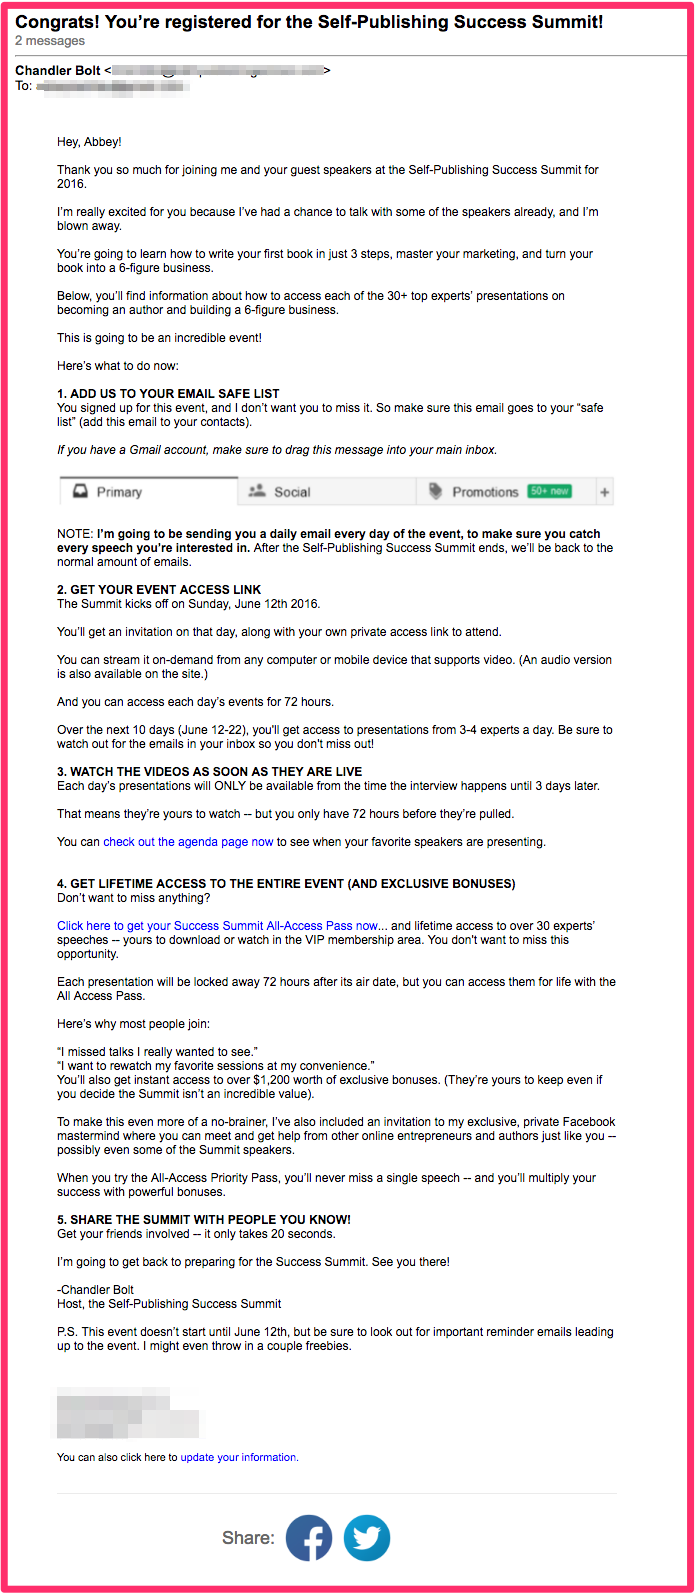
Phase #3: Developing and promoting
There are 3 major things to focus on in Phase #3 of hosting your virtual summit.
Step #1: Set up your PPC campaign.
Step #2: Create your individual speaker pages.
Step #3 Quality control everything.
Here is a basic outline of what this phase will look like:
Step #1 Promote through paid advertising.
One of the key ways that Chandler was able to get the word out about his virtual summit was through the use of paid advertising. Mainly, Facebook ads.
You will want to complete this step at least one month before your summit starts.
While we won’t exhaust all the the details of running paid advertising (if you are completely new to running Facebook ads, hiring help may be worth it), here are some of the basics:
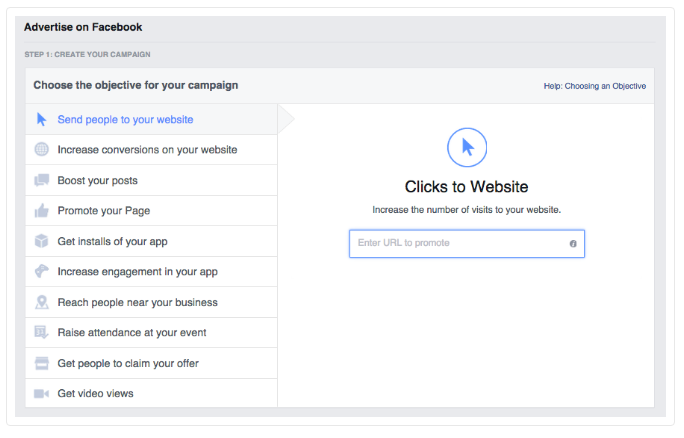
Action Item #1: Choose your ad campaign’s objective.
When you first start your Facebook ad campaign, you’ll be prompted to choose an objective for your ad. Choose “Website Conversions.” You’ll then need to make sure that you have a Facebook pixel applied to your landing page to track conversions.
Action Item #2: Choose your budget.
You can choose a daily budget or a lifetime budget. The choice is up to you and what you can afford. You are going to be keeping track of your ad and making sure it is converting well as you go along, so it might be good to start with a smaller budget and then raise it as the ad does well.
Action Item #3: Write your ad.
As you write your ad, remember your target audience. What is the end result that your attendees will get when joining the summit? Include that in your advertising.
Action Item #4: Choose an image.
At this point, you already should have a few graphics created for your Facebook ad. Facebook allows you to test multiple pictures for your ad, which we highly recommend doing. Testing multiple versions of your text and images is one of the best things you can do to improve your ad’s effectiveness.
Action Item #5: Choose ad placement.
When placing your ad, you’ll have three choices for where it will appear: the News Feed, via Mobile, or on the right column. We recommend testing out each of these three and then, after a few days, removing the placement that isn’t working well. Also, remember to make sure your landing page is extremely mobile-friendly when you choose the mobile option.
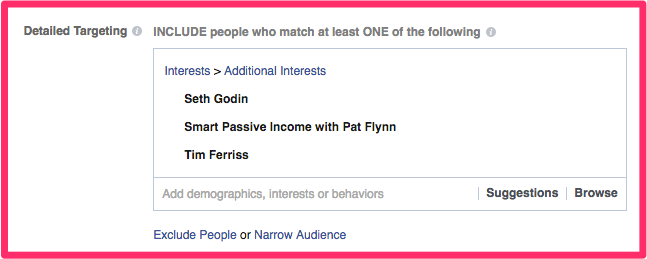
Action Item #6: Choose ad targeting.
Ad targeting may be the single most important part of your Facebook ad. This is how you determine who will actually see your ad.
If you already have a large email subscriber list, you may want to choose the “Custom Audience” target. You’ll be able to upload your list, and even create a lookalike audience based on your list’s key features.
If you don’t have an existing list, the best way to target your audience is through interests. You can specifically target people who are interested in a certain topic. We recommend choosing an individual or company who is an influencer in your niche. For instance, in the online marketing world, you might choose someone like Pat Flynn, Seth Godin, or Tim Ferris.
Step #2 Develop your inside pages.
Once your Facebook ad is running, it’s time to get to work developing your summit’s inside pages.
Here are the pages you’ll need and the different elements that should be included:
Action Item #1: Check your landing & thank-you pages.
Congrats: You’ve already created these!
You’ll probably want to check on your pages to make sure they are updated. Have any new key speakers been added? Update your landing page accordingly.
Action Item #2: Create a sales page with an order form.
What it is: Your sales page is the page for the product you’ve decided to pitch at your summit’s end. It is how attendees will purchase your offer.
What it should include:
• Sales copy
• A video
• A “contact us” button (a way to connect visitors to email your support team)
• Social share buttons
• Order form and payment gateway
Once your sales page is written, be sure you perform a test sale!
Action Item #3: Create individual speaker pages.
What they are: These are the pages that hold the interviews with the speakers and include their CTAs under their interviews/ videos. An individual page for an individual speaker is a very simple page, and the primary goal is for people to have an easy place to watch the interview. We suggest creating a simple page in WordPress for these inner pages.
Action Item #4: Create your presentations page.
What it is: This page is where you can hold the currently available interviews for viewing. You’ll list each of the day’s speakers, their topics, and links to access each interview.
Here’s an example:
Action Item #5: Create your agenda page.
What it is: This is the page that will hold your agenda for all the speakers. It includes a list of speakers, the dates and times that they will be speaking, and a link to each speaker’s page. Also include a link to purchase your summit’s all-access pass.
Example: Here’s a link to the agenda page Chandler used for his summit.
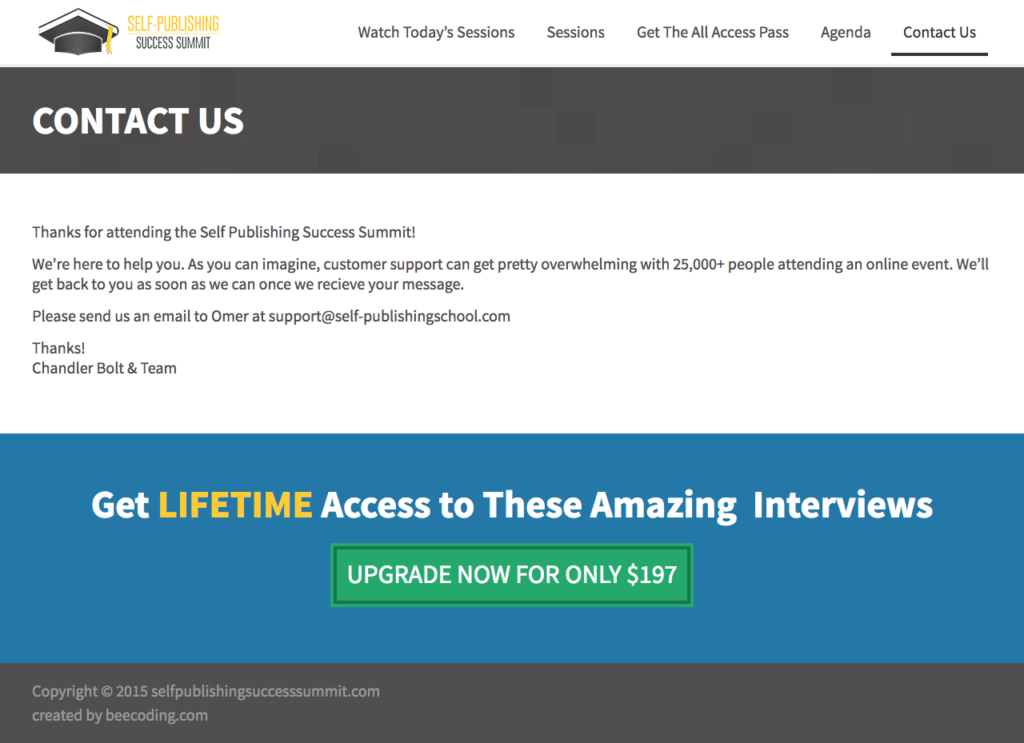
Action Item #6: Create your “Contact Us” page.
What it is: This will be a standard contact page for your support team, to be used by any attendees who have questions.
Example:
Action Item #7: Create a membership site for priority pass buyers.
What it is: Where you will host all lifetime access videos. These pages need to be password-protected so only those attendees who purchase your premium pass can view them.
Your membership site should include the following concepts:
• Sections: Since Chandler and his team organized their summit into sections (writing, marketing, and publishing), the membership site and interviews were organized into these sections as well.
• You will publish the speaker pages here as well. These can look like the pages you designed earlier that host the speaker videos. The only difference is that these pages will stay on the membership site for life, while the other speaker pages will be removed after 24-72 hours (whatever time you have decided to make the videos available).
• Make sure that there is a link to the speaker’s CTA under each of the videos.
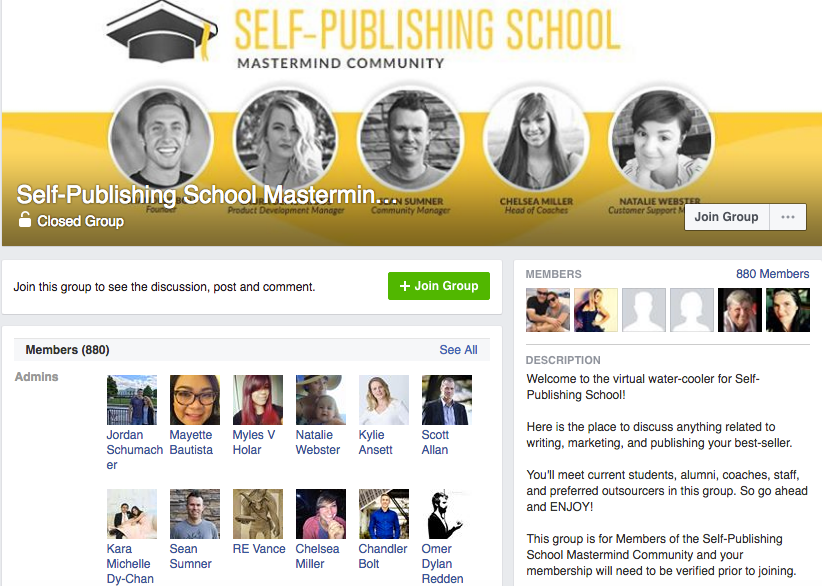
Action Item #8: Create a membership Facebook Group.
What it is: One of the key features that Chandler set up for those who purchased his summit’s all-access pass was a private Facebook community. This is a good time to set up your group.
Step #3: Quality control everything.
Schedule an entire week at the end of this phase (the month before your summit launches) to go over every asset you’ve created and double-check it.
Look over all of the following:
- Make sure all web pages, copy, emails, communication schedule, videos, sign-up/registration process, all mobile pages, and payment confirmation system and pages, tags in Infusionsoft, and all processes are processing correctly.
- Make sure all content is ready on inner pages. (Get a second pair of eyes to help with this!)
- Make sure your email service provider is integrated with your sign-up form.
- Test all pages, sign-ups, payments, and email automations
- Now test all of this again on a mobile device.
- Now test all of this again with different browsers.
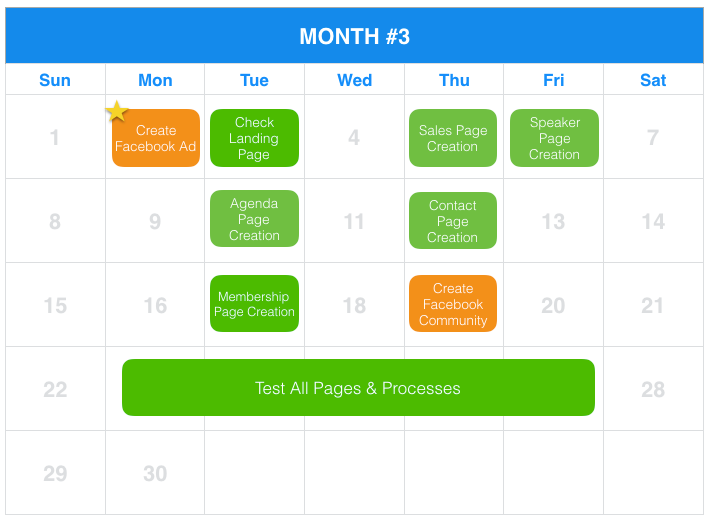
Phase #4: Launch the summit.
Your only job during Phase #4 of hosting your virtual summit is to promote the summit and fix any issues as they arise.
Here is a basic outline of what this phase will look like:
Congratulations! You’ve finally made it to the month of your summit.
It’s now time to promote and launch. The following will be your top focuses during the launch of your summit:
Action Item #1: Check in on your speakers and advertising.
Check in with each of your speakers and remind them to promote their interview. Chandler also recommends emailing them the day before their interview goes live to remind them to send out one last promotional push to their audience.
You should have paid promotion that has been running for a month now. Remember to check on your ad’s status and conversion rates and see if any changes should be made to improve the ad’s effectiveness.
Action Item #2: Schedule your social media posts.
Schedule promotion for your summit on all of your social media channels. We recommend using a program like Hootsuite for scheduling your promotional posts.
Action Item #3: Write and schedule your daily emails.
Write and schedule your daily email broadcasts that will be sent to those who are attending the summit.
Here’s an example of the first email that Chandler’s team sent to summit attendees:
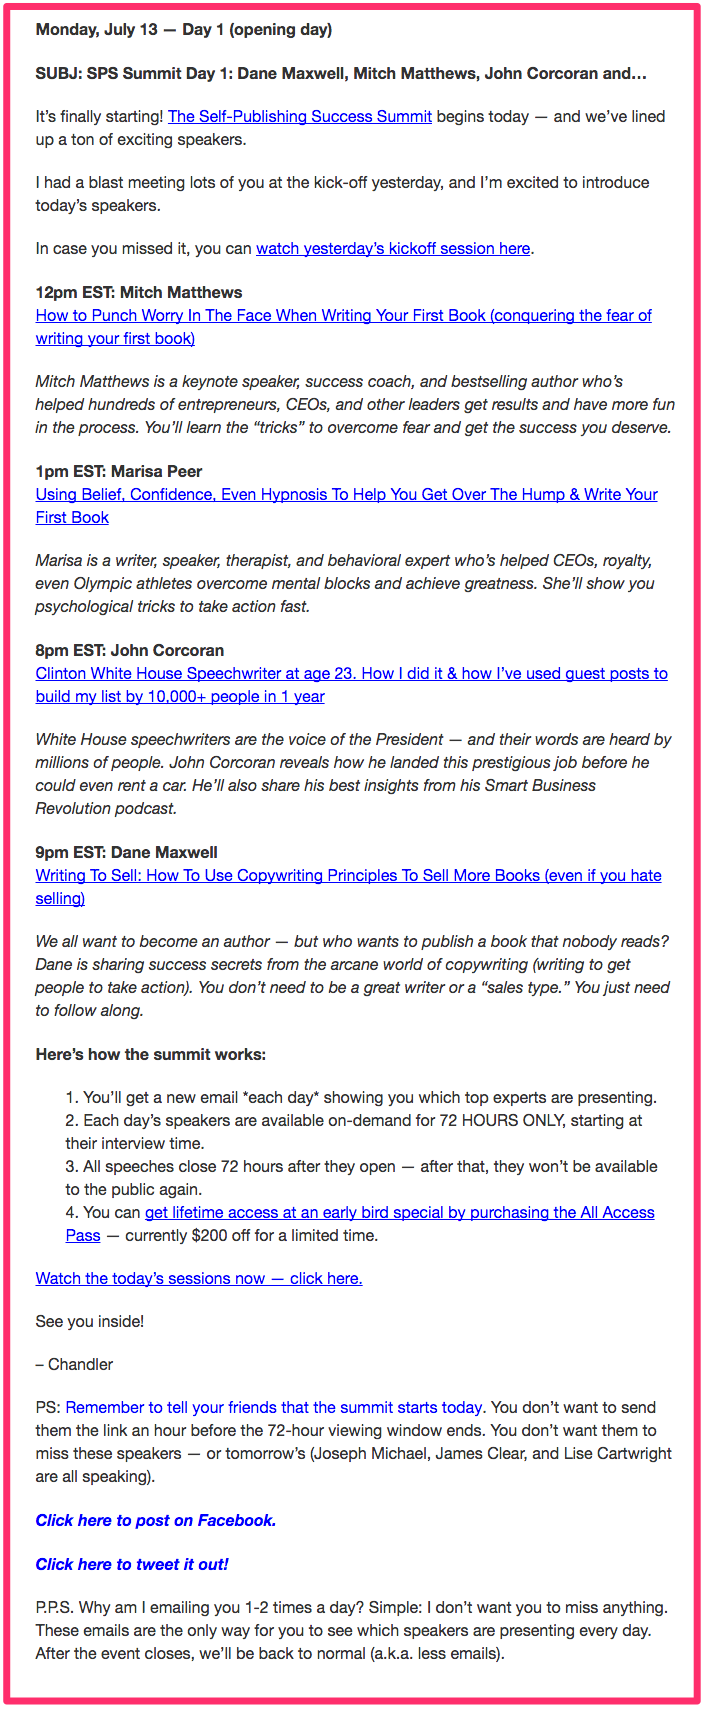
Action Item #4: Send reminders to your email list.
Email your existing list to promote the summit and encourage them to register.
Here’s when you will want to email them:
During the first week of the month: Send an email announcement about your summit to your entire email subscriber list.
One week before your summit begins: Send an email reminder to register to your entire list.
Day before summit begins: Send an email letting your list know that the summit starts tomorrow.
Day of the summit: Send an email highlighting your kick-off speech and letting them know the summit has begun.
Two days after summit starts: Send an “It’s not too late to join” email to your subscriber list.
Action Item #5: Don’t forget your price increases.
Schedule reminders to increase the price of your all-access pass throughout the summit and send emails out to summit attendees, letting them know that the price is about to increase.
Remember, here are the times we recommend increasing your all-access pass pricing:
Early bird All-Access Pass Price (until the summit begins): $97
All-Access Pass Price (change starting day of the summit): $197
Final All-Access Pass Price (change three days into summit): $497

Action Item #6: Hold daily meetings with your team.
If you have a team or a virtual assistant helping you during your summit, it’s important to have daily 15-minute meetings during summit week.
- Go over the day’s email that will be sent out the next day to attendees.
- Make sure all day pages are working.
- Make sure timers or pay increases are set.
- Ensure all dates and times are set in emails.
- Be sure that emails are set to go out to speakers notifying them of their interviews the day before they go live.

Phase #5: Wrap everything up.
Your summit is complete!
But the work isn’t done quite yet. There are a few key things to do before closing the books on your summit experience.
Here’s a list of tasks you’ll need to complete once your summit is over:
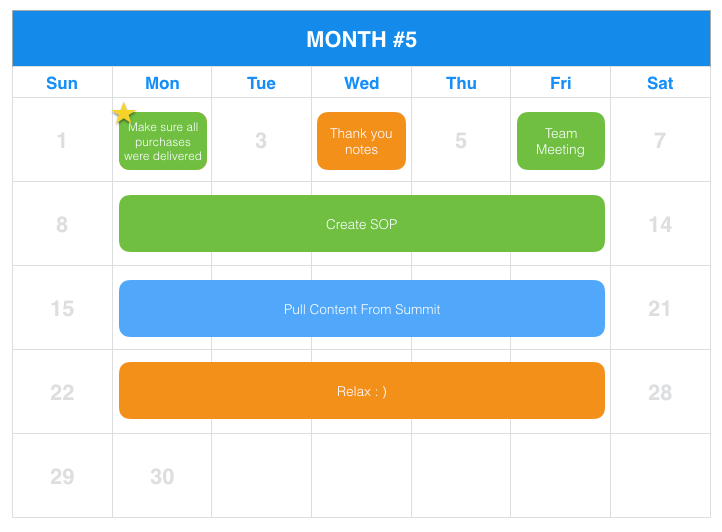
Action Item #1: Make sure all purchases were delivered from the summit.
Action Item #2: Send handwritten thank-you notes to each of your speakers.
Action Item #3: Have a team meeting about what went well and what should be improved.
Action Item #4: Organize your notes into an SOP or checklist to follow next year.
Action Item #5: Continue to monetize your summit. See what content you can pull from the interviews to continue to make money off your product in different ways. Can you create a paid training or opt-in from one of the trainings? Can you turn the interview into a webinar presentation? You’ve put in the work to conduct multiple interviews, so use them to their full capacity!
Action Item #6: Relax. You deserve it!
Want to get Chandler’s results?
The Virtual Summit Campaign I just outlined was exactly what Chandler used to grow his email list and launch his flagship product, Self Publishing School.
His first summit resulted in 25,000 new email subscribers and his second summit resulted in just over $300,000 in sales.
Running a summit isn’t a quick strategy and it isn’t an easy strategy; however, it’s one of the most effective and unique growth strategies I have seen to date.
In fact, Casey Graham, founder of the Rocket Company, recently sold his company for $4 million dollars.
Want to know what his #1 growth strategy was back in 2007 when he first started?
Virtual summits.
🙂
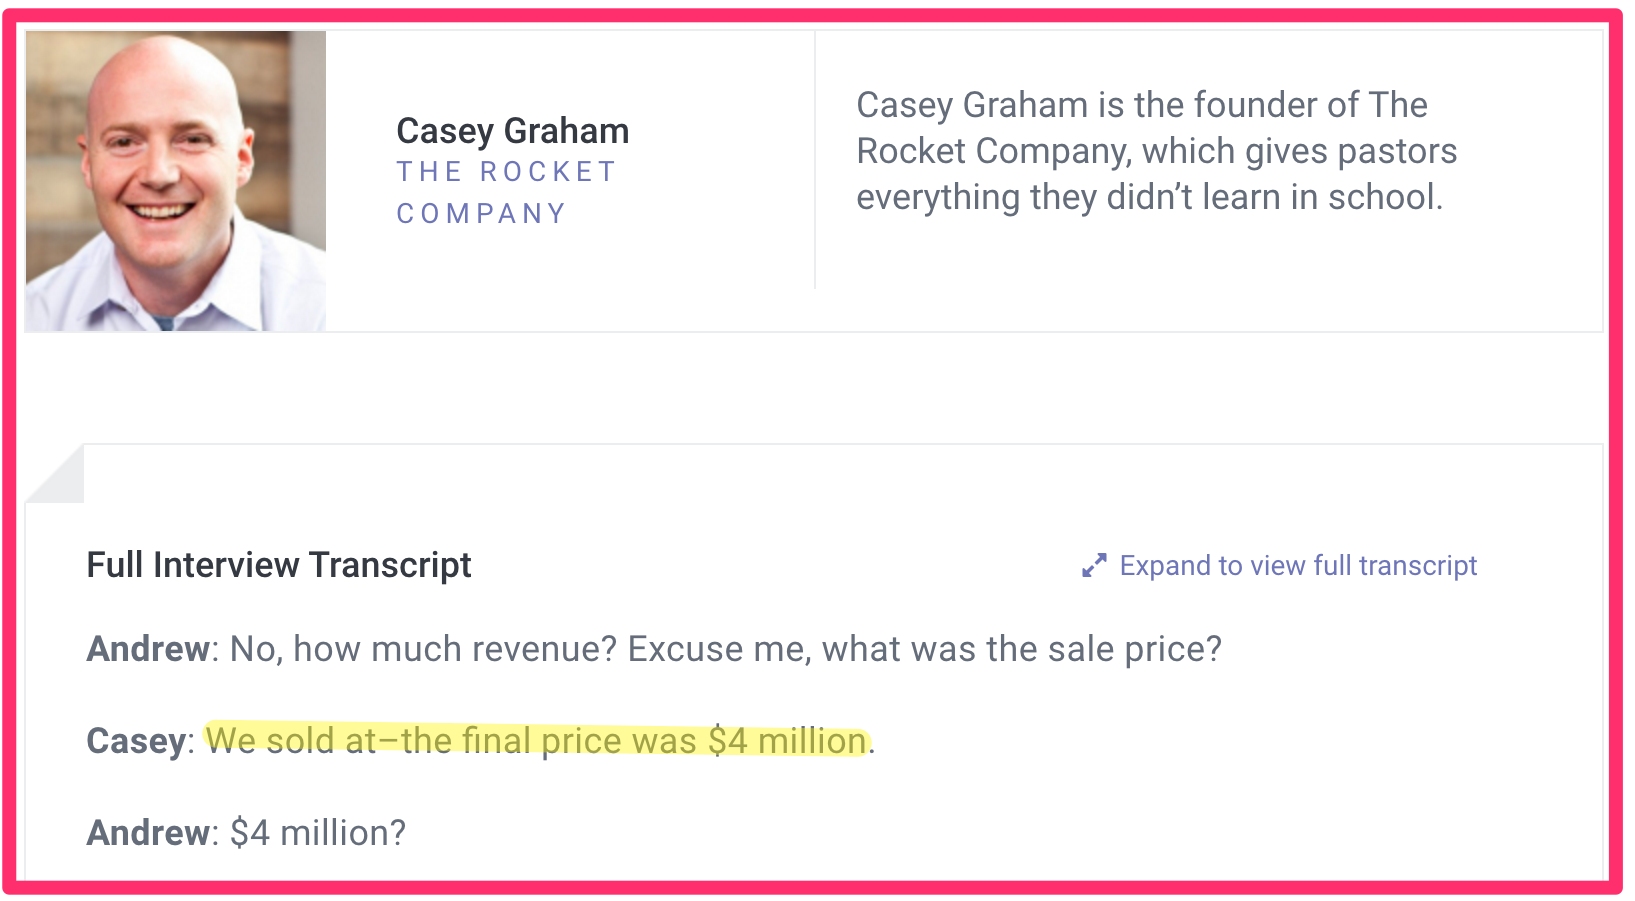
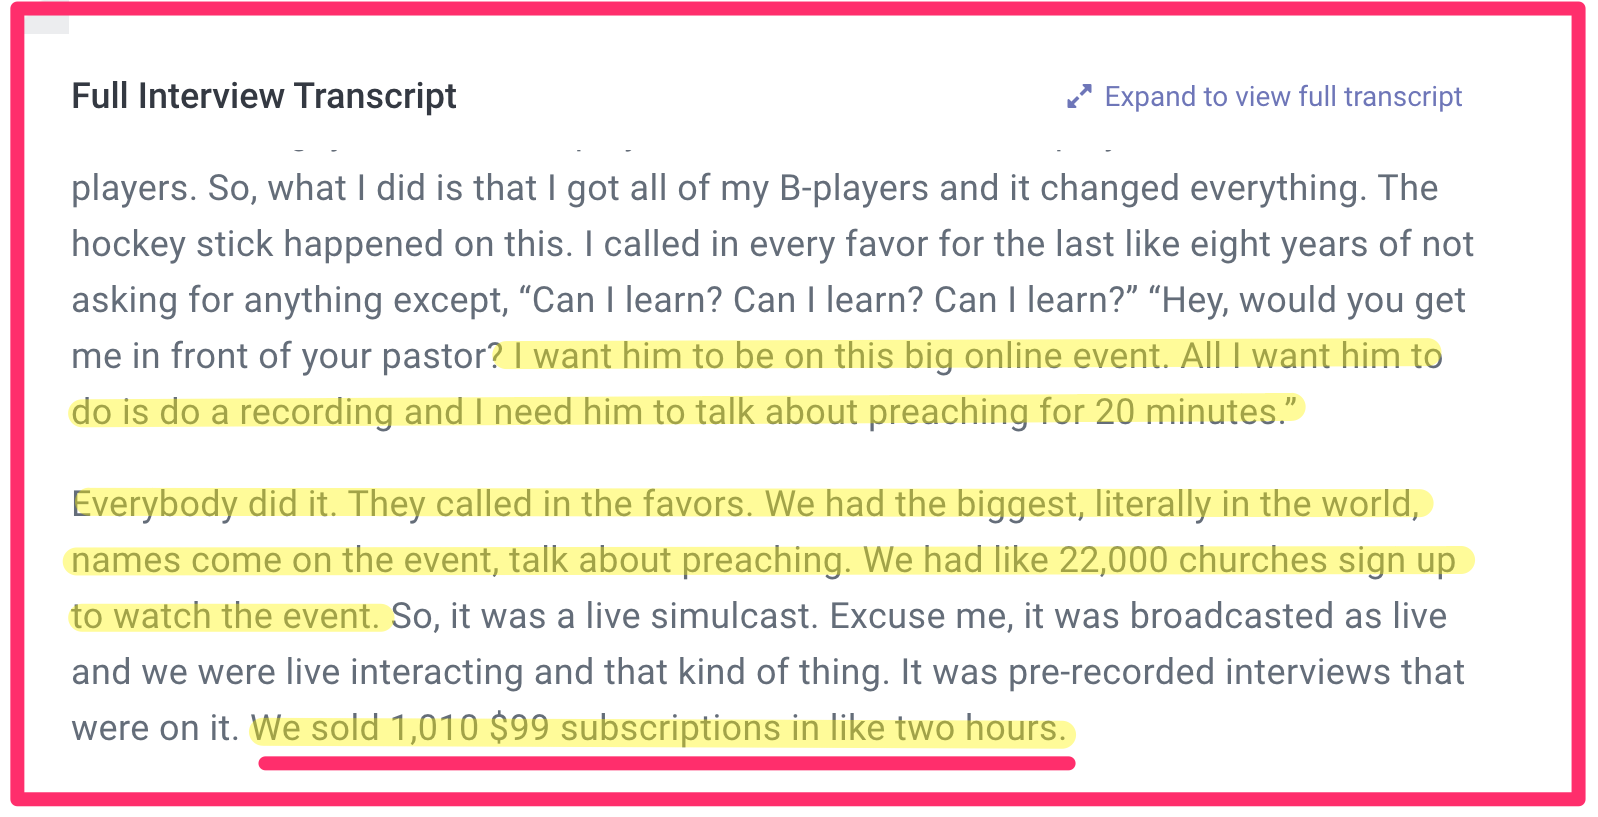 Source: Mixergy Interview with Casey after the sale of his company
Do you want to do a virtual summit?
If so, start by sharing your topic and dream list of speakers you would have at your summit.
Want us to find the best 2-3 growth opportunities for your business?
Book a free Strategy Call with our team. We’ll look under the hood of your business, identify your best growth opportunities, and show you the action plan for taking advantage of them.
Schedule a free call with a Growth Tools coach!