A lot of course creators try to price their online course by channeling their inner Einstein and calculating some mythical, perfect price that factors in every possible scenario:
- The perceived value their course delivers to customers.
- The affluence of their audience.
- What the competition’s charging.
- How pressing the pain they solve is.
- How in-depth the course content is…etc.
You, trying to calculate the price of your online course…in theory.
But here’s the problem with that: How in the world do you know the dollar value of these factors? What price point would you even pick for “the value of your course to customers”? Is that worth $100? Or $3?
It’s all just a hypothesis. Who knows how these factors translate to $$$ people are willing to pay in the real world?
To figure that out, you need a strategy that works in the real world.
You don’t have to be a mind-reader who can set the right price the first time (and if you are, you should put those skills to use in the stock market ![]() ).
).
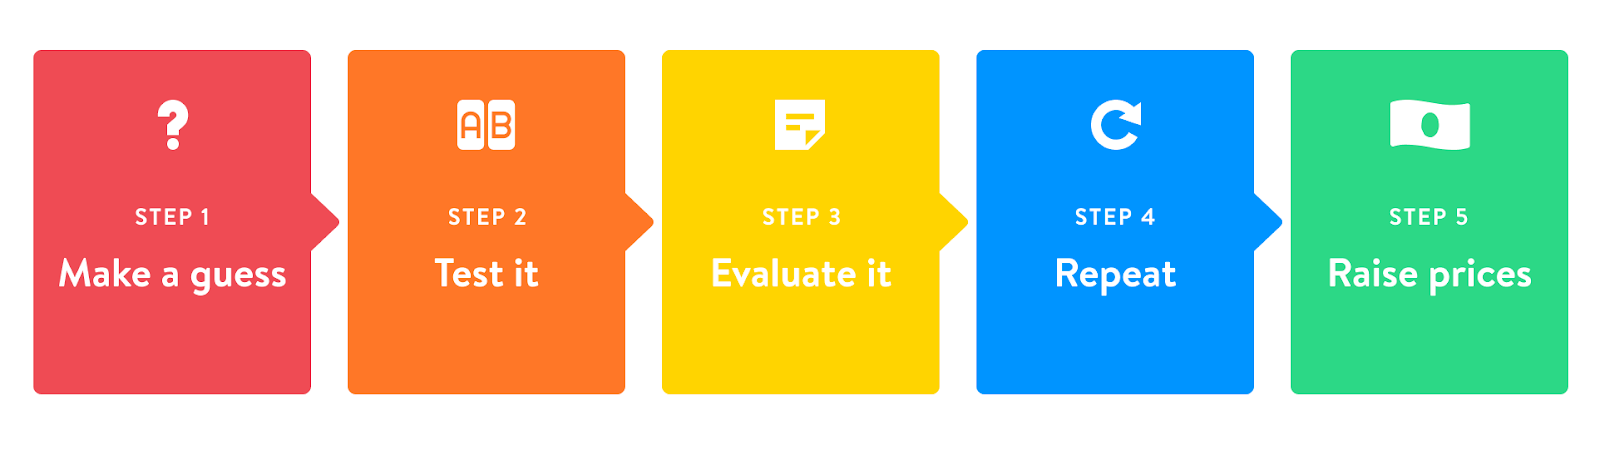
Instead, here’s the process: Make an educated guess (using the formula we provide below), test it, evaluate the results, and repeat until you have a solid price. Then increase your course price over time.
It’s a strategy we used to rake in over $1M in yearly course revenue. And it’s one we’ve taught to thousands of Growth University students.
Many of our Growth University clients sell courses and have been doing so for a while before joining our program. But most of them have never changed their pricing.
Why? Usually something like this:
It’s what I’ve always done. Raising prices just doesn’t feel right. What if it makes my subscribers mad? What if the launch income I depend on goes down?
If you’re afraid to raise prices, that’s fine. Just don’t let it stop you from raising prices. Tiered pricing is one risk-free way to do this. But it’s not the only way.
You can also just raise your prices.
Last year, we were getting more sales for our Growth University coaching program than we could keep up with. So we doubled our price, expecting sales to go down. Our sales went up.
We were charging people twice as much money for the exact same program and our sales. Went. Up. ![]()
This post explains our step-by-step pricing strategy so you can set and increase your course price, too:
- Pick your initial course price.
- Validate sales with the people most likely to buy.
- Set up tiered pricing.
- Evaluate the results using the benchmarks in this post.
- Raise your course price over time.
Let’s get right to it.
 Get it Free FREE Download: Get our Ultimate Pricing Toolkit for Course Creators, including our Tiered Pricing Calculator, course validation email sequence template, price increase email sequence template, and more.
Step 1: Pick Your Initial Course Price
Let’s start with some ground rules.
- You will not guess the perfect price on the first try.
- You’ll probably be in the right ballpark.
- You can get the pricing exactly right eventually.
- A small percentage of your customers will pay double whatever you’re charging.
That means your first guess is not the most important part of this process. It’s a starting point. And once you’ve picked it, you need to A) evaluate how effective it is, and B) give the people who are happy to pay more a way to do so. That’s what we’ll cover in the rest of the post.
For this step, keep it simple:
- Step #1: Pick a number you’d like to charge. This will either be a way lower price or way higher price than it should be; we guarantee that.
- Step #2: Find out what others in your space with similar offerings are charging. If their program includes way more or way less than you do, it’s not a good comparison.
- Step #3: Average your chosen number with your competitors’ average price, and run with it. For example: Let’s say you want to charge $1,000, but your closest competitor charges $500. (1000 + 500) ÷ 2 = 750. Your starting course price is $750.
Remember, this is just a starting point. Do not permanently anchor your online course pricing to competitors. They could be leaving money on the table by undercharging. Or they might have low conversion rates because their course is priced too high or poorly positioned. Because you’ll evaluate and adjust your pricing based on real-world testing, you won’t need to reference their prices again.
For example, say you teach people how to do web design, and everybody in your market charges $197. You might think there’s no way you could ever charge $2,000 for that. Really? Designers wouldn’t pay $2,000 for anything in their careers?
They’re working on a MacBook, they have Photoshop, they have all the latest design tools, but somehow they wouldn’t pay you more money if you could solve their problem in a better way than everyone else?
Of course not! They are already paying a premium price for the tools to solve that problem. Just because your market doesn’t charge something is totally irrelevant to you. It isn’t about the market — it’s about what the leads you get in front of will pay.
So it’s important to start this process at Step 1 and pick your target price. Don’t be embarrassed about it, don’t overthink it, and don’t let imposter syndrome speak for you. Pick the price you want to charge, and meet the competitors halfway. You’ll charge a different price after testing what the market really wants to pay.
The easiest way to know that number is to set up tiered pricing (once you’ve validated your course).
Step 2: Validate Your Course
If you’ve already launched your course to your audience and they’re actually buying it, you can skip this step and learn about tiered pricing in Step 3.
If you haven’t validated your idea but you’re investing time and money into course creation anyway …
Stop whatever you’re doing and do validation instead. It is the single most important element of making a course.
What do we mean by “validate your course”? Sell copies of the course to your target audience before you invest hundreds of hours into its creation. Never, ever build a product without concrete proof that it will make money for you.
Here are the basic steps:
- Identify 50-100 of the most engaged members of your audience.
- Ask them if they’d be willing to give you feedback on a project you’re working on.
- If they say yes, thank them and ask them to:
(a) Read the product description for your upcoming course.
(b) Take a short survey about the product description. In this survey, ask them if they want to buy the course. - If they say they want to buy the course, offer them a discounted price to pre-order the course and be the first to test it when it’s complete.
- Aim for 10%-20% of these highly engaged followers to buy.
Use the price you came up with in Step 1 as a starting point. Knock off 50% for the presale. Your presale students will use a rougher version of your course than what you’ll launch to your audience, so don’t feel shy about offering a no-brainer, discounted price to prove that someone will buy it from you. Plus, you can get testimonials from them and use their feedback before your main launch.
Once you’ve proven that your course will be revenue-generating, you can plan more strategic pricing for your launch.
Reminder: You can get a customizable copy of our proven Validation Email Sequence Template when you download your free copy of the Ultimate Pricing Toolkit for Course Creators.
Step 3: Create Pricing Tiers
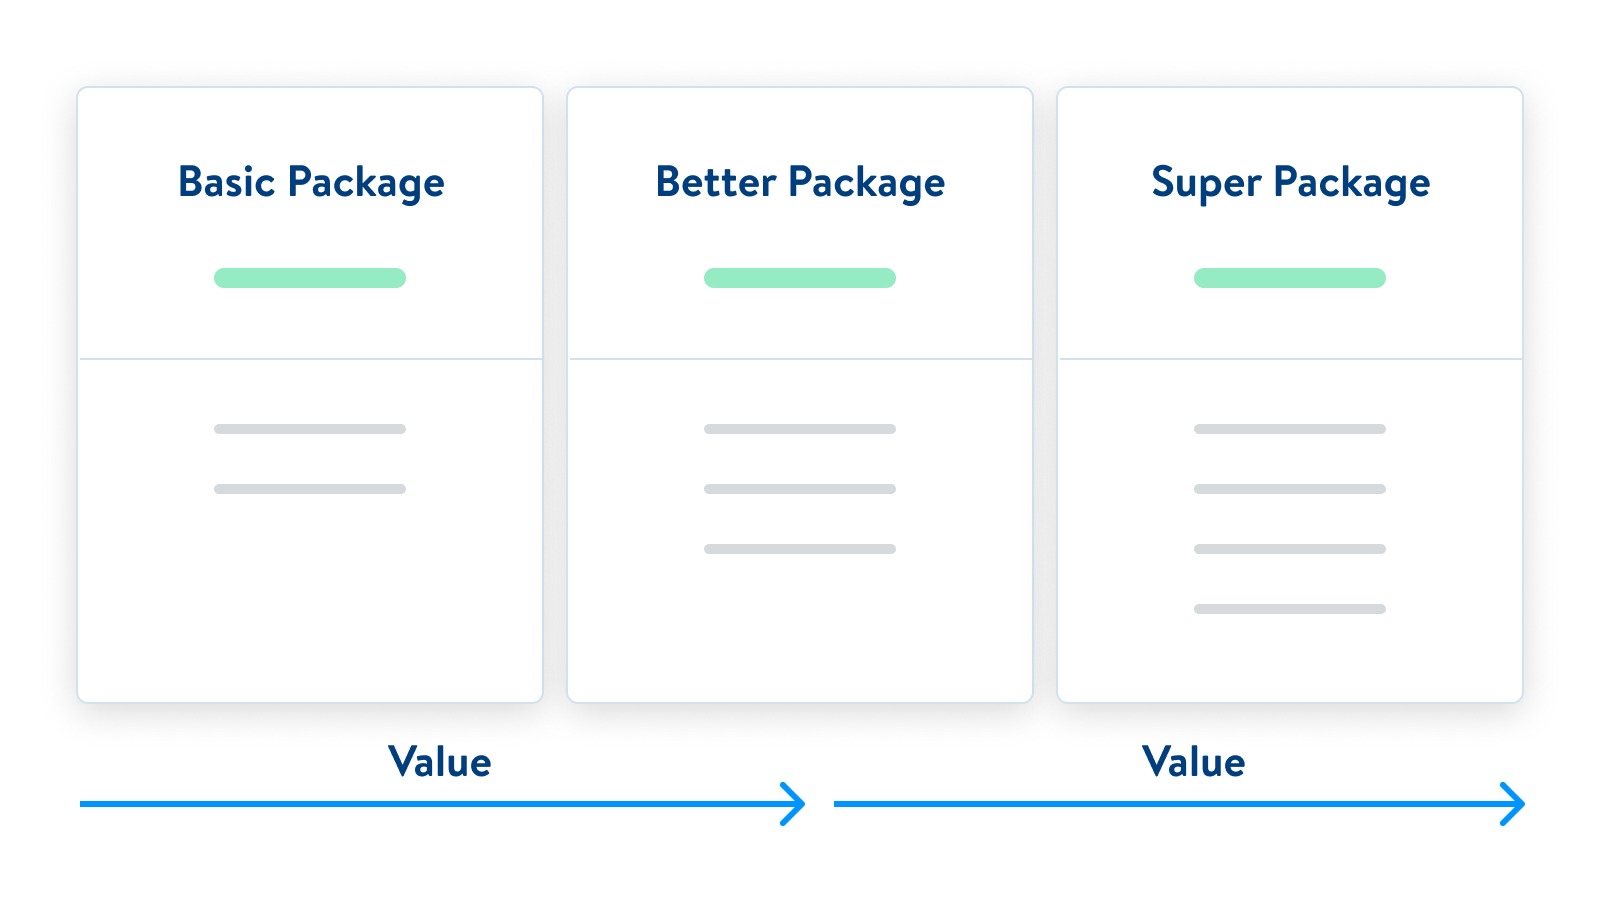
Back in Spring of 2015, we offered two pricing tiers for our flagship course, Get 10,000 Subscribers, which taught folks how to build their email lists to 10,000 subs: one was $600 and the other was $1200.
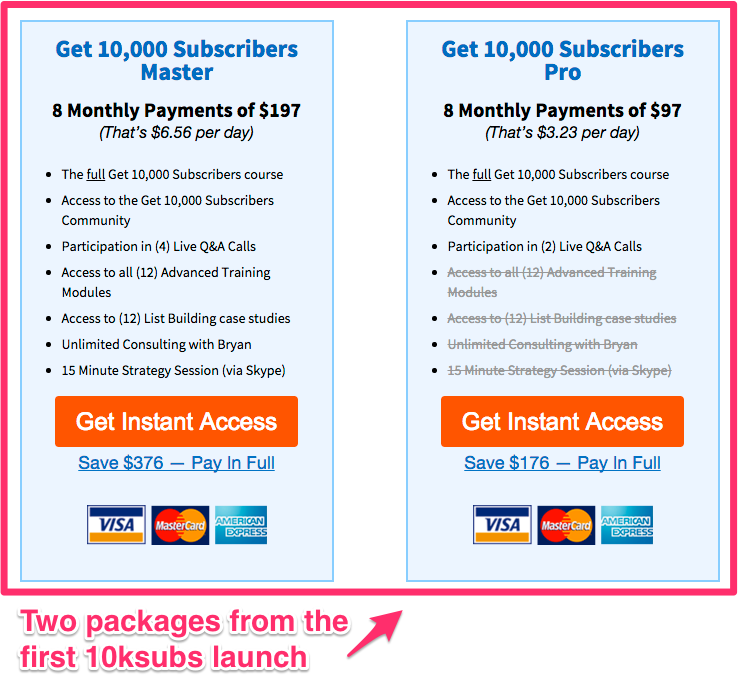
Over 50% of our customers bought the $1200 package, so we knew there would be folks who could (and would) pay us more (we’ll explain why in Step 4). So, during our Fall launch, we added a third tier, like this:
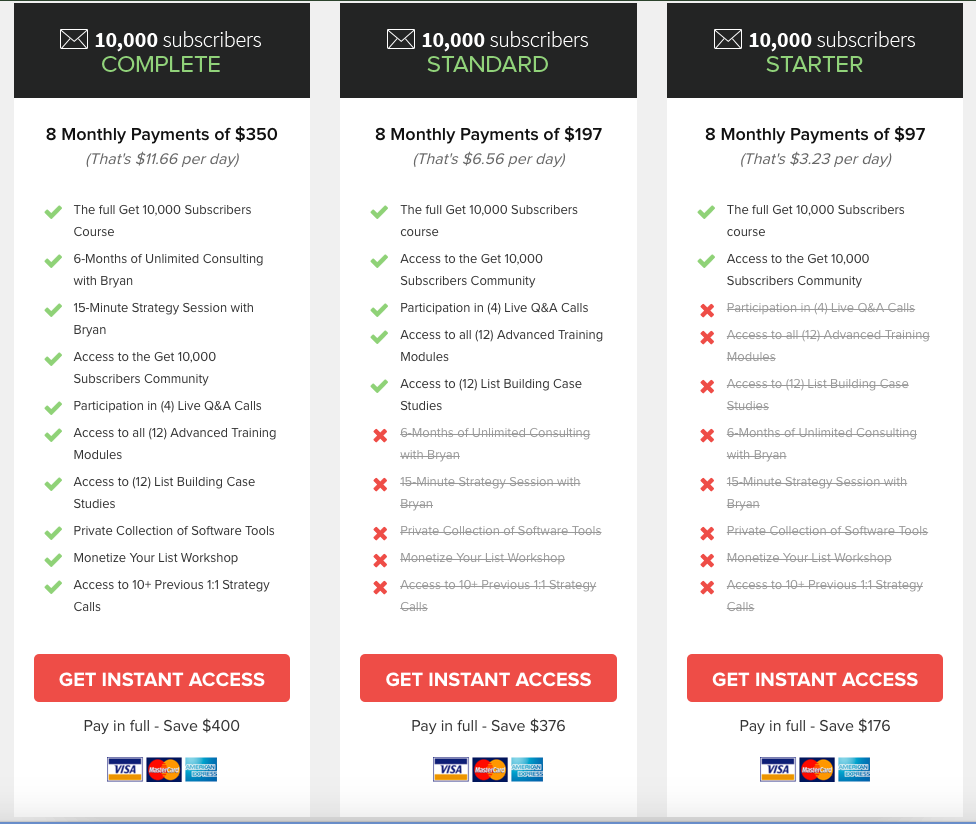
So you could buy the starter package for $600, the standard package for $1200 (which was the high-end tier last time around), or the complete package for $2400.
All we did was move some bonus material from the $1200 tier to the $2400, plus add a few extra perks. The course itself stayed exactly the same. Here’s what it looked like when we analyzed purchases.
49% bought at the low price ($600), 27% bought at the 49 middle price ($1,200), and 24% bought at the high price ($2,400).
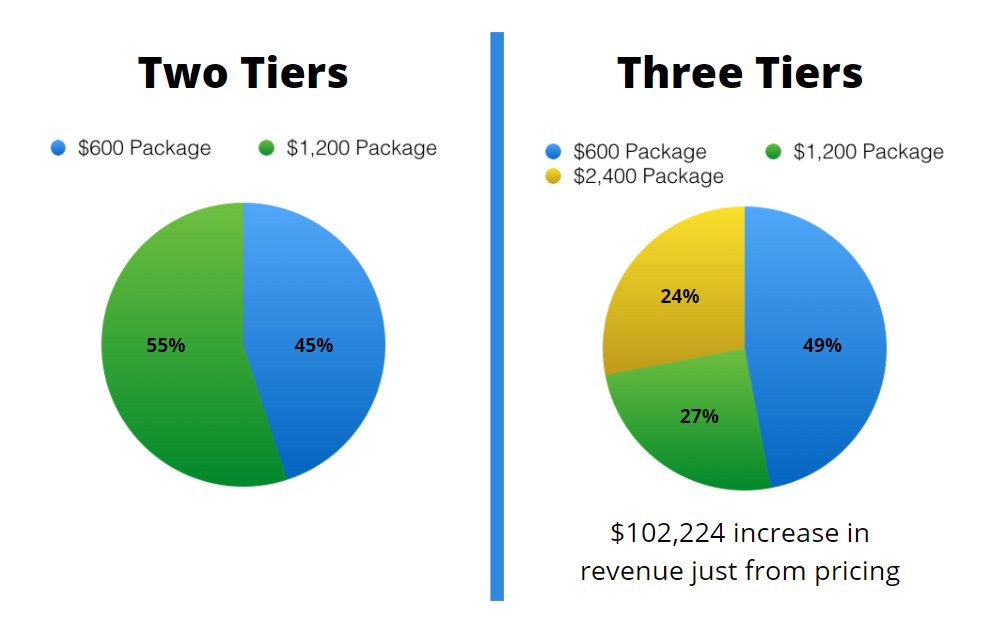
If we hadn’t added a higher price point, we can assume that everyone who bought the $2,400 package would have bought the $1,200 package instead. For us, that was 84 people who paid an extra $1200 each. In other words, without changing the course, we earned an extra $100K.
This strategy is why football stadiums offer skyboxes. It’s why Netflix offers Basic ($8.99), Standard ($12.99), and Premium ($15.99) packages. Tiered pricing works.
So how do you set up your own pricing tiers?
If you’ve been selling your course at the same price since day one, take some small goodies from that tier and put them under one that costs twice as much.
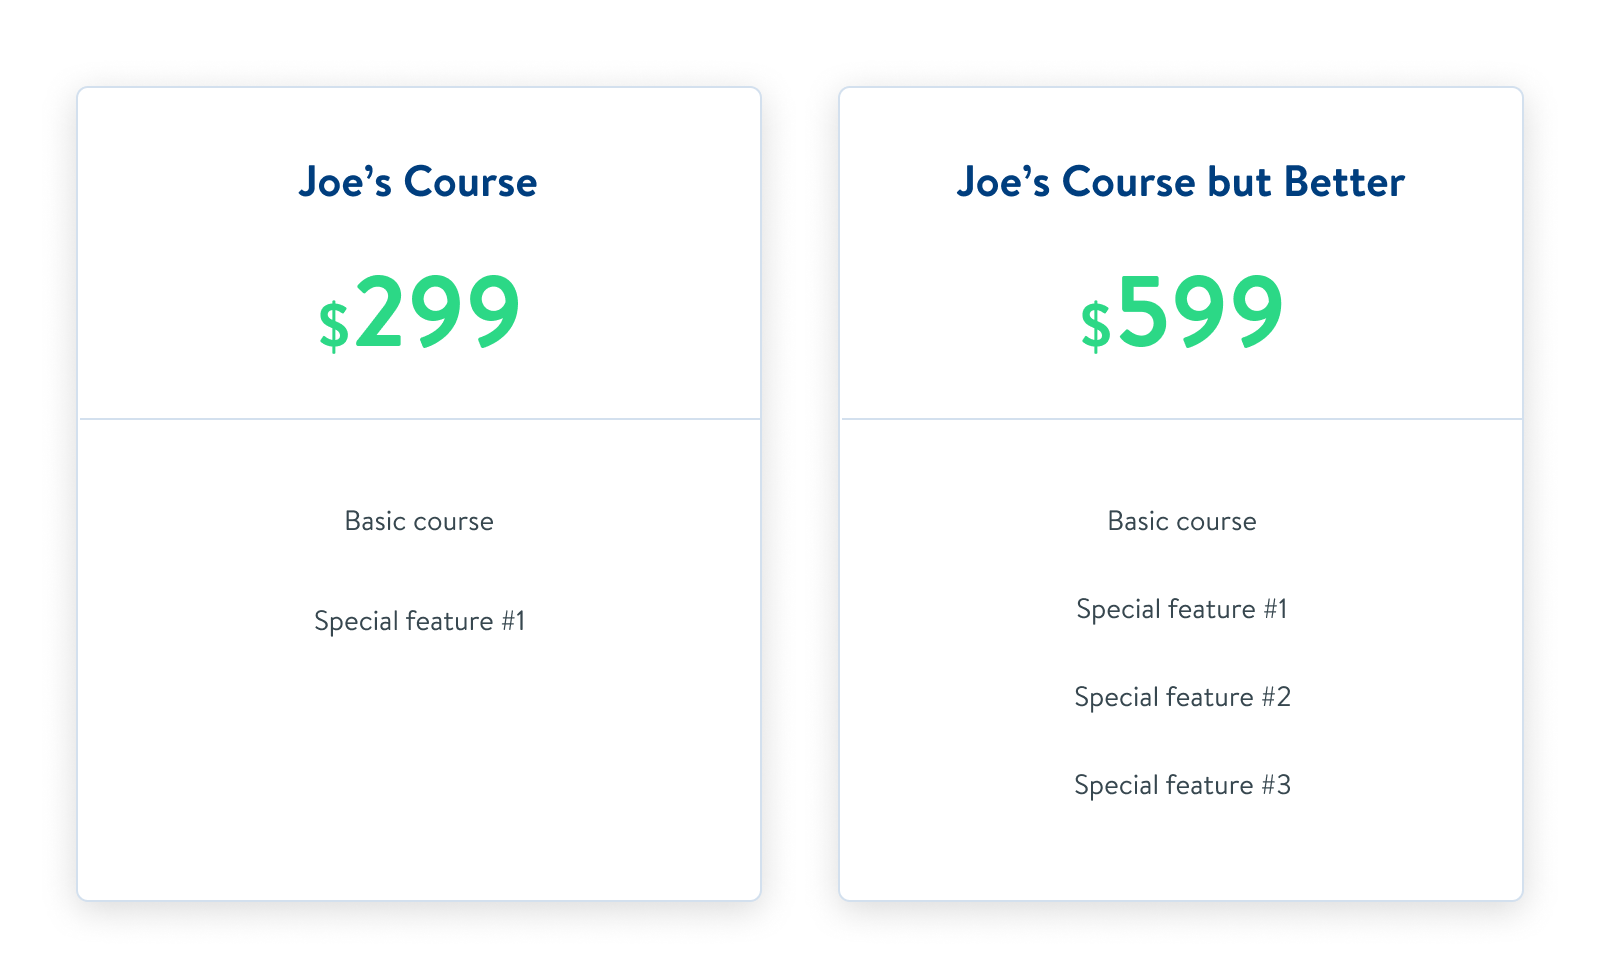
Once you’ve sold your course at two tiers, you can evaluate their performance and add a third tier. If you want, you can offer three tiers right away and see who bites. If you suspect you’ve been undercharging, for example, you might test a price that’s double and one that’s roughly doubled again. If you’ve been charging $299, for example, then you could try two more tiers at $599 and $999.
When you make sales at higher tiers, the math quickly works out in your favor. Let’s walk through a hypothetical example to see how much tiered pricing can affect your bottom line. Imagine you sell a book and typically get 10 purchases a day:
- On the first day, you sell ten books for $10. You make $100.
- On the second day, you decide to offer a fancy package for the book (complete with bonus materials like maps or video interviews). It’s the same book (with perks), but you’re charging $50. Say seven people buy the plain book at $10 and three buy the nicer package at $50. Now you’ve made $220 in one day, more than double the previous day’s revenue.
- Now let’s say you add a third offer for day three: a book, the bonus materials, and a two hour meeting with you. You price it at $500. Six people buy the plain book, three buy the $50 package, and one buys the $500. You make $710, over seven times your original daily earnings.
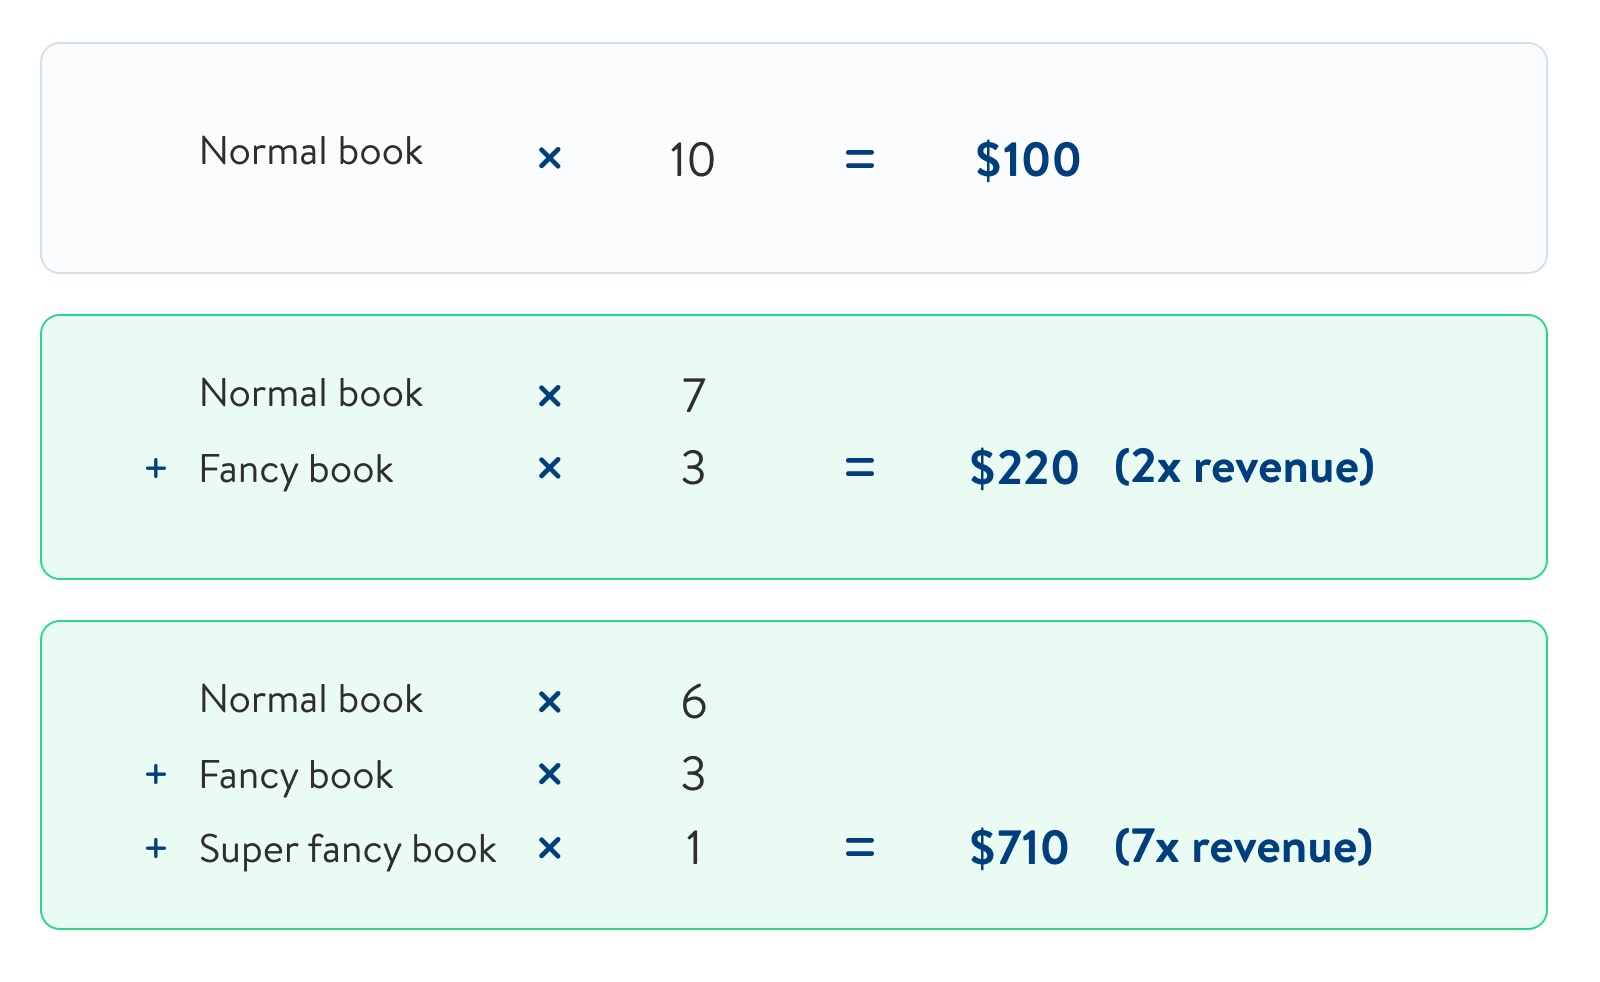
Notice in this example that revenue increased with the same number of sales. What happens to that amount of money if you double your leads? If you 10x them?
That’s the power of tiered pricing.
Use our Tiered Pricing Calculator when you download our free Ultimate Pricing Toolkit for Course Creators to find out how much revenue you could gain with 2-tier or 3-tier pricing.
But How Do You Come Up with Tier Ideas?
We have a whole guide to tiered pricing here. In it, you’ll find more ideas for what to put in your tiers to motivate potential students. Here are the best examples we’ve seen online for any kind of product:
- Higher quantity (multiple copies of your product).
- Higher quality (more in-depth functionality or features, a mini-course on an advanced or related course topic, and so on…).
- Inclusion of a done-for-you service.
- Group coaching.
- One-on-one coaching.
- Online call or webinar.
- Partnering with another entrepreneur.
- Access for a longer time period (multi-year membership).
- Increased commitment from customers (e.g., they sign up for six months instead of three).
- Program customization (customize your product to them).
- Advanced trainings on using the product (could be in person or in self-paced format).
- Case studies of successful customers (this helps them visualize exactly how to use it for themselves).
- Unlimited consulting with your team.
There are endless tier options.
Step 4: Evaluate Sales
Adding multiple pricing tiers for your course will do amazing things to your revenue — if you’re tracking sales and tweaking your prices accordingly.
During validation, your goal should be to get 10%-20% of folks who see the presale pitch to buy. If you’re getting a higher conversion rate, bump the price up.
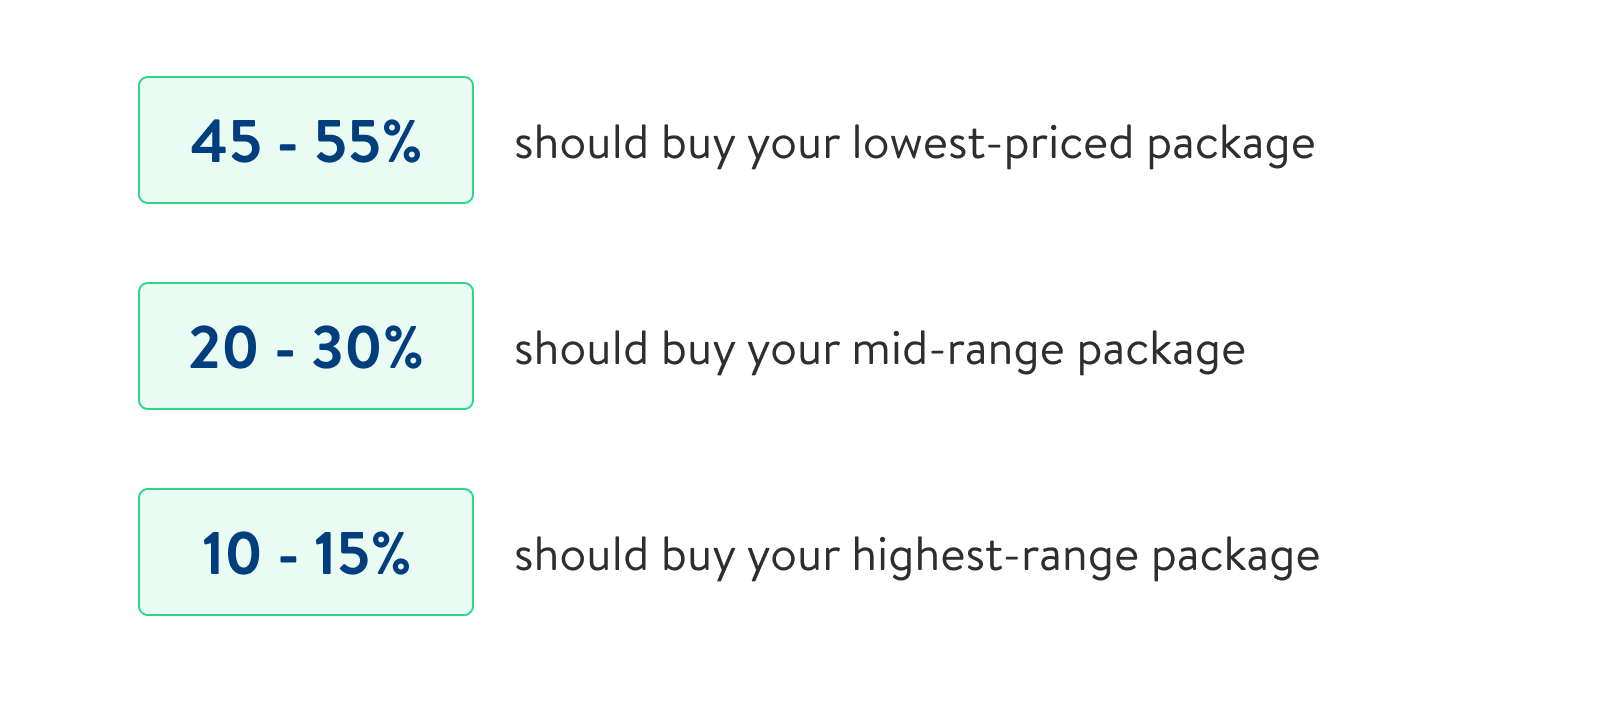
After you’ve launched your course and offered multiple tiers, aim for these percentages:
Adjust your prices based on your findings. Here are a few examples.
Scenario #1: You have a $97 package and a $497 package. 90% of buyers pick the more expensive package.
Adjustment: Raise your prices! Make $497 the lowest tier and add two higher tiers.
Scenario #2: You have three tiers, one at $199, one at $399, and one at $999. 70% of purchases are for $199 and 30% are for $399.
Adjustment: You have one of two possible problems: Either you’re charging too much for your third tier or you don’t offer enough value to justify the jump in price. Push value to the mid-range and high-range packages and see what happens.
Scenario #3: You’re launching for the first time. You have two tiers, $500 and $1,000. Your sales are split 50-50.
Adjustment: Add a third tier for $2,000.
As you make these adjustments over time, you will get closer to the sweet spot for your course price. While tiered pricing is an excellent way to make more money, it’s not the only way to adjust price.
If you never raise prices on your course, you’re leaving money on the table.
Step 5: Increase Your Price
Ready to raise your rates? You have three basic options:
- Create more expensive tiers.
- Run a price increase promotion.
- Offer payment plans.
These options aren’t mutually exclusive. The timing is all up to you.
Note: We’re not advocating a price increase for existing customers. If you have a membership program, don’t just raise your rates out of the blue. But for new customers of your course, don’t be afraid of a price increase.
Option 1: Create More Expensive Tiers
To do this, push value from your lower tiers to your higher tiers. Or, create new perks that justify spending more money.
Then, go back to Step 4 to evaluate your success and adjust accordingly.
Option 2: Run a Price Increase Promotion
A price increase campaign is a great one-off promotion to run with your audience. And it works every time. You can run them at set intervals (such as every six months) or whenever you need a boost to hit your income goals.
Here’s what you do:
- Evaluate your current pricing and decide how much to increase it.
- Tell everybody via email, social media, Facebook groups, etc. that the price of your course is going up. Set a specific deadline about a week out.
- Remind folks one to two more times as the deadline approaches.
- Watch the sales roll in.
After that, start charging the higher price and don’t look back.
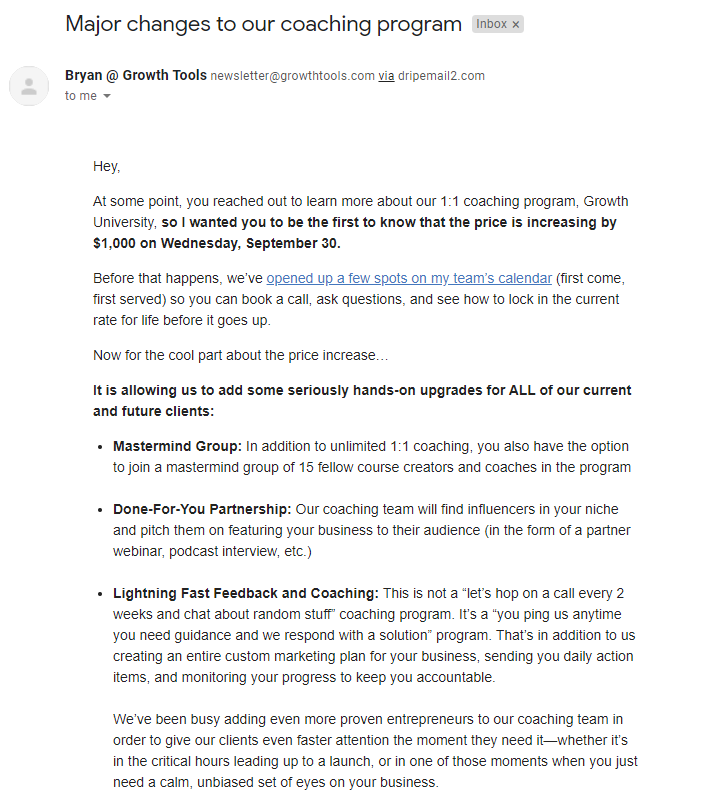
For example, here’s part of the email we sent to our subscribers when we raised prices this year:
You can steal our entire Price Increase Email Sequence Template (and customize it for your course) when you download our free Ultimate Pricing Toolkit for Course Creators.
Option 3: Offer Payment Plans
We prefer full-pay to payment plans. It’s less of a headache and it’s the most reliable. But payment plans open the door for folks who can’t afford a lump sum payment.
It’s a little more work for you to automate and comes with the risk of someone not making their payments. That said, most people make their payments on time.
If you offer payment plans, charge 10-15% more for using them. Think of it as compensating you for missing the up-front cash and the amount of time you spend troubleshooting payment methods. It’s a simple enough method to help you meet consistent, monthly revenue goals.
What Are You Waiting For?
Don’t forget to download our free Ultimate Pricing Toolkit for Course Creators so you can pick a price, craft your tiers, sell your course, and keep adjusting.
Get it Free FREE Download: Get our Ultimate Pricing Toolkit for Course Creators, including our Tiered Pricing Calculator, course validation email sequence template, price increase email sequence template, and more.
Don’t worry about getting things perfect the first time — no one does. But you know what you can’t get back? All the time you spend fretting about what to charge. Go get those course sales!