Website optimization is like working out.
Even when you want to do it, it feels impossible to get started.
What gym should I go to? What machines should I use? What’s the proper way to deadlift? Should I sign up for a class?
Forget all that.
In this post, I’m going to show you the 3 parts of your website that matter most if you want to immediately grow your email list, increase leads, and boost sales.
Of the 6,000+ students and 1:1 clients I’ve worked with, I’ve NEVER (not one time) seen someone doing all three of these things. Yet, I regularly see businesses double their daily subscriber count and sales when they do.
Thing #1: Is your homepage converting 10% of visitors to subscribers?
Thing #2: Are your top 10 blog posts converting 20% of visitors to subscribers?
Thing #3: Are your 5 most linked to articles bringing in 5,000 visitors per month from Google?
By the time you make it to the end of this 3-step website optimization process, you’ll be able to answer “yes” to all three.
Ready? Let’s get started!
Website Optimization Step #1: Create Your Upside-Down Homepage
The first place we’re going to look at is your homepage.
Why the homepage?
Reason #1: Your home page gets more traffic than any other page on your site.
Reason #2: It’s the front door to your business and sets the tone for every future conversation.
Reason #3: Improving it is incredibly simple and you’ll see results immediately.
Quick example…
A few years ago, the Videofruit homepage was bringing in 150 email subscribers (leads) a week. After I implemented the new framework, it started bringing in 280.
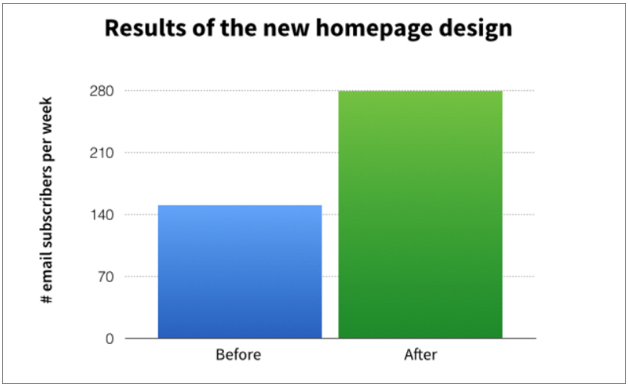
That’s an 86% increase.
Since every subscriber is worth $20, that meant we brought in:
- $2,600 more every single week
- $10,400 more every month
- $124,800 more every year
All from tweaking the design and layout to make it easier for visitors to learn about us and join our list.
This new homepage layout and design are fundamentally different than what you are used to. I call it the Upside-Down Homepage, and it looks like this:
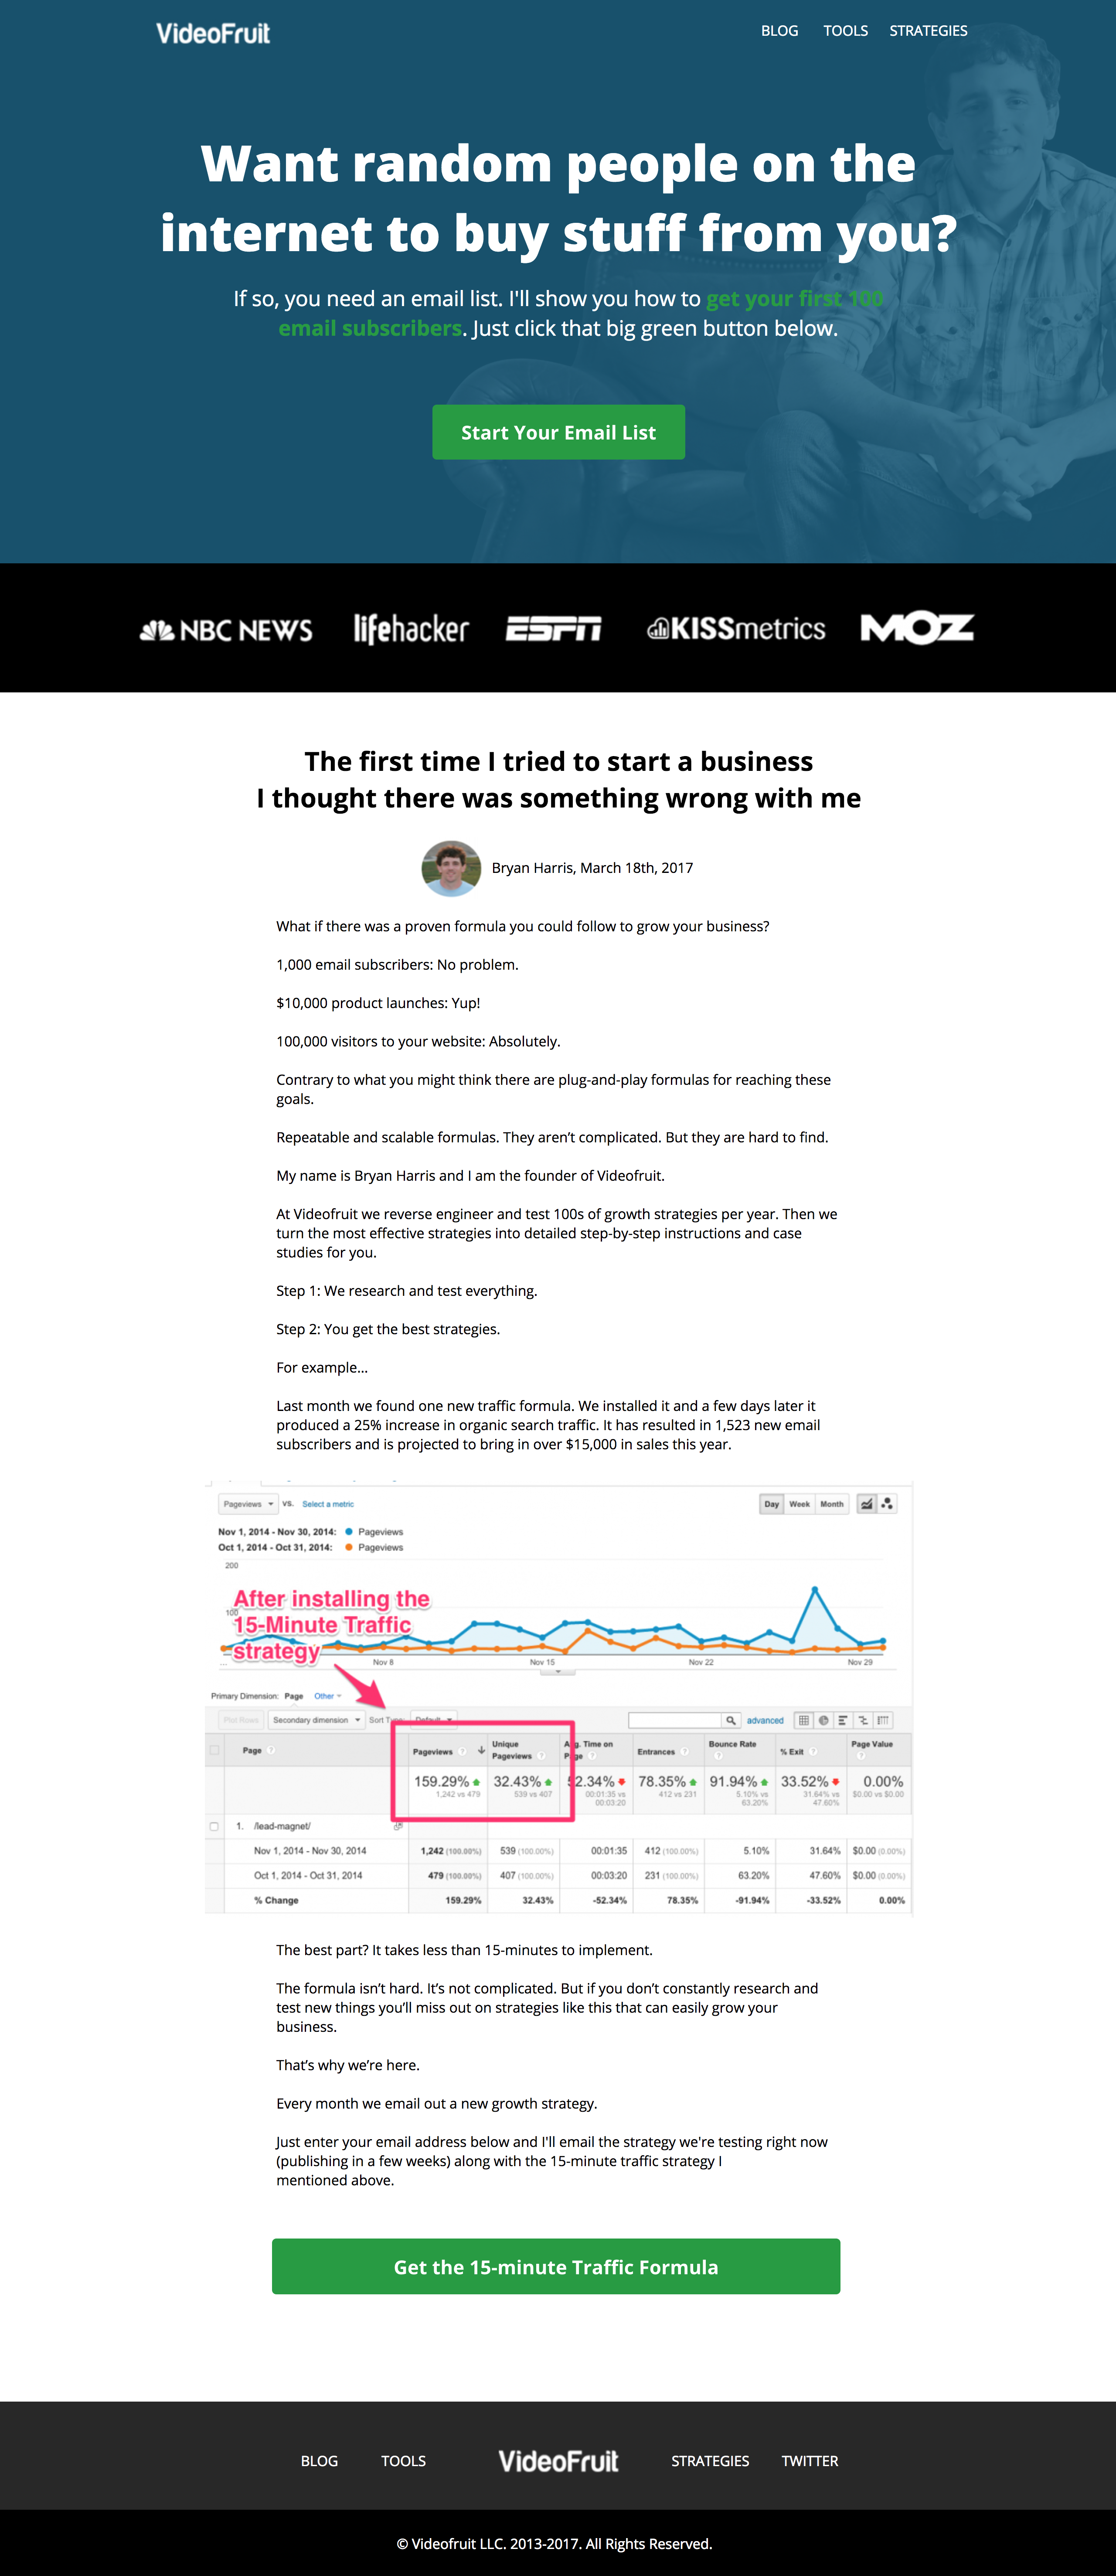
As you can see, there are 5 distinct sections of the Upside-Down Homepage:
Part 1: Above the Fold
The top the page is dedicated to one thing: giving your readers what they want. Many websites push this call to action to the sidebar or footer. However, I’ve found that by making it the first thing someone sees when they come to your site, it increases the chances of them seeing it and acting on it.
Part 2: Social Proof
The social proof section indicates that you are someone to be trusted, based on the sites you have been featured on and companies you have worked with.
Part 3: Pilot Story
The pilot story is the the key to the Upside-Down Homepage. Instead of letting your best content get lost on page 10 of your blog, the pilot story highlights your best content, introduces the new reader to you and your site and then gives them a call to action to learn more. (More on that in the next step.)
Part 4: Call to Action
The call to action at the end of your pilot story works much like a content upgrade in a normal blog post. It takes your reader by the hand and leads them to the next thing you’d like them to do.
Part 5: Navigation
This is what makes this home page “upside-down.” Most websites have their navigation at the very top of the page, but we found moving it to the bottom of the page increased focus and conversions.
The best part? You likely already have almost all the information you need to piece together your Upside-Down Homepage, even if you can’t design or code. Trust me, I can’t do either of those and I still managed to do mine myself.
To make this as easy as possible for you, I put together a quick video tutorial that shows you how to create an Upside-Down Homepage from scratch in just a few minutes.
Check it out and I’ll take you through the process step-by-step.
Want to create your own Upside-Down Homepage with the same tool I used in the video? Click here to get your free Welcomely account.
Alright, now let’s break down how to create the content for each section of the Upside-Down Homepage.
Part 1: Above the Fold
The top of the Upside-Down Homepage is all about giving your visitors your main call to action right away.
For most sites, this will be a call to action to opt in for something and get added to the email list. Sometimes there are exceptions—an ecommerce site, for example, might lead with their most popular product instead of their email list.
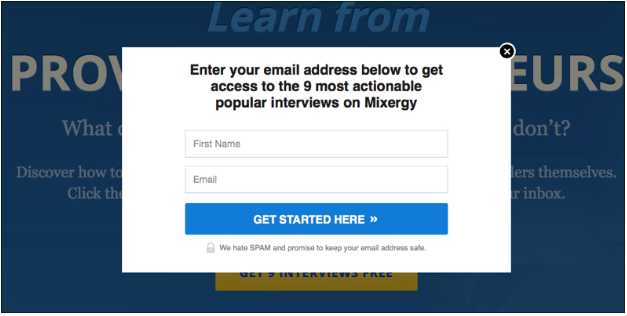
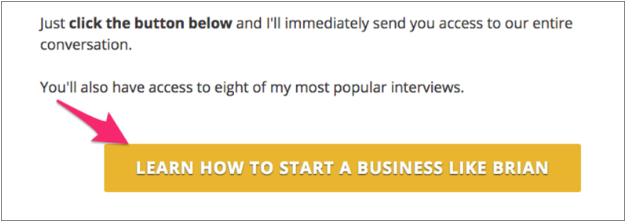
Here’s what the above-the-fold call to action looks like on Mixergy’s Upside-Down Homepage.

Mixergy’s main call to action is to “Learn From Proven Entrepreneurs,” and they give away their top 9 interviews of all time.
You’ll notice the hard call to action in the yellow button.
Clicking that brings up a LeadBox to collect opt-ins:
When creating your Upside-Down Homepage, don’t randomly choose your above-the-fold call to action. A great way to pick a call to action that converts is to use the headline from one of your most popular blog posts.
For example…
If one of your most popular articles is “10 Ways to Teach Your Puppy to Walk on a Leash,” you can take that headline and adapt it as your above-the-fold call to action with something like this: “Just got a puppy? Download our free guide that will show you 10 ways to teach your puppy to walk on a leash.”
Your action items:
- Action Item #1: Identify your 5 most popular blog posts.
- Action Item #2: Pick the article that would best fit a beginner to your website.
- Action Item #3: Wordsmith the headline of that article for your above-the-fold call to action.
Part 2: Social Proof
The second part of the Upside-Down Homepage is designed to instantly give you credibility by showing that you’ve worked with (or been featured by / involved with) companies new visitors will already be familiar with.
Like this:

If you haven’t been featured on a site yet, this can be a great place to use a quote from someone you respect. If you’re an entrepreneur, a quote from Seth Godin or Gary Vaynerchuk would work well.
The key here is to show your audience you are someone they can trust.
Your action items:
- Action Item #1: Make a list of companies you have worked with in the past.
- Action Item #2: Make a list of websites you have been featured on.
- Action Item #3: Select 5 of the most popular items from your two lists and feature them in this section of your homepage.
Part 3: Pilot Story
The third part of the Upside-Down Home Page is where things get interesting.
It’s the secret sauce.
Most websites have an above-the-fold call to action. Many use social proof and some even use a road map to help their customers find their best content.
But after that, it’s just a mess.
A typical website gives their visitors too many things to do. With the Upside-Down Homepage, we do the exact opposite.
I want you to think of your homepage as the pilot episode of a TV show.
The job of that pilot episode is to hook viewers with a compelling story and get them to watch the next episode. The exact same thing is true of your homepage. The #1 goal of your homepage is to capture your visitors’ attention and get them to keep reading.
So instead of cluttering this area with other calls to action, we’re going to use what’s been proven to work:
Your best story.
We’re going to use the best content on your website to hook your new visitors and then give them a call to action to subscribe to your email list to learn more.
Let’s walk through the two primary steps.
Step 1: Find your best content.
To find your most popular content, follow these steps:
- Log into Google Analytics.
- Click “All Web Site Data” for the site you’re analyzing.
- In the sidebar, scroll down to and click on “Behavior > Site Content > All Pages”
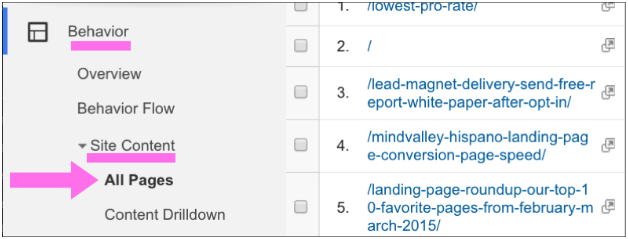
- Scroll down to see the stats for your site’s traffic and you’ll notice the most visited pages on your site. Be sure to sort by “Pageviews.”
Chances are your homepage is ranked #1, followed by a page or post that’s getting the most attention. Choose the content that’s ranked highest here.
Now it’s time to structure your pilot story so that your visitors are compelled by it and follow your call to action at the end.
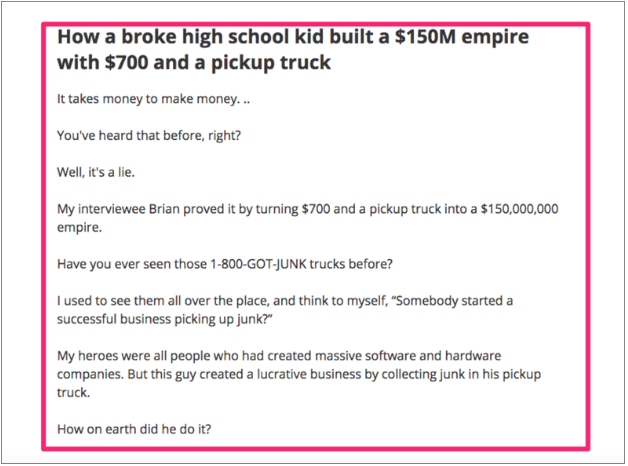
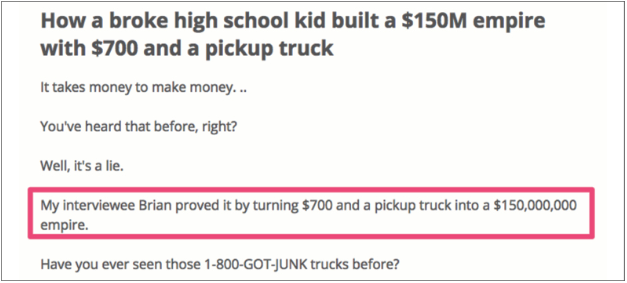
To do that, start your story by sharing an attention-grabbing result.
In Mixergy’s case, we started the article by sharing the result that the interviewee experienced.
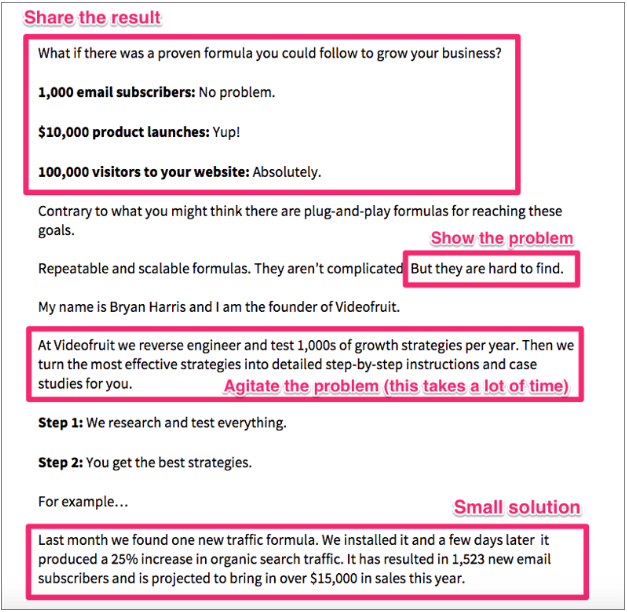
Once you’ve introduced the result, you need to do three things:
Thing #1: Keep your readers’ attention by sharing the problem that the subject of the article experienced.
Thing #2: Agitate that problem by talking about the struggle that happens when trying to achieve the result.
Thing #3: Give the reader a small glimpse of the solution.
Here is an example of all four elements in action on the Videofruit homepage:
Your action items:
- Action Item #1: Pick the piece of content you’ll use as your pilot story. (Make sure it’s one of your already-popular articles.)
- Action Item #2: Format the article to follow the four-part structure we outlined above (result, problem, agitate, solve).
Part 4: Call to Action
Remember the last time you binge-watched a show on Netflix? What happens at the end of each episode?
They make it extremely easy to watch the next episode by auto-playing it.
The call to action at the end of your pilot story is your auto-play.
The call to action should tell your readers what to do next.
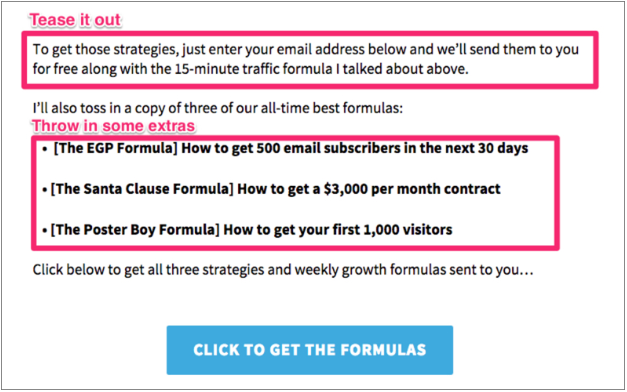
I recommend saving the meat of the content you used for your pilot story and giving it to the readers here.
For example . . .
In the pilot story on Videofruit I tease out a marketing strategy I discovered that increased my traffic by 25%. This is how I set up the call to action at the end.
Your action items:
- Action Item #1: Write the conclusion of your pilot story by teasing out the lead magnet your reader will get when opting in.
- Action Item #2: On the button that triggers your LeadBox™, tell the reader what to do (click) and what they’ll get (the formulas).
Part 5: Navigation
The last part of the Upside-Down Homepage is what truly makes it “upside-down.”
Most people put their navigation links at the top of their site. We do the exact opposite. We put them in the footer.
Like this:

We’ve found that by moving the navigation links to the bottom of our homepage, our bounce rate decreased by 83%.
That means people are MORE likely to stay on our site when we tell a good story FIRST and give them options SECOND.
Your action item: Move your navigation links from the top of the page on your homepage to the bottom.
Website Optimization Step #2: Convert 20% of Blog Visitors into Email Subscribers
In Part 4 of the previous section, I described how to make the end of your homepage give visitors the same feeling they get while binge-watching a show on Netflix.
By priming visitors for a “next step,” and then giving it to them in the form of an email opt-in, you’re basically giving them the “auto-play next episode” Netflix feature that’s probably caused you to spend an entire weekend glued to the couch.
It’s part of what makes the Upside-Down Homepage template convert so well.
But the awesome thing is you can apply this same concept to your high-traffic blog posts and get even better results.
This is the second step we always take with our 1:1 clients and students to immediately optimize their website and supercharge their list growth. Here’s the basic overview of the process:
- Identify your blog posts that are bringing in the most traffic.
- For each blog post, create a piece of bonus content specifically tied to the post’s topic (this is called a Content Upgrade).
- Provide a clear, compelling call to action that makes opting in for that piece of bonus content a logical, irresistible next step after reading the blog post (this is easier than it sounds).
Let’s break these down step-by-step.
Step #1: Identify Your Popular Posts
If you followed the steps to create your Upside-Down Homepage, you’ve already done this! I described the whole process in Part 3 (the Pilot Story) section in the first part of this post.
To recap:
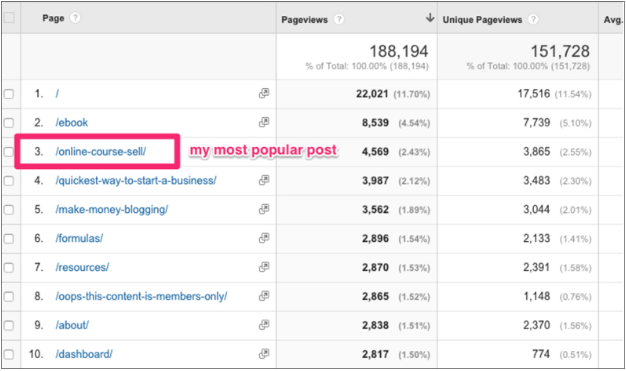
- Log into Google Analytics.
- Click “All Web Site Data” for the site you’re analyzing.
- In the sidebar, scroll down to and click on “Behavior > Site Content > All Pages”
- Sort by “Pageviews” and you’ll find your most popular posts:
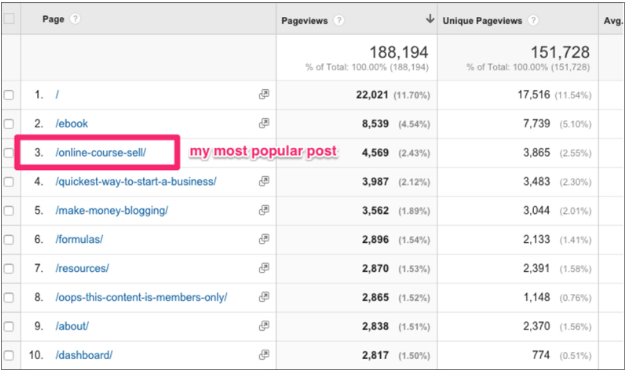
Identify your 5-10 most popular posts to get started.
Step #2: Create a Content Upgrade for Each Popular Blog Post
This is the step that people tend to make WAY more complicated than it needs to be.
This piece of bonus content doesn’t need to be a masterpiece. It just needs to be highly relevant to the post’s topic.
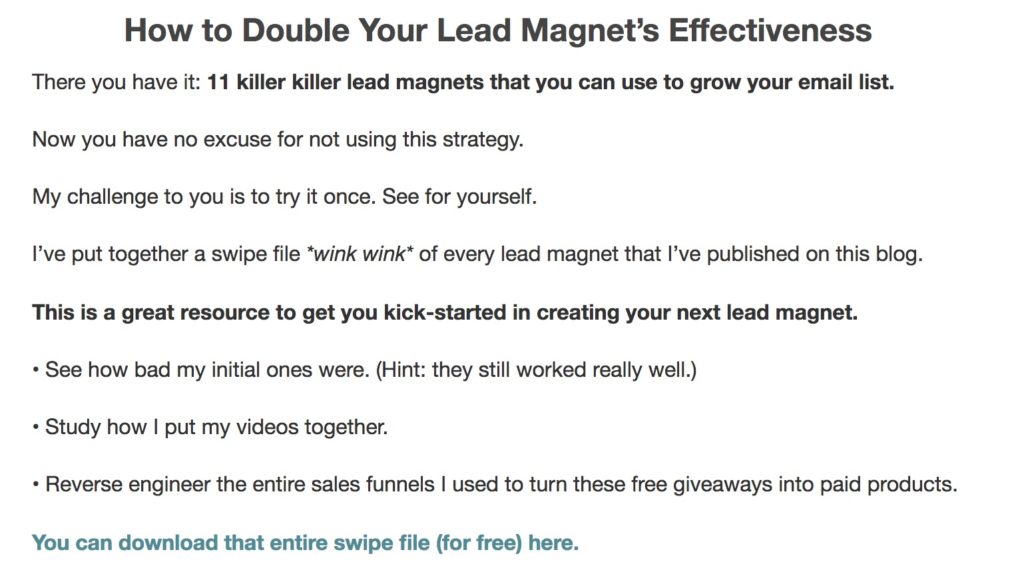
Here are 4 content upgrade examples from the Videofruit blog:
- For the “How to Create a $6 Million Webinar” post, I put together a bundle of 4 email outreach scripts I’ve used to book partner webinars. I had already used them, so I didn’t need to do anything other than bundle them into a PDF.
- For the “How to Start a Coaching Program” post, I gave people the emails I used to launch the Videofruit coaching program. Again, these already existed, so I didn’t have to create anything from scratch.
- For the “How to Double Your Email List in 24 Hours” post, I created an incredibly simple checklist of the framework the post covered.
Without overloading you with details, I’ve also gotten consistently great results with all of the following content upgrade formats. Some have worked better than others, but ALL of them work better than just using the same generic email opt-in call to action on every blog post:
- A package of relevant links
- A short how-to video
- A Q&A video
- A PDF version of the blog post (this works great for longer posts)
- A mini video course
- A swipe file of helpful examples related to the post’s topic
- A giveaway/contest
I cover all of these types of content upgrades in detail in this post, so check it out if you want to go in-depth.
Once you’ve created the content upgrade, all you need to do is properly set up and insert the call to action in the post itself. Which brings us to Step #3.
Step #3: Add a Compelling Call to Action to Each Blog Post
Why is watching the next episode of a Netflix show so irresistible?
Because they spend the entire episode you’re watching setting up the next one! By the time the auto-play feature kicks in, you’re already primed to keep watching.
That’s why your call to action should be a natural extension of what you’ve talked about in the blog post. To do that, just follow these 2 steps:
Step #1: Create Expectation
At the beginning of a blog post, you’ll almost always include at least one sentence that explains to readers what they’re going to get out of reading the post.
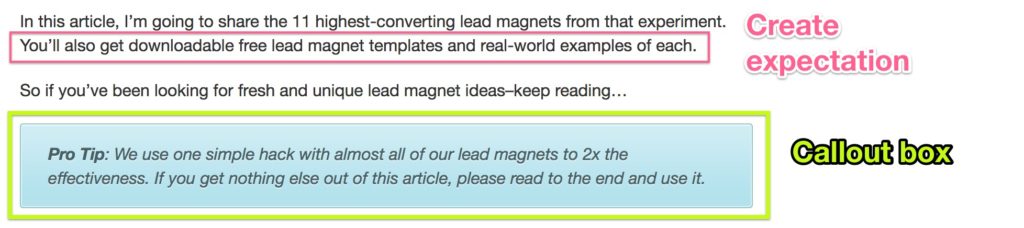
For example, in the post about content upgrades I linked to above, I wrote the following sentence in the post’s intro:
“In this article, I’m going to share the 11 highest-converting lead magnets from that experiment.”
But I didn’t stop there.
The next sentence created an expectation for the bonus content I planned on offering readers later in the post:
“You’ll also get downloadable free lead magnet templates and real-world examples of each.”
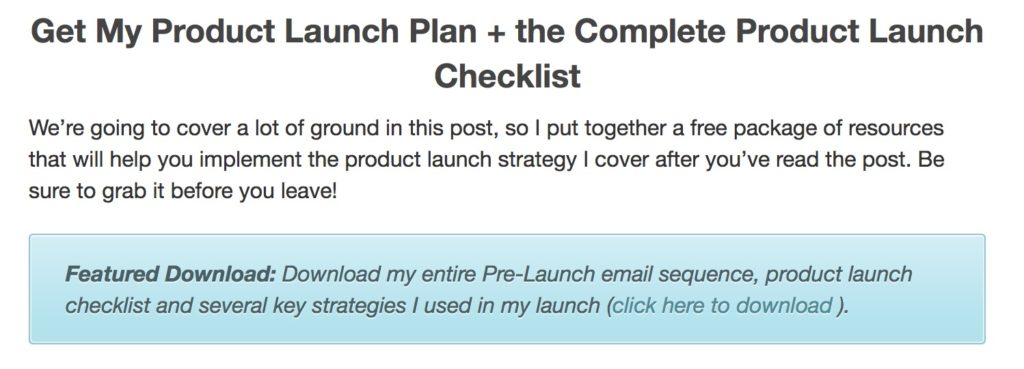
After that, I even inserted a call-out box to make sure they knew they could get a free, high-value resource at the end of the post:
Step #2: Insert a Clear, Compelling Call to Action
If you pick a solid idea for your lead magnet and create the expectation for it by following the previous step, this step is incredibly easy.
At the end of your post, insert a link to an opt-in form that allows people to sign up for your list and receive the content upgrade. Clearly communicate that they can get the content upgrade by clicking the link and signing up. It’s also good to include a few teaser sentences or bullet points about the content upgrade’s value.
For example, here’s what I put at the end of the post I described in the previous step:
Pro Tip: If the blog post you’re adding the CTA to is fairly long, consider adding a CTA near the beginning of the post as well. You can add it immediately after you insert the expectation-creating sentence.
For example, in this epic “Ultimate Product Launch Plan” blog post (it’s several thousand words), I added the following to the post’s intro:
I’ve consistently seen content upgrades to your most popular posts dramatically increase visitor-to-email subscriber conversion rates on sites in all kinds of industries.
We consistently get signup rates of 20% or higher on Videofruit posts with content upgrades.
When Brian Dean from Backlinko added content upgrades to his most popular posts, his conversion rate increased by 782%.
When it comes to website optimization, it doesn’t get much easier.
Website Optimization Step #3: Attract Thousands of New Visitors Every Month with a Few Basic, Non-Nerdy SEO Tweaks
What would you do if you woke up tomorrow and found that 100,000 people had visited your website?
Would be crazzzzzy!
Well, it’s 100% doable. Even if you’re in some crazy weird sub-niche like palm reading or stand up paddle boarding. You might think there aren’t 100,000 people that are interested in your topic. And if you think that you’d be wrong in almost every case.
The internet is a big freaking place.
The problem is you probably don’t know how to tap into the single biggest source of traffic online: Google.
For the longest time, I actively avoided thinking about SEO. It always felt like this black box special boys club that once you finally figure it out Google changes some mysterious algorithm and everything goes to crap.
As a result, for the first 2 years of working on Videofruit I completely ignored it.
Eventually, my friend Brian Dean (the guy I just mentioned in the last section) called me out on it and challenged me to try a few dead simple SEO strategies.
The results?

Nuts, right!?
Those strategies took me 2 hours to implement and resulted in over 40,000 new visitors and 3,500 email subscribers to the blog within the first month.
Since that moment, I’ve added this simple SEO checklist to every website optimization project we take on. Here’s how it works.
Step #1: Identify Your Most Linked-To Blog Posts
Note that this is most linked-to blog posts, which is usually a little bit different that your most popular blog posts by pageviews (which is what we looked at in website optimization steps 1 and 2).
Why is this important? Because Google considers quality links to pages on your site one of the biggest indicators that your content is quality and relevant.
In SEO lingo, these are known as backlinks. The more quality backlinks a page on your site has, the easier it is to get that page to show up high on search results pages for topics related to your post (I’m generalizing here, but that’s the basic gist).
If you’ve ever seen SEO nerds start drooling uncontrollably, they were probably thinking about backlinks at the time. Because they’re straight up magic for getting free traffic from Google.
By identifying the pages on your site with the most backlinks, you’ll identify the pages where you can get the quickest SEO wins.
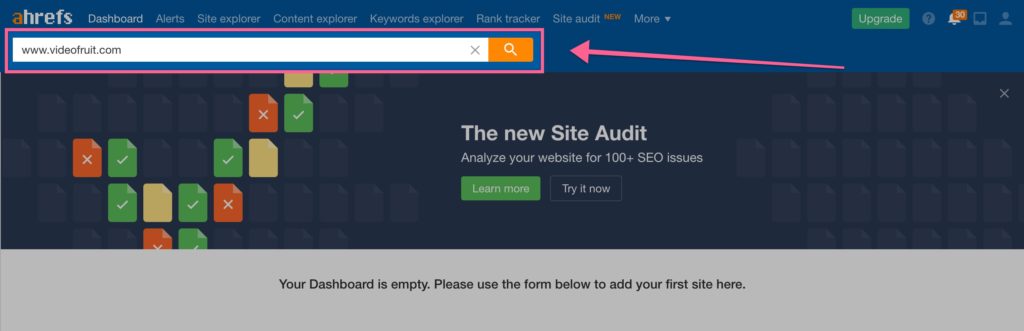
There are tons of tools you can use to figure out how many people are linking to pages on your site, but the one I like the most is Ahrefs.
You’ll start by entering your website URL:
Then, click “Best by links” in the left sidebar and you’ll get a list of the pages on your site with the most backlinks:
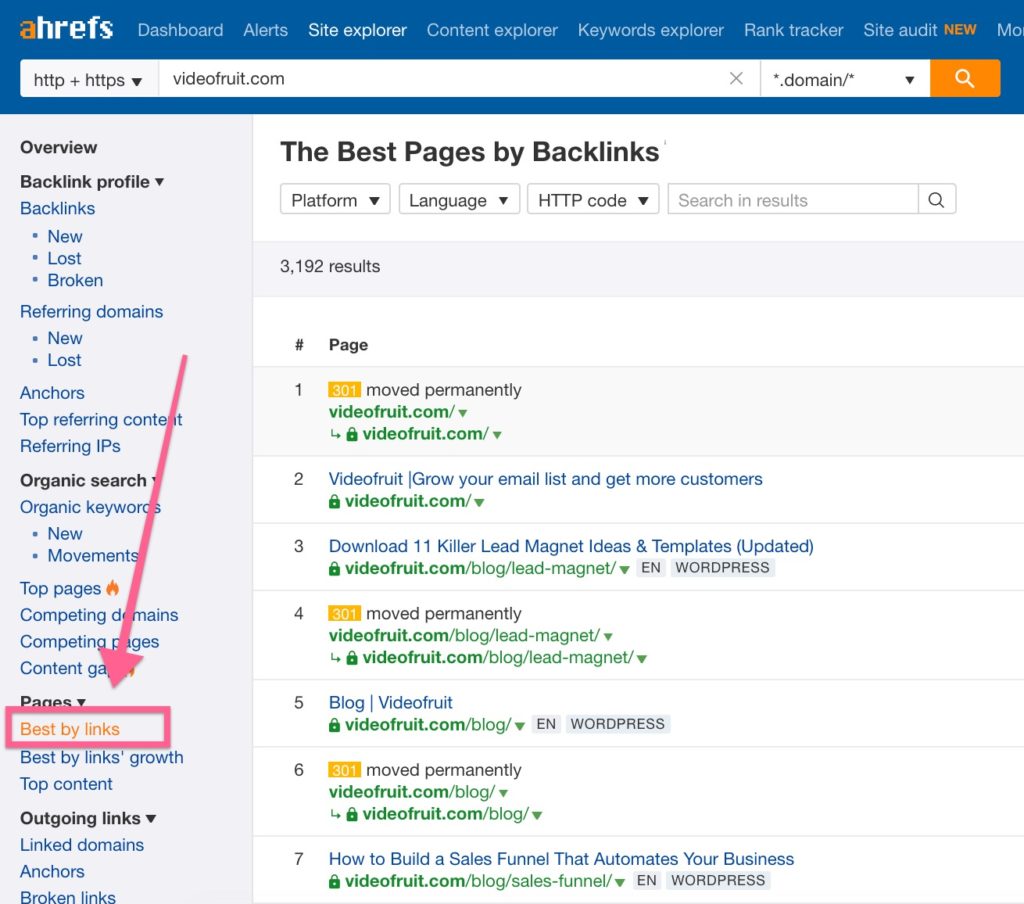
Your homepage will likely be #1, followed by your most linked-to blog posts.
Step #2: Figure Out Which Posts Aren’t Ranking Well
Inevitably, on almost every website I’ve ever seen, at least one of the blog posts with the most backlinks isn’t ranking well for any popular Google searches.
Why?
Because whoever wrote the post didn’t take the time to optimize it for any keywords people search for.
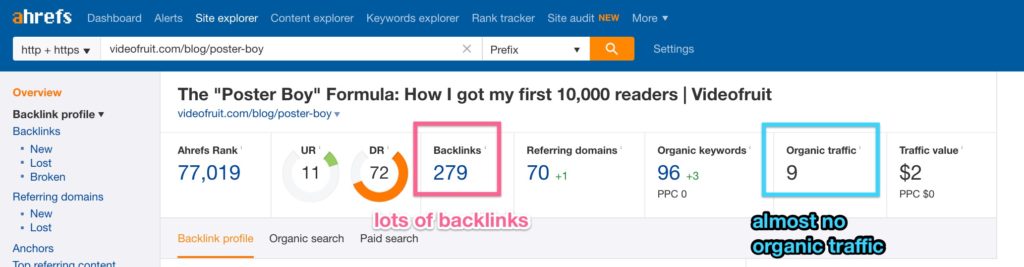
Confession: There are still tons of blog posts on Videofruit that have lots of backlinks but not very much organic traffic because I ignored doing this for the longest time.
My post about the Poster Boy Formula is a prime example.
When I paste its URL into Ahrefs, you can see it has over 250 backlinks, yet only gets around 9 visitors a month coming from organic searches in Google:
When you think about it, it’s easy to see why Google isn’t sending this post any traffic.
“Poster Boy Formula” is a term I made up. Which means no one is going to Google and searching for “Poster Boy Formula.” In fact, when I click “Organic search,” Ahrefs shows me the top 5 searches it actually is ranking for:
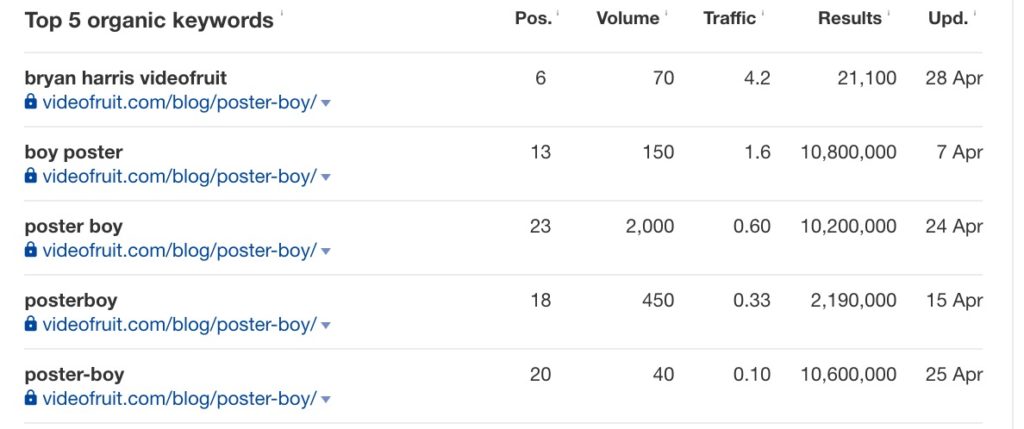
Other than “bryan harris videofruit,” all of the keywords it’s ranking for are variations of the phrase “poster boy.” Unfortunately, people searching for “poster boy” probably aren’t searching for the things the post actually helps people do (get more blog readers).
That’s why in Step #3 we’re going to optimize it for keywords that are actually relevant to the post.
Step #3: Optimize Posts for Relevant High-Traffic Keywords
First, you need to figure out what your post actually helps people accomplish. Then, we’re going to use Ahrefs to find out what keywords people use when they search for solutions to that problem (or answers to a question, etc.).
In the case of the Poster Boy Formula, it shows readers how to attract more readers to their blog.
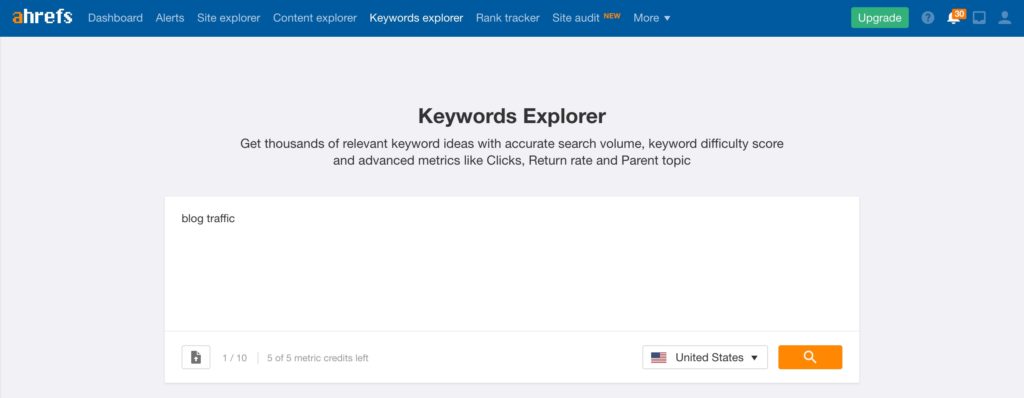
I’ll click “Keywords explorer” at the top of Ahrefs and search for keywords related to “blog traffic.”
Ahrefs will then give me a list of the most popular keywords related to that topic, ranked by search volume per month:
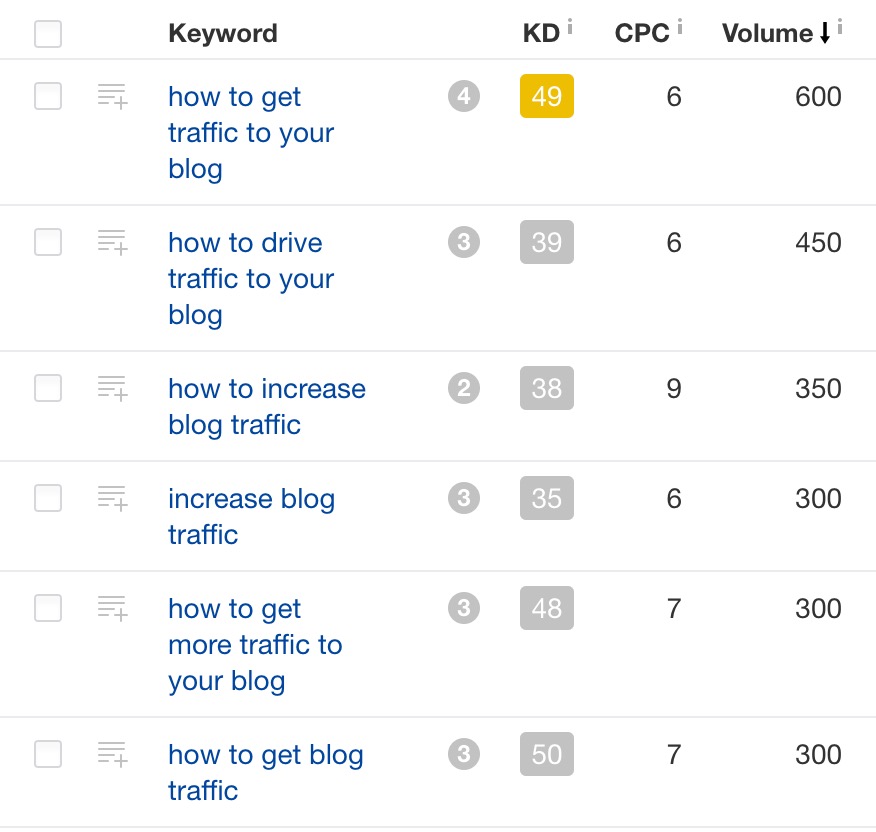
The top keyword is “how to get traffic to your blog,” which gets about 600 searches a month. That means if I optimize the Poster Boy Formula to rank for that keyword, I could expect to get a few hundred additional visitors to it each month if it makes it to the top of Google’s results page.
That would be much better than the 9 visitors per month it’s currently getting from Google!
The “KD” column stands for “Keyword Difficult,” which is an estimate of how difficult it would be to rank in the Top 10 for that particular keyword. 49 isn’t super easy, but considering the post already has over 250 backlinks, I should be in good shape.
The only thing to do now is optimize the post.
This, of course, is where it can get suuuuuper complicated.
But instead of focusing on the literally hundreds of possible ways to improve a page’s ranking, we’re going to focus on the handful of easy, quick wins that I’ve seen make the biggest impact:
Thing #1: Put the keyword in the post’s title
This is easy. In this case, I’m going to change the title from “The ‘Poster Boy’ Formula: How I Got My First 10,000 Readers” to “How to Get More Traffic to Your Blog with the Poster Boy Formula.”
Thing #2: Tweak the post’s URL so it contains the keyword
Another easy one. In this case, I would simply change the URL slug from /poster-boy-formula to /how-to-get-traffic-to-your-blog.
Thing #3: Rewrite the intro
This is where it’s important to put yourself in the shoes of someone who is googling the keyword you’re trying to rank for. Do that, then re-read your post’s original intro.
Does it quickly communicate to that reader that their question is likely to be answered in the post? Rewrite it so it does.
It’s also important to include the keyword in the first paragraph of your intro.
Thing #4: Use the keyword several times throughout the post’s content
Look for other opportunities to use the keyword throughout the post. Insert it where you can, but don’t force it.
Thing #5: Tweak the post’s SEO description
The SEO description is that chunk of text that people will see when your post comes up in Google. This stuff:

If you use WordPress, it’s super easy to update this text with a free plugin like Yoast SEO.
Make sure to use the keyword you want to rank for in your new description. If you need inspiration, type the keyword into Google and see what the current high-ranking pages have written.
Ask yourself what would make yours stand out as a must-read from the current Top 10 results.
Again, these 5 things are just the tip of the iceberg. If you want to do even more, I highly recommend checking out Brian Dean’s complete checklist here. He knows more about SEO than anyone else I’ve seen.
Website Optimization Doesn’t Have to Be Complicated
You’ve probably noticed a pattern with each of my 3 website optimization steps—they each focus on things that are relatively quick and easy to do.
Are there more things you can do to optimize your website for more email subscribers and sales? Of course!
But when you start with these 3 steps, you can make a noticeable impact extremely fast.
Which one will you start with? Leave a comment below and let me know!
Want us to find the best 2-3 growth opportunities for your business?
Book a free Strategy Call with our team. We’ll look under the hood of your business, identify your best growth opportunities, and show you the action plan for taking advantage of them.