In this article, I’m going to show you how to run Facebook ads for your online course using a simple and effective 4-step funnel.
But before I do that, tell me: Do any of these promises sound familiar?
- “Turning Facebook ads on is going to solve all your course sales and marketing problems.”
- “A Facebook ads funnel is passive: You turn it on, and once it is going, there’s nothing else for you to do.”
- “Facebook ads should be the first marketing channel you focus on.”
What do those three statements have in common?
They’re all wrong.
Let’s debunk each, one at a time.
Misconception #1: Facebook ads solve all your marketing and sales problems.
Like any other marketing tactic, Facebook ads are not perfect. They work well when executed properly, but they are not a be-all-end-all solution.
Misconception #2: Facebook ads funnels require no maintenance.
This is laughably wrong.
Just like any other sales funnel, Facebook ads require optimization and a perpetual influx of effort. Unfortunately, they also require lots of capital to keep them running effectively.
Misconception #3: Facebook ads should be the first marketing channel you focus on.
Facebook marketing is expensive. Ads require a lot of time and effort to implement and maintain.
That makes them a terrible way to start building an audience.
The only exception to this I can think of is if you, or someone on your team, has extensive Facebook ads selling experience. If that is the case, go for it. Use that to your advantage.
If not, I don’t recommend any course creator run Facebook ads to grow their business until they have reached about a million a year in revenue consistently.
Let me put it another way:
If you’re unwilling to light $10,000 on fire and flush the ashes down the toilet every month, and losing that much money keeps you up at night, DON’T touch Facebook ads.
There’s a much easier way than paid social media marketing to get leads for your online course. It’s called partnership marketing.
It doesn’t take money to succeed. And it needs way less time invested than many other marketing methods.
Partnership marketing is a way to leverage other people’s audiences (OPA) rather than fighting tooth and nail for each person added to your email list.
It can get you to $1M a year without having to light your marketing budget on fire every other day.
Since I’ve already created several complete guides to what it is and how to do it, I’m just going to drop the links here:
- Partnership Marketing 101: How to Book Your First Partnership
- How This Course Creator Quit Her Day Job and Made $12K per Month with Partnership Marketing
- How to Find New Customers and Increase Sales
- How to Get Booked on Podcasts That Drive Your Online Course or Coaching Sales
Go check those out.
You can also book a complimentary strategy session with one of our expert coaches. We’ll walk you through the ins and outs of partnership marketing and teach you how to best leverage that knowledge to skyrocket your revenue.
If after all that, you still feel confident that Facebook ads is the way forward for you, keep reading this post. In it, I’ll go in depth on one of my favorite Facebook ads funnels for online courses. I’ll cover:
- The steps you should take before you even open Facebook ads manager.
- A detailed breakdown of the 4-step Facebook ads Funnel.
- Common mistakes that course creators make when running Facebook ads, and how to avoid them.
Let’s dive in.
Step 0: Do This Before You Even Open Facebook Advertising Manager
Running Facebook ads, no matter how simple the funnel, requires up-front work. At least, if you want them to be effective at bringing in new leads and course sales.
Before you even open the Facebook ads manager, you need to do three things:
- Validate your offer and describe your best-fit client.
- Create a funnel map.
- Decide on exactly what your ads will look like.
Let’s look at each one by one.
1. Validate your offer and find your best-fit client profile.
Most course creators struggle to sell their courses because they haven’t gone through the process of organically validating their offer.
Is your course something people actually want? How sure are you?
(No, it doesn’t matter how good you think your course is.)
To run Facebook ads that are both effective and efficient, you need to know your course is something people want. And there is no way of knowing this unless you’ve already sold your course.
If you need help validating your course, I’ve written a step-by-step guide covering this very topic called “How to Create and Sell Online Courses: The Process We’ve Used to Validate and Launch more than $1M in Yearly Course Sales.” Go check that out.
You’re back? Good.
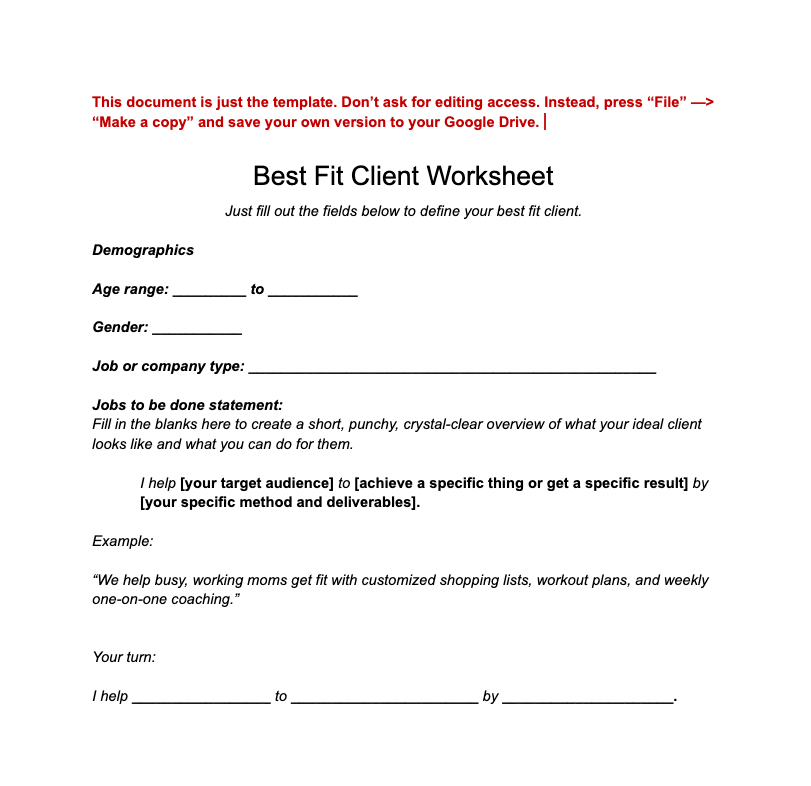
Now that you’ve validated your course, you need to take that information and use it to create a Best-Fit Client Profile. To do so, you should answer a few key questions such as:
- Who exactly is the person you’re selling to?
- What are their demographics (i.e., gender, age, location)?
- Why are they buying your course?
Take a few minutes to fill out this Best Fit Client Worksheet:
If you skip these steps, you’ll be left guessing when targeting your ads. Guessing is just as good as flushing your marketing money down the toilet.
2. Create a funnel map.
Got your best-fit client profile ready?
Great.
Now it’s time to visualize what your funnel is going to look like. (I’ll explain the funnel I recommend you implement further down this post.)
You can use pen and paper, or one of many software options out there (just Google “funnel mapping software”).
Why?
Laying out a blueprint of your funnel allows you to:
- See the customer journey, from the moment they see your ad until they decide to purchase your course or book a call.
- Find holes in that journey you might have missed otherwise.
Here’s an example of a funnel map:
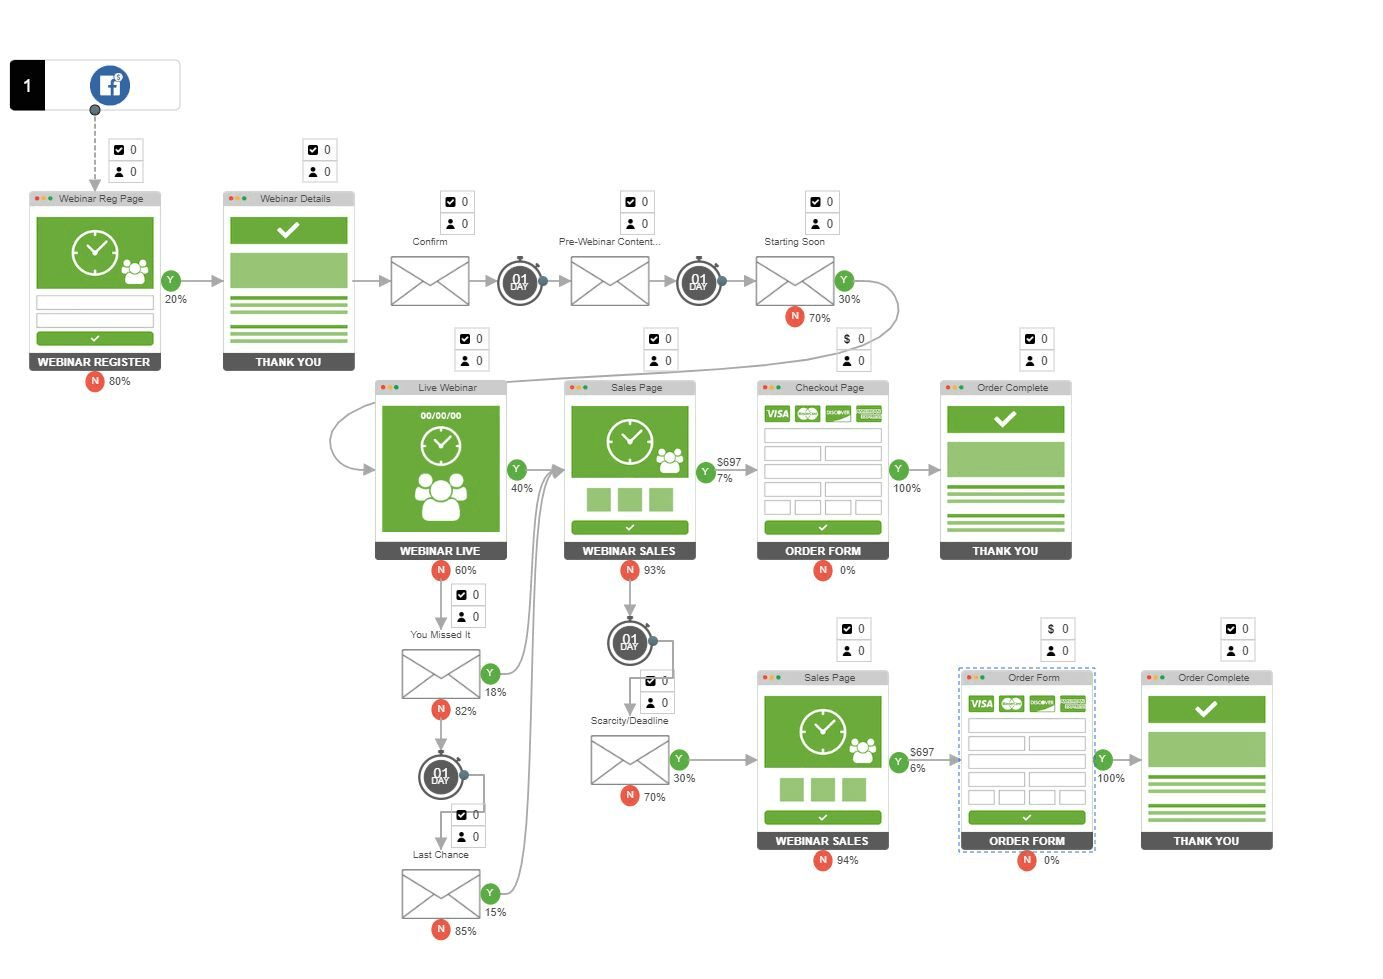
Looks complicated, right? But if you strip away all the notations, the basic idea is this:
It shows all the different paths a potential customer could take after seeing the first ad.
As long as you know what happens after each action (even if it’s hand-drawn), you’re good to move to the next step.
3. Decide on exactly what your ads will look like.
Now it’s time to create your ads. It helps to draft them in an app like Google Docs before setting them up in Facebook Ad Manager.
This is what we call a Media Buying Plan, and it includes:
- What date + time you want your ads to start running.
- What types of ads you’re running.
- What goal you’re optimizing for.
- What your target audience looks like.
- What your ad copy is going to be.
- What your headline you’re going to use.
- What your budget is going to be.
- And anything else you think would be wise to include.
In short: You write down everything about your ad, from A to Z, before you even open your Facebook ads manager.
Why?
Because the last thing you want is to spend hours in your ad account, push spend to your ad set, have them run for a few days … and then realize you made a mistake. Each time you change the ads, Facebook has to start the optimization process all over again.
I’m not saying you won’t need to make changes (you will), but if you constantly put them up and pull them down because you didn’t plan them out right, you’re wasting your ad budget.
By the way: One thing I won’t go over in this post is the nitty-gritty technical details of adding content to your Ads Manager account, deciding where to run them (only Facebook? Are Instagram ads included?), how to retarget site visitors, etc.
You can learn all of that for free from Facebook tutorials, or take a MasterClass or Udemy ads course to get those details down.
A Simple 4-Step Facebook Advertising Funnel for Online Courses
Now that you know how to handle ad campaign prep, it’s time I show you my favorite Facebook ad funnel for online courses.
The short version is:
- Run to a warm or cold audience.
- Offer a lead magnet (in the form of a recorded mini-training).
- Create a high-converting “Thank-You” page that includes the full mini-training with a link to book a call (or take them straight to the purchase page if the product is under $3.5k).
- Send a follow-up email sequence to nurture leads who don’t buy right away.
Let’s look at each one by one.
Step 1: Decide Whether to Run to a Warm or Cold Audience
Before you run a Facebook ad campaign, you need to decide whether you’re running to a cold audience or a warm audience. There are pros and cons to each:
- Running to a cold lookalike audience has a bigger reach, but costs more money and has a lower chance of a conversion.
- Running to a warm audience is more limited, but costs less money and has a higher chance of conversion. You do need, of course, a warm audience to target to begin with.
So which one should you choose?
If your online course business is between $100K–$1M in total revenue, run to a warm audience. Warm audiences convert 20-30% better because they’re already familiar with your business. You’ll spend less on campaigns and still improve your sales.
If your online course is over $1M in total revenue, then you can run to both a warm and a cold audience. Your positioning is good enough to hold up when you run ads to people who have never heard of your brand before.
The good news is that this funnel works equally well no matter what you choose. (It’ll only alter slightly what you do on Step 4 of the funnel, but more on that later.)
Who should you target if you’re running ads to a warm audience?
Retargeting website visitors (unless you’ve already got data on another group) is the way to start. If they’ve been to your site, they already know who you are.
You can identify them easily by installing a Facebook pixel on your site (which you’ll need to do anyway if you plan to track your campaign’s success). Then create a retargeting audience of website visitors which your Facebook pixel will track.
Step 2: Offer a Recorded Mini-Training as a Lead Magnet
The second step in the funnel is to offer a lead magnet in the form of a mini-training. This should go in the body of your ad.
Here’s one we’ve used:

What does a good lead magnet look like?
Whatever your best-fit client profile tells you they need.
If you went through the process of identifying your best-fit client, you should know by now exactly what their biggest pain points are. Use that knowledge to create a mini-training that addresses those pain-points.
How?
You can do this one of two ways:
- Option 1: Record a 10-20 minute training in which you address the best-fit client’s pain points.
- Option 2: Take a module from your course that addresses these pain points and offer that as a lead-magnet.
Have your mini-training ready? Great.
Before you have your leads watch the training, first …
Send them to a single landing page that includes three things:
- A short bullet-point description of the key takeaways from the mini-training.
- A call-to-action (which will take leads to a thank-you page that includes your mini-training).
- A bunch of testimonials for social proof.
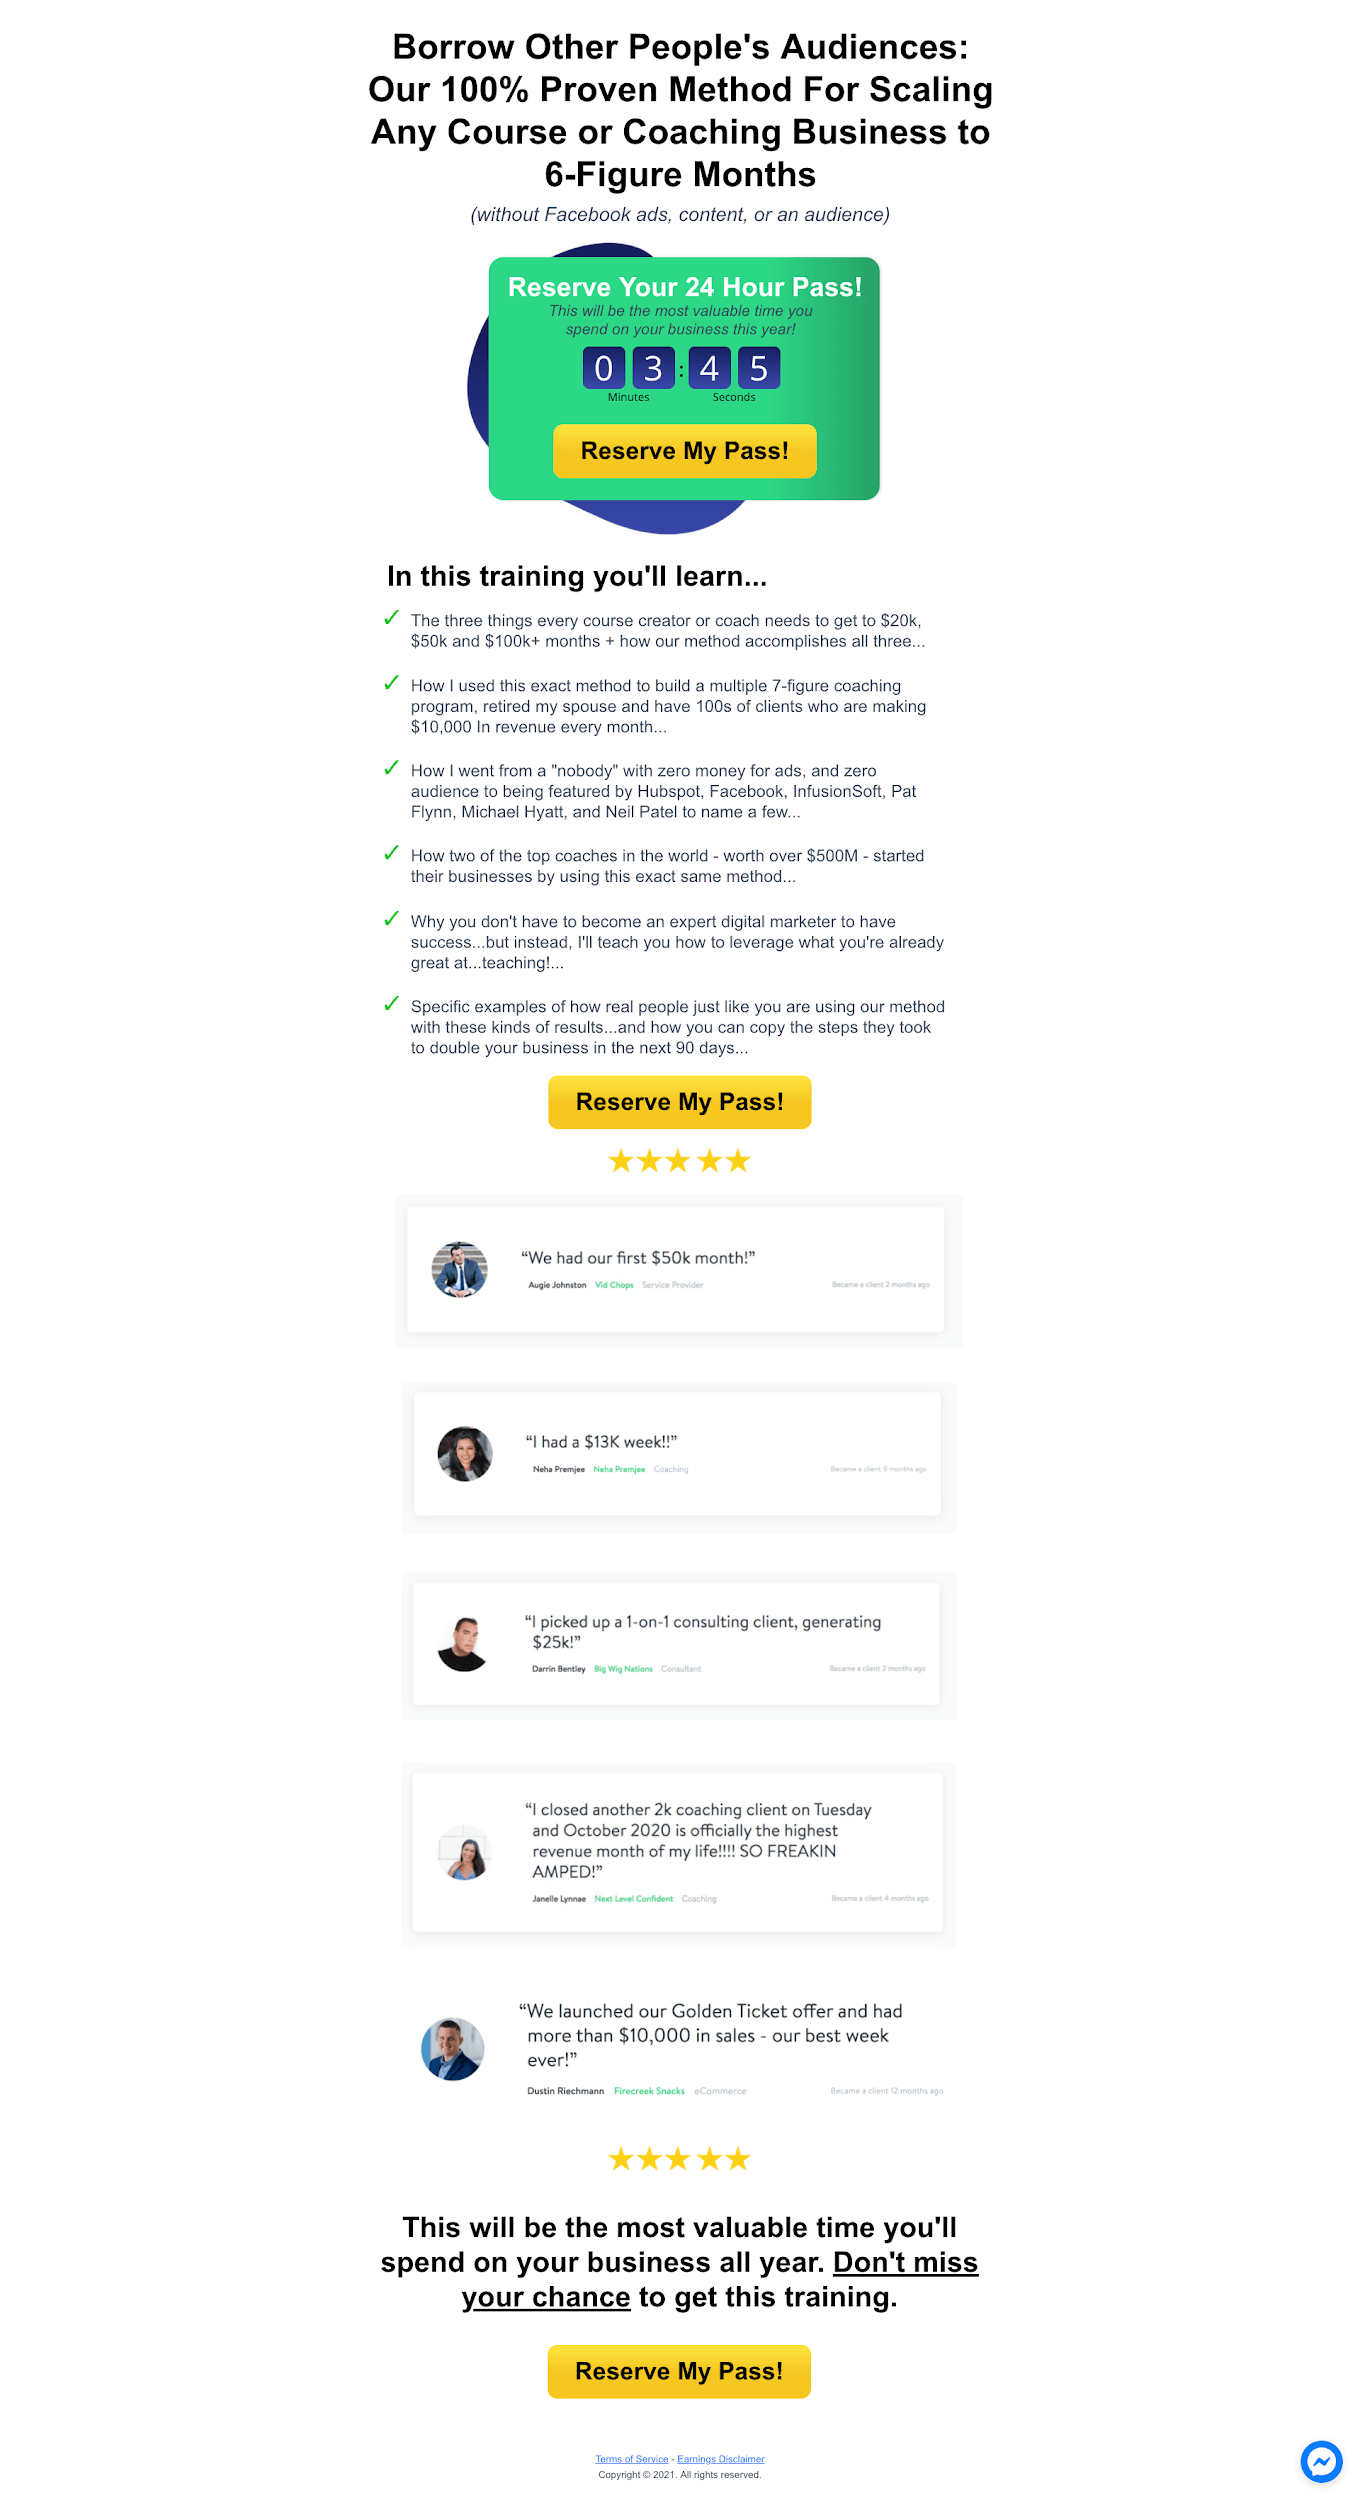
If you look at the image above, you’ll notice we also included a 24-hour expiration to watching the training, and a button to “reserve your pass.”
Why?
A “reserve your pass” notice comes with built-in urgency, which triggers action.
Additionally, this gives you an excuse to have a step in-between the ad and the mini-training, which filters out people who are not interested in watching your video right now—leads that are not ready to be converted but might be in the future (more on this in Step 4.)
Step 3: Create a High-Converting Thank-You Page
The third step in the funnel is to create a high-converting thank-you page, where you include:
- A video embed of the mini-training.
- A short questionnaire for your leads to read before they take further action (if you’re having them book a call).
- Instructions and a call-to-action to purchase the course OR book a call.
- More testimonials.
Here’s an example of a thank-you page for one of our Facebook ads campaign:
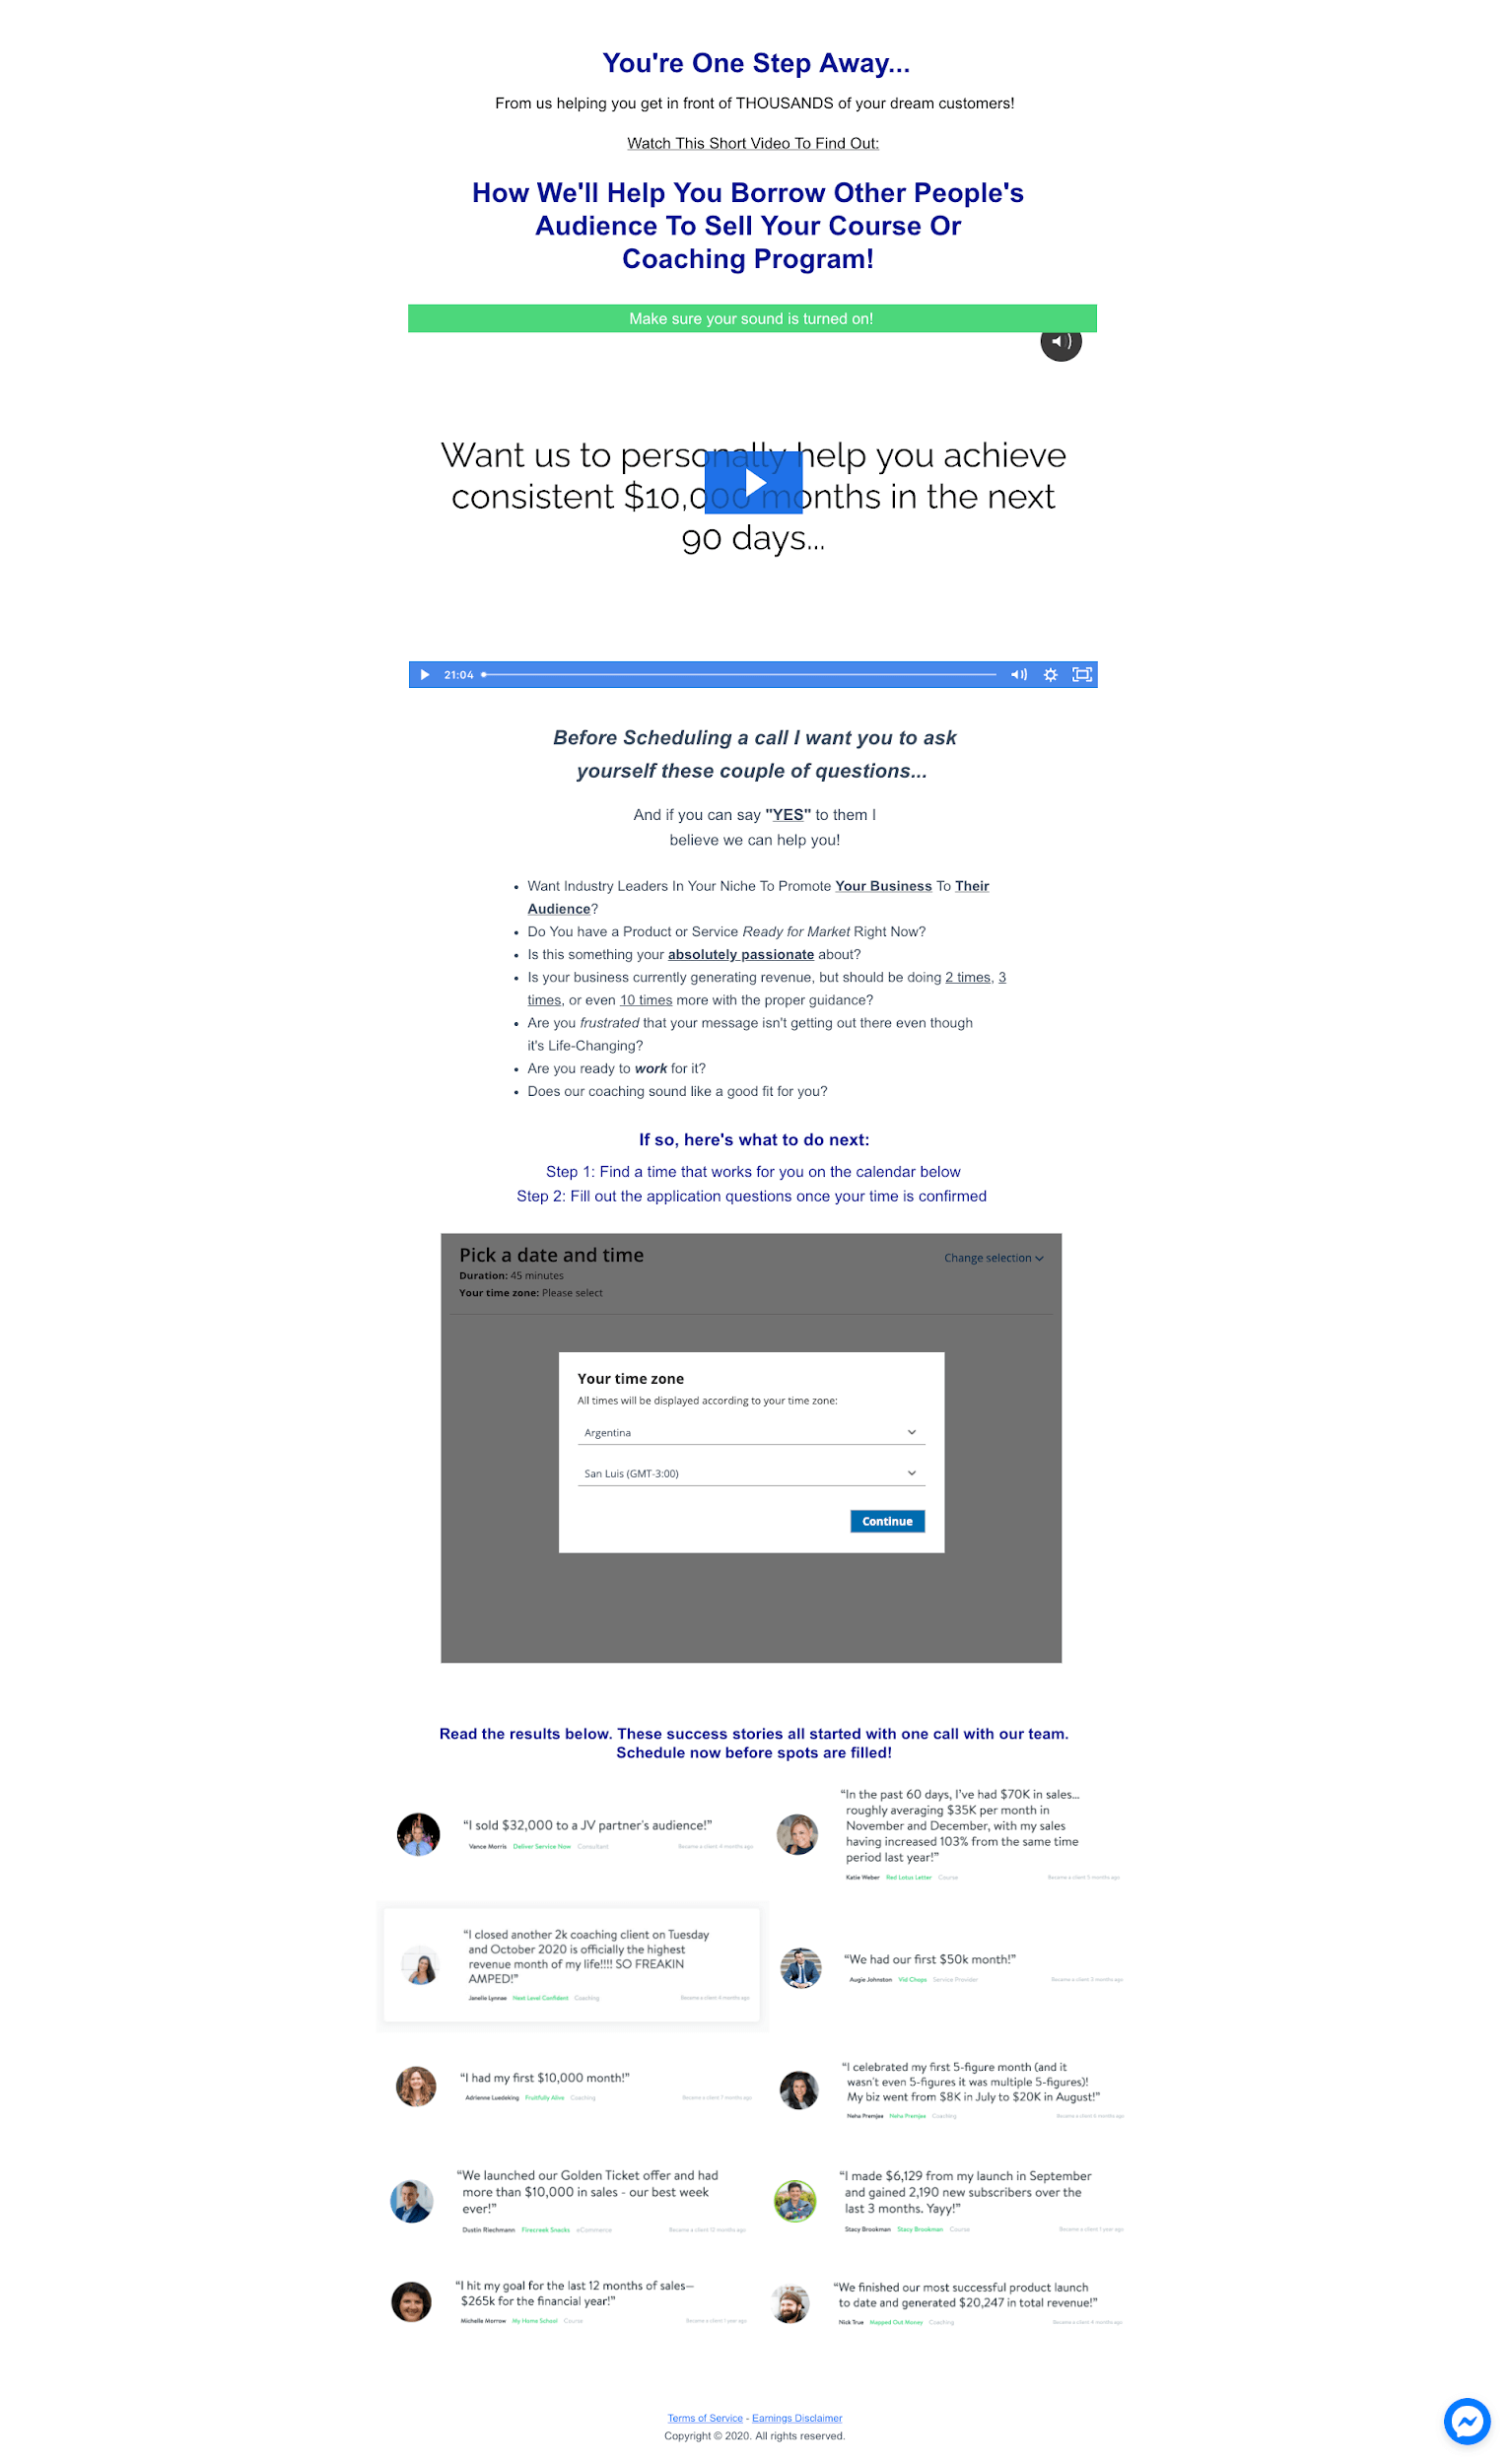
The video delivers on the promise you made in the ad, and the short questionnaire allows your leads to further filter themselves by taking the time to consider if they truly are the right fit for your course.
But how do you decide whether to send your leads to book a call or straight up purchase your course?
It depends on your course’s pricing.
For self-paced courses under $3,500, have the CTA send your leads to an order form for purchase.
(Notice how I said “order form” and not “sales page”? That’s because, in this funnel, your “thank-you page” functions as a sales page.)
For courses with a price tag above $3,500, have your leads book a call first.
Most people will want to talk to you before spending $3,500+ of their hard-earned money on your course.
That’s why you need to have a call with them, and convince them to buy.
I know, I know. Sales calls are hard and take a lot of your time.
Good thing someone (me) took the time to write a whole post about How to Close Sales Calls If You’re a Coach, Consultant, or High-Ticket Course Creator.
Oh, and one more thing.
If you go for “book a call”—delay the appearance of that button until the person has watched the video (or at the very least, have a 2-minute timer delay.)
Why?
If someone doesn’t watch the video, they’re not going to buy. It’s that simple. Even if they end up scheduling a call, they’ll just clog up your system.
Another step you could take to further prevent this from happening is to have the “book-a-call” button link to a qualification/scheduling form, such as:

That way you can have the lead confirm they have watched the video and know the basics (and confirm that they really are interested in buying your course).
Send them to the scheduler only after they have submitted that form.
Now, if you’ve executed Steps 1-3 correctly …
Congratulations!
You’ve gotten lots of new leads, a few calls booked, and some of those leads even bought your course!
“Bryan! What about the leads that didn’t convert? Did I just waste a ton of money on Facebook ads that weren’t 100% effective?”
Two things:
First, no ad funnel is 100% effective. Second, I haven’t finished explaining the funnel.
There is one step missing…
Step 4: Run Unconverted Leads Through a Follow-Up Nurture Cycle
At this point, your ad is running and bringing you new purchases or calls for your course. It’s doing its job.
Now it’s time to take those already-warm leads (the ones who signed up to watch your mini-training but didn’t convert) and run them through a follow-up email sequence to nurture them.
What does that sequence look like?
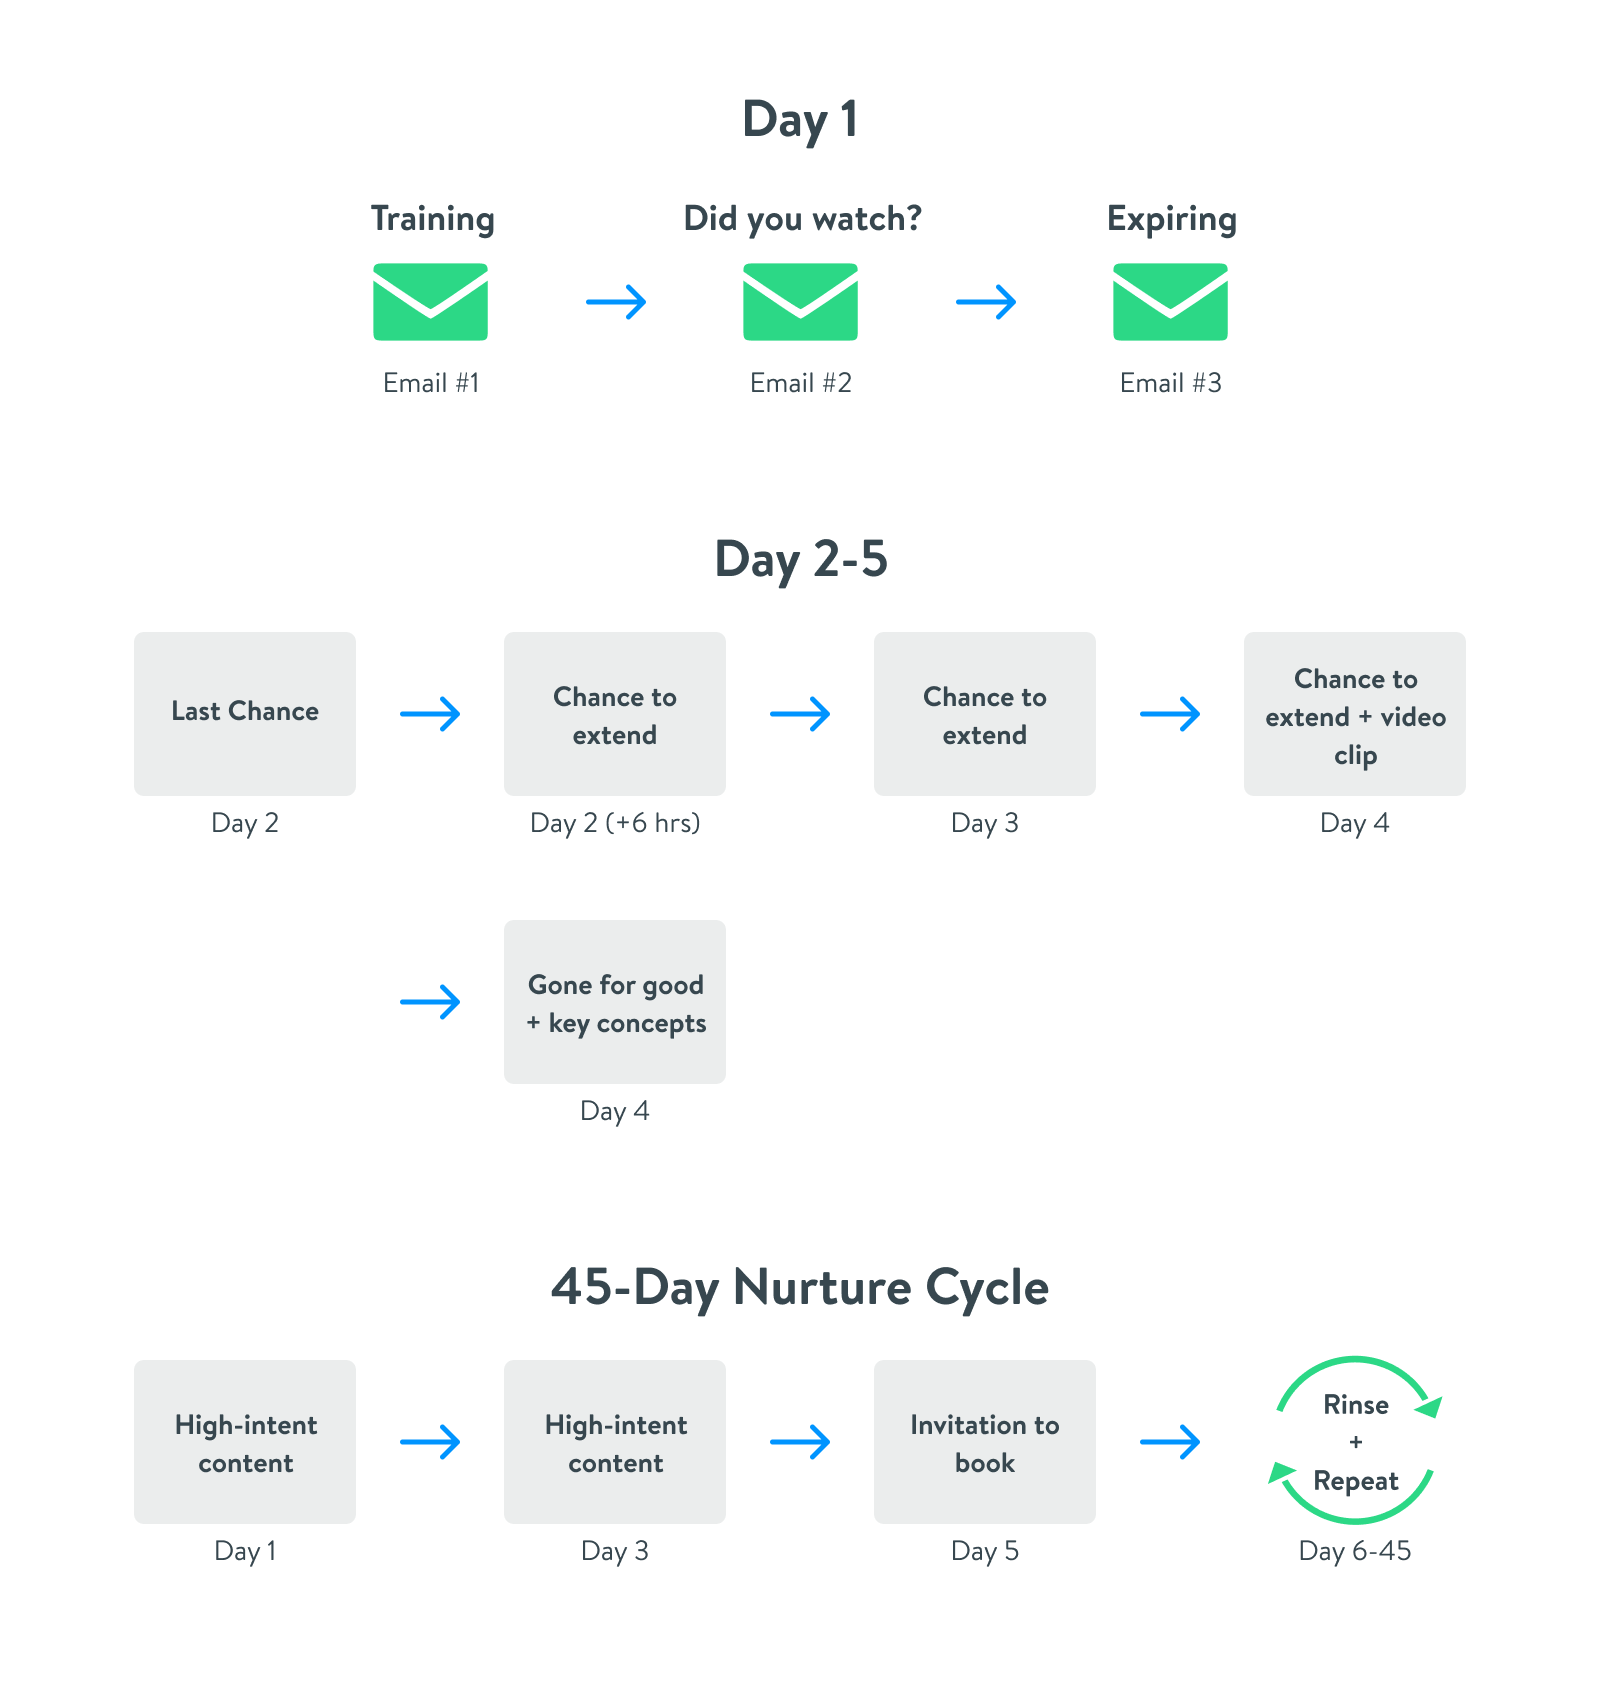
Day 1
During the first 24 hours after a lead signs up and watches your training (but doesn’t convert), you should send three different emails.
Email #1: The moment they sign up, immediately deliver a version of your training to their email inbox.
Email #2: Send this 90 minutes after the first email. In it, ask the lead whether they watched the video training or not, and remind them there is still time to do so, but not much left (this hits their sense of urgency).
This email should also include a cliff-notes style set of bullet points covering the key takeaways from the training, with time stamps. You can even take out the copy from your landing page and put that in this email.
Email #3: This is another reminder that the training is expiring soon, which should be sent 6 hours after the second email. Frame this as a “last chance” to watch the training.
Days 2-5
The emails you sent during Day 1 should have helped you convert a big chunk of the leads that hadn’t watched the video. But there will still be another chunk of leads that haven’t converted. So now it’s time to hit that urgency trigger inside their heads.
During Day 2 of the nurture cycle, send two emails:
Email #1: This should be another “last chance to watch the training” message, to be sent 1 hour before the expiration.
Email #2: 6 hours after the first email, send your leads a note telling them the training has expired BUT offer them the chance to extend the time-window. Write something simply like “let me know, and I’ll send you a link that will expire within 24 hours.”
During Days 3, 4, and 5 of the nurture cycle, send just one email a day:
Email for Day 3: Send a note reminding the leads that the training has expired, and offering a “last chance for extension.” If they request an extension and watch the training, great! If they request the extension but don’t watch the video, you send them …
Email for Day 4: Send this email about 25 hours after the extension has expired, and include a chance to ask for another extension. I also recommend you include a quick training takeaway to further motivate them into watching, something like “check out my favorite 1 minute of the training.”
Email for Day 5 : In this email, you fulfill the promise you made at the very beginning. This is something all marketers should know—Digital Marketing 101: What you give, you need to take away. Tell your leads the live training webinar is gone for good BUT offer something else in exchange.
Take the video training and turn it into an 800- to 1000-word post that teaches the key concepts via text. Include that in your email. You should also consider linking to a short case study or something similar.
Now, if you’ve run your leads down this 5-day email sequence, and some of them still haven’t converted …
Accept the fact that these leads are not ready to buy your course for now, and bump them to a 45-day Nurture Cycle.
The 45-Day Nurture Cycle
This is one of my favorite strategies for warming up cold leads. It’s simple to follow. Once your leads have gone through the 5-day email sequence, run them through another email sequence.
Day 1: Send your lead a high-intent piece of your content for them to check out. By “high-intent,” I mean something that is (1) really good, and (2) has been proven to work with your audience. Something that everyone loves.
If you don’t know how to write high-intent content, check out my Bullet Hook Framework article, where I break down the exact process we use.
Day 3: Send another high-intent piece of content. That’s it.
Day 5: Send a “hard booking/purchase” email, where you straight up ask your leads to buy your course or book a call with you. Here’s an example:

Now all you have to do is rinse and repeat over and over for the next two months.
Content, Content, Call-to-Action.
That’s it.
If you don’t have that many pieces of content, use case studies and write super-short lessons on issues your best-fit client usually struggles with.
And if the 45-day nurture cycle doesn’t work, just feed those leads into your regular newsletter so you can continue to nurture them over time along with your other subscribers.
What Are You Waiting for?
Like I said at the beginning of this post, Facebook ads aren’t for everyone. If you already have a successful small business built around your courses and are ready to inject an influx of leads from social media platforms, that’s fine!
The Facebook sales funnel template I described in this post is for you.
But if you’re not sure it’s time to start running Facebook ads (or you want to run them, but still want help), schedule a free call with my team. We’ll audit your course marketing strategy and talk through a 90-day plan to take your business to the next level.